Overview
Wayfair is a large and growing marketplace dedicated to home products that range from furniture, linens, décor, and kitchenware to home office furniture, home improvement, and patio – anything and everything for home and garden. It operates as a fulfillment channel, where merchants dropship orders for Wayfair. This means that Wayfair will buy products from a merchant and market them online, while the customers’ online orders will be forwarded to that merchant to be fulfilled. As with most fulfillment channels, listings must be created directly on Wayfair, and pricing negotiated with your assigned Wayfair representative.
The integration between Sellercloud and Wayfair allows you to seamlessly import orders, upload tracking information and invoices, and ensure your listings are always up-to-date with the latest inventory data. Sellercloud integrates with both B2B and B2C Partner accounts, as well as Wayfair Castlegate Fulfillment.
Prerequisites
There are two ways to integrate Wayfair into Sellercloud – via EDI or API. EDI involves transmitting documents through an FTP, whereas API establishes a direct connection between the two platforms.
The workflow for Sellercloud’s EDI integration with Wayfair is comprised of the following steps:
- Complete the required integration form and return it to Wayfair.
- Enter your Wayfair credentials into Sellercloud’s Wayfair Company Settings.
- Configure the Shipping Method Mapping for Wayfair. While this is optional, it will set the correct shipping method for each order.
- Configure Wayfair Invoices/Packing Slips.
- Your Sellercloud server must be whitelisted on Wayfair Partner. Contact Sellercloud Support for your server’s IP address.
Follow the next sections in this article to set up the EDI integration step by step.
The workflow for Sellercloud’s API integration is the following:
- Submit a ticket to Wayfair to request the API integration.
- Grant your Wayfair account access to their APIs, and then follow the steps in Wayfair’s Onboarding Guide to complete the API testing. You must complete this stage before you can go live.
- Generate API credentials and then enter them into Sellercloud’s Wayfair Company Settings.
- Configure the Shipping Method Mapping for Wayfair. While this is optional, it will set the correct shipping method for each order.
- Configure Wayfair Invoices/Packing Slips.
- Note that we currently do not support Wayfair Order Cancellation import via API. For now, order cancellation can come in automatically only if you have integrated via EDI.
Skip to the last section of this article (Integrate Wayfair via API) for a detailed walkthrough of steps 1-4.
Wayfair Integration Form
Follow these instructions to complete the integration form (some information is on the form itself):
- Section One: Contact Information— Complete contact information.
- Section Two: Connectivity & Documents Options
- Connection Type – FTP Direct Connection – Enter Yes
- Transaction Type – ANSI X12 – EDI – Enter Yes
- Process:
- Inventory – Yes
- Purchase Orders – Yes
- Order Acknowledgment – Yes
- Advanced Shipment Notifications –Yes
- Invoice – Yes
- EDI Configuration Version – enter Yes in the 4010 box
- Production ISA:
- Qualifier – Enter ZZ
- ID – Use the company telephone number
- Test ISA:
- Qualifier – Enter ZZ
- ID – use the company telephone number and add an optional “T” at the end
- Section Three: Inventory Options
- Frequency— choose Hourly and enter 2
Wayfair General Settings
- In Sellercloud, click Settings > Company Settings > Toolbox > Wayfair Settings > General Settings.
- Complete the fields using the field values below for reference. See these instructions for setting co-op fees here for dropship.
- When done with these settings, select the Wayfair Enabled checkbox.
- Click Save.

| FIELD | VALUE |
| Customer ISA Qualifier | ZZ |
| Customer ISA ID | Wayfair ID you create. For example, your company telephone number. |
| Wayfair ISA Qualifier | 01 |
| Wayfair ISA ID | Provided by Wayfair. |
| Wayfair Seller ID | Leave blank. |
| Supplier ID | Provided by Wayfair. |
| Supplier Warehouse ID | Typically, this is the warehouse’s zip code. |
| Order Handling Fee | Co-op Fees for Dropship Channels. |
| Wayfair FTP Server | Provided by Wayfair. |
| Wayfair FTP User Name | Provided by Wayfair. |
| Wayfair FTP Password | Provided by Wayfair. |
| Login Email | Provided by Wayfair. |
| Login Password | Provided by Wayfair. |
| Safety Qty | This helps reduce the risk of overselling by subtracting a number of units from the available quantity. |
| Default Qty | When an item is set as replenishable, the value set here can be used as a default quantity for Wayfair. |
Wayfair Locations
(Optional) If you have multiple locations set up in Wayfair, you can map your local Sellercloud warehouse(s) to their corresponding Wayfair IDs. This mapping determines which warehouse’s available inventory is sent to each location and helps prevent issues during inventory updates.
- Go to Settings > Companies > Manage Companies > Select a Company.
- Access the Toolbox > Wayfair > Locations > Edit.
- In the Wayfair Locations panel, click the + icon.
- Enter the ID of the location as seen in Wayfair and click Add.
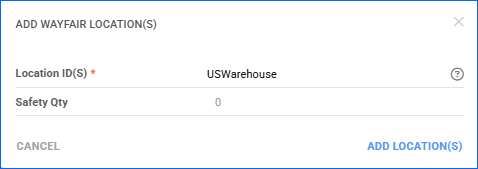
- Repeat the process as needed based on the number of Wayfair locations you manage.
- Next, map your Wayfair location/s to the corresponding local warehouse/s in Sellercloud.

- Once done, click Save.
Wayfair Shipping Method Mapping
Wayfair has unique codes to indicate shipping services. You can map these codes to services in Sellercloud to ensure the correct shipping service is assigned when shipping the order.
You must check Enable Wayfair Shipping Method Mapping per Carrier in your Client Settings. This allows more flexibility when adding various shipping services.
Once you’ve enabled this setting, follow these next steps:
- Access Company Settings > Company > Wayfair Settings > Shipping Method Mapping.
- Here, you can add existing mapping and create a new mapping. For the new mapping, you’ll need Zenith Freight Lines (ZEFL).

- Enter the required information.
- Click Save.

Configure PDF Invoices
As a fulfillment channel, Wayfair requires that its packing slip be printed and included inside the shipping package with the order.
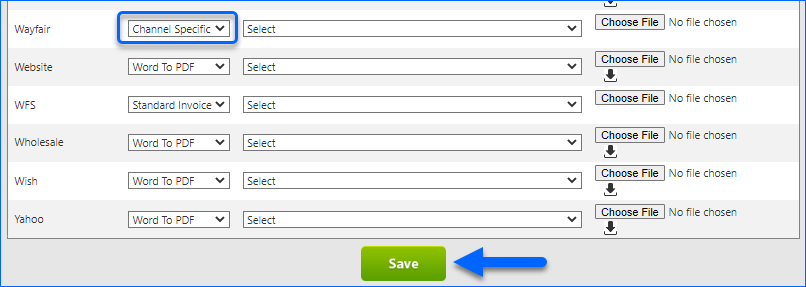
The Wayfair packing slip will print automatically for Wayfair orders. However, if you are using the Per Channel Invoice Preferences option, you must first configure the Wayfair-specific packing slip settings:
- Click Company Settings > Toolbox > Invoice Settings.

- Click Per-Channel Preferences.
- Find the channel in the list > Select Channel Specific from the Invoice Type dropdown.
- Click Save.
Wayfair Backorders
To send Backorder information to Wayfair, you must be enrolled in the OOSP (Out of Stock Purchasing) program. To use this feature in Sellercloud, you need to enable Send Backorder Information on the company’s Wayfair General Settings page. When enabled, we will send inventory for out-of-stock products following these rules:
- If there is no OnOrder quantity, Sellercloud will send the quantity on order as zero.
- If the product is marked as Discontinued, no backorder information is sent, even if quantity is available.
- If the product is not discontinued and the OnOrder quantity is > 0, Sellercloud checks the relevant delivery date: Estimated Arrival Date (for container-based workflows) or Expected Delivery Date (for PO-based workflows).
- If the selected delivery date is set to a date in the future, then Sellercloud will send the quantity on order and the expected delivery date as is.
- If the selected delivery date is in the past or not populated, Sellercloud checks the following Wayfair General Settings:
- EnableBackOrderedDeliveryDays
- BackOrderedDeliveryDaysToSend
- If both settings are enabled and valid, the system will add the number of days specified in BackOrderedDeliveryDaysToSend to calculate the delivery date and use that as the expected date in the backorder data.
Shipping Containers
If your workflow includes Shipping Containers, you need to enable the Enable Shipping Containers for PO Client Setting in Sellercloud. When this setting is enabled, we will send the Qty On Order and Estimated Arrival Date fields of a container as backorder information instead of the Qty On Order and Estimated Delivery Date fields of Purchase Orders.
If the above Client Setting is enabled but shipping container details are not populated, App Setting WayfairSendOnOrderQtyIfOnOrderContainerQtyIsNotAvailable ensures that we will still make an attempt to send the purchase order fields as backorder information based on the logic described above. Contact Sellercloud Support to have this setting enabled on your server.
Integrate Wayfair via API
You can also integrate Wayfair into Sellercloud via API.
To set up the API integration on Wayfair’s end:
- Sign in to the Wayfair Partner Home portal.
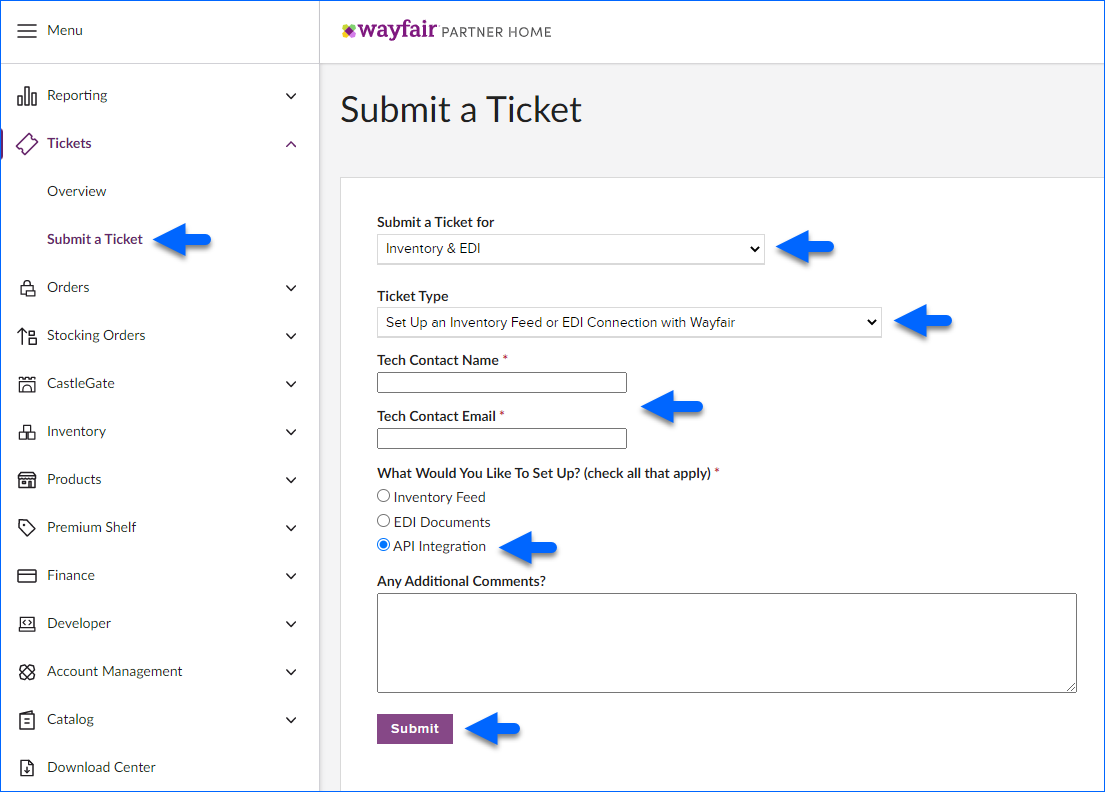
- Click the Tickets tab in the menu on the left and then select Submit a Ticket.
- Set the Submit a Ticket for option to Inventory & EDI.
- Set the Ticket Type to Set Up an Inventory Feed or EDI Connection with Wayfair.
- Submit your contact information in the Tech Contact Name and Tech Contact Email fields.
- Under What Would You Like To Set Up? select API Integration.
- Optionally, add Any Additional Comments.
- Click Submit.
- Next, go to the User Management Page.
- Grant your account access to the Wayfair APIs by clicking Edit (the pencil Icon) and checking the API box under Access Permissions. You can also click the Create New User button to create a new Partner Home account.
- Follow the steps outlined in Wayfair’s Onboarding Guide to complete the API testing. You must complete this stage before you can go live.
- Update the ticket with a list of the API queries and mutations you want to set up. Wayfair will validate that your testing steps have been completed and grant you access to go live.
To go live and enable the API integration:
- On the Wayfair Partner Home portal, select the Applications tab in the menu on the left and click the + New Application button.
- Set the Name to Sellercloud and enter a Description for the new application into the Create Application pop-up.
- Toggle the selection from Sandbox to Production, then click Save. This will open the Client Secret pop-up.
- Copy your Client ID and Client Secret from the pop-up. This information is only accessible until you close the pop-up – don’t close it until you copy the details and save them somewhere.
- Open Sellercloud and go to your Company Settings.
- Click Toolbox and select Wayfair > General Settings.
- Click Edit.
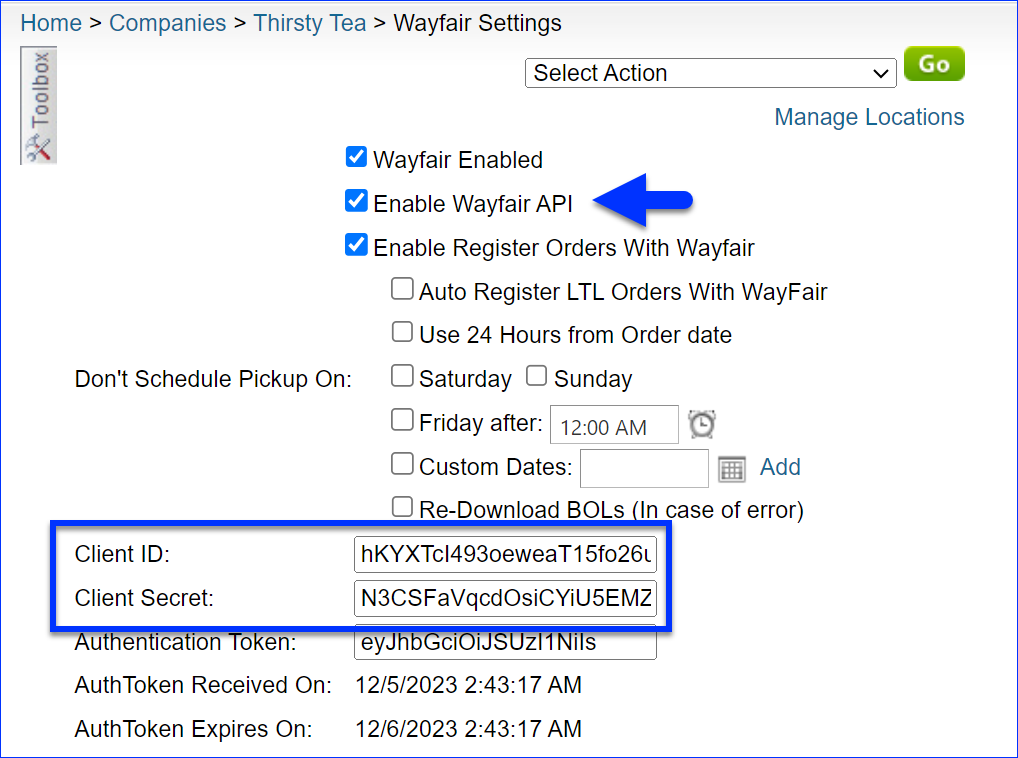
- Check the Enable Wayfair API box.
- Enter your Wayfair details into the Client ID and Client Secret fields.
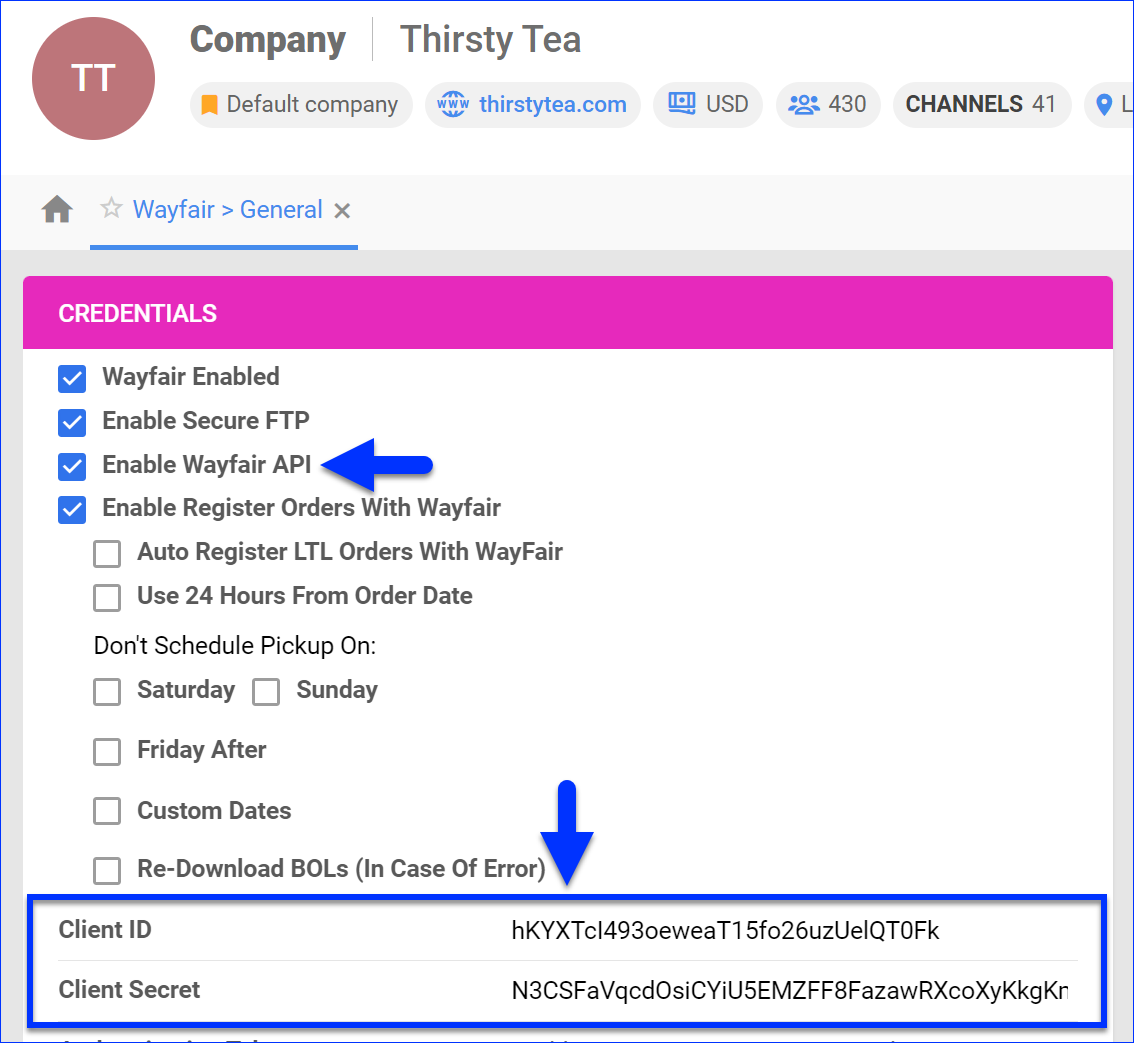
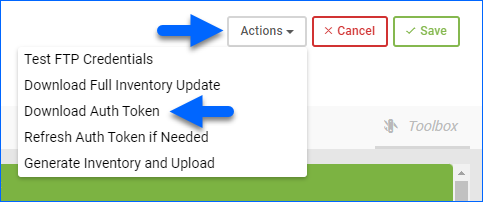
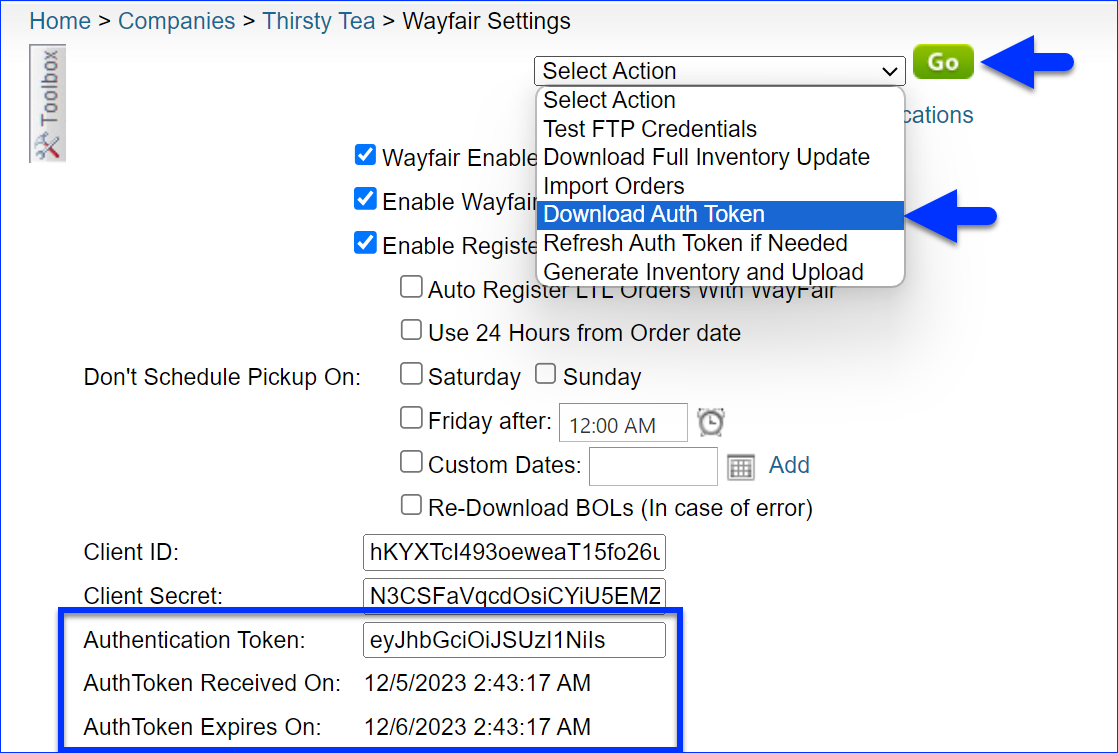
- Click Actions and select Download Auth Token. If this action is successful, it will populate the Authentication Token, AuthToken Received On, and AuthToken Expires On fields.
- Click Save.
Overview
Wayfair is a large and growing marketplace dedicated to home products that range from furniture, linens, décor, and kitchenware to home office furniture, home improvement, and patio – anything and everything for home and garden. It operates as a fulfillment channel, where merchants dropship orders for Wayfair. This means that Wayfair will buy products from a merchant and market them online, while the customers’ online orders will be forwarded to that merchant to be fulfilled. As with most fulfillment channels, listings must be created directly on Wayfair, and pricing negotiated with your assigned Wayfair representative.
The integration between Sellercloud and Wayfair allows you to seamlessly import orders, upload tracking information and invoices, and ensure your listings are always up-to-date with the latest inventory data. Sellercloud integrates with both B2B and B2C Partner accounts, as well as Wayfair Castlegate Fulfillment.
Prerequisites
There are two ways to integrate Wayfair into Sellercloud – via EDI or API. EDI involves transmitting documents through an FTP, whereas API establishes a direct connection between the two platforms.
The workflow for Sellercloud’s EDI integration with Wayfair is comprised of the following steps:
- Complete the required integration form and return it to Wayfair.
- Enter your Wayfair credentials into Sellercloud’s Wayfair Company Settings.
- Configure the Shipping Method Mapping for Wayfair. While this is optional, it will set the correct shipping method for each order.
- Configure Wayfair Invoices/Packing Slips.
- Your Sellercloud server must be whitelisted on Wayfair Partner. Contact Sellercloud Support for your server’s IP address.
Follow the next sections in this article to set up the EDI integration step by step.
The workflow for Sellercloud’s API integration is the following:
- Submit a ticket to Wayfair to request the API integration.
- Grant your Wayfair account access to their APIs, and then follow the steps in Wayfair’s Onboarding Guide to complete the API testing. You must complete this stage before you can go live.
- Generate API credentials and then enter them into Sellercloud’s Wayfair Company Settings.
- Configure the Shipping Method Mapping for Wayfair. While this is optional, it will set the correct shipping method for each order.
- Configure Wayfair Invoices/Packing Slips.
Skip to the last section of this article (Integrate Wayfair via API) for a detailed walkthrough of steps 1-4.
Wayfair Integration Form
Follow these instructions to complete the integration form (some information is on the form itself):
- Section One: Contact Information – Complete contact information.
- Section Two: Connectivity & Documents Options.
- Connection Type – FTP Direct Connection – Enter Yes
- Transaction Type – ANSI X12 – EDI – Enter Yes
- Process:
- Inventory – Yes
- Purchase Orders – Yes
- Order Acknowledgment – Yes
- Advanced Shipment Notifications –Yes
- Invoice – Yes
- EDI Configuration Version – enter Yes in the 4010 box
- Production ISA:
- Qualifier – Enter ZZ
- ID – Use the company telephone number
- Test ISA:
- Qualifier – Enter ZZ
- ID – use the company telephone number and add an optional “T” at the end
- Section Three: Inventory Options
- Frequency— choose Hourly and enter 2
Wayfair General Settings
- In Sellercloud, click Settings > Company Settings > Toolbox > Wayfair Settings > General Settings.
- Complete the fields using the field values below for reference. See these instructions for setting co-op fees here for dropship.
- When done with these settings, select the Wayfair Enabled checkbox.
- Click Save Settings.

| FIELD | VALUE |
| Customer ISA Qualifier | ZZ |
| Customer ISA ID | Wayfair ID you create. For example, your company telephone number. |
| Wayfair ISA Qualifier | 01 |
| Wayfair ISA ID | Provided by Wayfair |
| Wayfair Seller ID | Leave blank |
| Supplier ID | Provided by Wayfair |
| Supplier Warehouse ID | Typically, this is the zip code of the warehouse |
| Order Handling Fee | |
| Wayfair FTP Server | Provided by Wayfair |
| Wayfair FTP User Name | Provided by Wayfair |
| Wayfair FTP Password | Provided by Wayfair |
| Login Email | Provided by Wayfair |
| Login Password | Provided by Wayfair |
| Safety Qty | This helps reduce the risk of overselling by subtracting a number of units from the available quantity |
| Default Qty | When an item is set as replenishable, the value set here can be used as a default quantity for Wayfair. |
Wayfair Locations
(Optional) If you have multiple locations set up in Wayfair, you can map your Sellercloud local warehouse(s) to their corresponding Wayfair IDs. This mapping determines which warehouse’s available inventory is sent to each location and helps prevent issues during inventory updates.
- Go to Settings > Company > Toolbox > Wayfair Settings > Locations.
- Enter the ID of the location/s as seen in Wayfair and map it to the corresponding local warehouse/s in Sellercloud.
- Once done, click Save.
Wayfair Shipping Method Mapping
Wayfair has unique codes to indicate shipping services. You can map these codes to services in Sellercloud to ensure the correct shipping service is assigned when shipping the order.
You must check Enable Wayfair Shipping Method Mapping per Carrier in your Client Settings. This allows more flexibility when adding various shipping services.
Once you’ve enabled this setting, follow these next steps:
- Access Company Settings > Company > Wayfair Settings > Shipping Method Mapping.
- Here, you can add existing mapping and create a new mapping. For the new mapping, you’ll need Zenith Freight Lines (ZEFL).
- Enter the required information.
- Click Save.

Configure PDF Invoices
As a fulfillment channel, Wayfair requires that its packing slip be printed and included inside the shipping package with the order.
The Wayfair packing slip will print automatically for Wayfair orders. However, if you are using the Per Channel Invoice Preferences option, you must first configure the Wayfair-specific packing slip settings:
- Click Company Settings > Toolbox > Invoice Settings.
- Click Per-Channel Preferences.
- Find the channel in the list > Select Channel Specific from the Invoice Type dropdown.
- Click Save.

Wayfair Backorders
To send Backorder information to Wayfair, you must be enrolled in the OOSP (Out of Stock Purchasing) program. To use this feature in Sellercloud, you need to enable Send Backorder Information on the company’s Wayfair General Settings page. When enabled, we will send inventory for out-of-stock products following these rules:
- If there is no OnOrder quantity, Sellercloud will send the quantity on order as zero.
- If the product is marked as Discontinued, no backorder information is sent, even if quantity is available.
- If the product is not discontinued and the OnOrder quantity is > 0, Sellercloud checks the relevant delivery date: Estimated Arrival Date (for container-based workflows) or Expected Delivery Date (for PO-based workflows).
- If the selected delivery date is set to a date in the future, then Sellercloud will send the quantity on order and the expected delivery date as is.
- If the selected delivery date is in the past or not populated, Sellercloud checks the following Wayfair General Settings:
- EnableBackOrderedDeliveryDays
- BackOrderedDeliveryDaysToSend
- If both settings are enabled and valid, the system will add the number of days specified in BackOrderedDeliveryDaysToSend to calculate the delivery date and use that as the expected date in the backorder data.
Shipping Containers
If your workflow includes Shipping Containers, you need to enable the Enable Shipping Containers for PO Client Setting in Sellercloud. When this setting is enabled, we will send the Qty On Order and Estimated Arrival Date fields of a container as backorder information instead of the Qty On Order and Estimated Delivery Date fields of Purchase Orders.
If the above Client Setting is enabled but shipping container details are not populated, App Setting WayfairSendOnOrderQtyIfOnOrderContainerQtyIsNotAvailable ensures that we will still make an attempt to send the purchase order fields as backorder information based on the logic described above. Contact Sellercloud Support to have this setting enabled on your server.
Integrate Wayfair via API
You can also integrate Wayfair into Sellercloud via API.
To set up the API integration on Wayfair’s end:
- Sign in to the Wayfair Partner Home portal.
- Click the Tickets tab in the menu on the left and then select Submit a Ticket.
- Set the Submit a Ticket for option to Inventory & EDI.
- Set the Ticket Type to Set Up an Inventory Feed or EDI Connection with Wayfair.
- Submit your contact information in the Tech Contact Name and Tech Contact Email fields.
- Under What Would You Like To Set Up? select API Integration.
- Optionally, add Any Additional Comments.
- Click Submit.

- Next, go to the User Management Page.
- Grant your account access to the Wayfair APIs by clicking Edit (the pencil Icon) and checking the API box under Access Permissions. You can also click the Create New User button to create a new Partner Home account.
- Follow the steps outlined in Wayfair’s Onboarding Guide to complete the API testing. You must complete this stage before you can go live.
- Update the ticket with a list of the API queries and mutations you want to set up. Wayfair will validate that your testing steps have been completed and grant you access to go live.
To go live and enable the API integration:
- On the Wayfair Partner Home portal, select the Applications tab in the menu on the left and click the + New Application button.
- Set the Name to Sellercloud and enter a Description for the new application into the Create Application pop-up.
- Toggle the selection from Sandbox to Production, then click Save. This will open the Client Secret pop-up.
- Copy your Client ID and Client Secret from the pop-up. This information is only accessible until you close the pop-up – don’t close it until you copy the details and save them somewhere.
- Open Sellercloud and go to your Company Settings.
- Click Toolbox and select Wayfair > General Settings.
- Click Edit.
- Check the Enable Wayfair API box.
- Enter your Wayfair details into the Client ID and Client Secret fields.
- Click Actions and select Download Auth Token. If this action is successful, it will populate the Authentication Token, AuthToken Received On, and AuthToken Expires On fields.
- Click Save.
