Overview
The Shopify Account Integration lets you seamlessly manage your Shopify orders directly from Sellercloud. It allows you to download orders automatically, update their fulfillment status, map shipping methods to specific carriers and services, issue refunds, cancel orders, and more.
To explore other related topics, refer to our Shopify Category.
Order Download and Tracking Upload
You can download orders from Shopify automatically or manually. Additionally, this integration supports importing Exchange orders and Returns from your website.
In some cases, Shopify may flag an order’s fulfillment status as On Hold, often due to minor issues like a typo in the shipping address. When we receive such an order, we create it locally and automatically set the Sellercloud General Status to On Hold, to prevent shipping it before you can verify the details.
Automatically
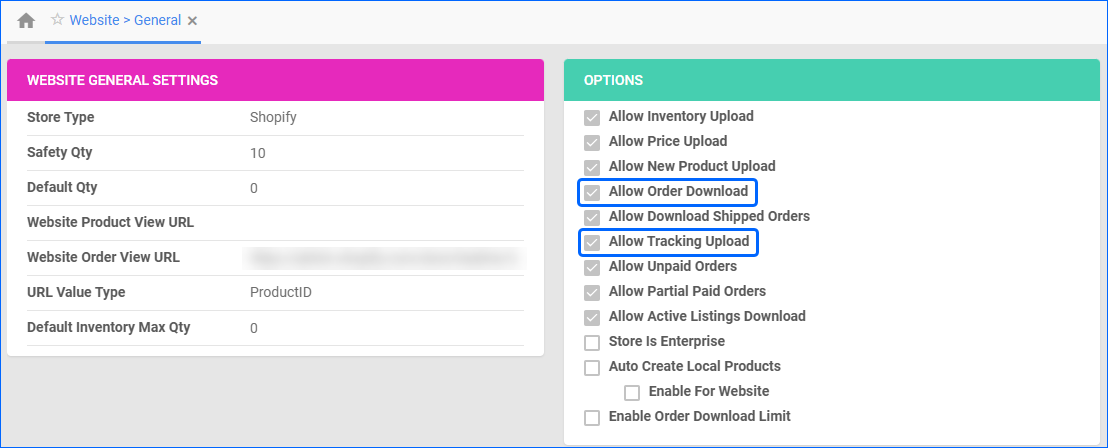
To enable automatic order synchronization between Shopify and Sellercloud:
- Go to Company Settings.
- Click Toolbox and select Website > General Settings.
- Click Edit.
- In the Options panel, enable:
- Allow Order Download – Download Shopify orders to Sellercloud automatically. Orders are downloaded approximately every 30 minutes.
- Allow Tracking Upload – Upload tracking information and ship dates to Shopify automatically to update the order status on the channel.
- Click Save.
In cases where orders have been Split or shipped in multiple packages, the App Setting ShopifyEnableMultipleTrackingNumbers must be enabled to send multiple tracking numbers to Shopify. If the order has a single line item with a quantity of 1, but is a kit split into multiple packages, the app setting EnableShopifyIncludeAllPackageTrackingNoInTrackingUpdate must also be enabled to send all tracking numbers.
Shopify can also be configured to automatically fulfill certain products (e.g., digital goods). In such scenarios, it is important that you properly configure your Sellercloud account to accommodate it. For this workflow:
- App Setting ShopifyDoNotCreateNonShippingOrderItems must be set to True.
- Client Setting Shopify Ignore Order Item Fulfillable Quantity must be disabled.
It is also possible to Revise Existing Tracking Information on Shopify if, for example, you unship an order and then generate a new label. For this workflow:
- App Setting ShopifyEnableMultipleTrackingNumbers must be set to False.
- Client Setting Shopify Allow To Revise Tracking Numbers must be enabled. If you do not see it, the above-mentioned app setting is likely still enabled.
You can open a ticket to Sellercloud Support to ensure the relevant AppSettings are configured on your server.
Ship From Warehouse
The Shopify Location Mapping is also relevant when importing orders from your Website. This is mainly controlled by the Use Location Received In Order For Ship From Warehouse setting on the Shopify General Settings page in your integrated company:
- When the setting is disabled:
- Fully Shipped orders are always assigned the Ship From Warehouse mapped to the Location ID we receive from Shopify.
- Unshipped orders are not affected by the Location ID received with the order.
- When the setting is enabled, we will assign the local warehouse mapped to the Location ID received for all Shopify orders.
If you have mapped multiple warehouses to the same Location ID, we will pick the first one to set as the Ship From warehouse on orders.
Inventory Reserves
By default, when a new Shopify order is created with Payment Status Charged or Authorized, we automatically reserve the inventory to prevent overselling. If you would like to extend this functionality to Unpaid orders as well:
- Navigate to Settings.
- Go to Orders > Reserve Unpaid Orders Settings.
- Click Edit and check the box next to Website. Click Save.

Import Returns
Our Shopify Account Integration supports automatically importing Returns that originate on your website. RMAs are requested based on their last modified date in Shopify. By default, the system checks for changes made in the last 5 days. This is controlled by the MWSOrderDaysLimit App Setting. You can open a ticket with Sellercloud Support to update it if necessary.
When a Return is imported, we check the product Disposition:
- RESTOCKED – We import such items as Received and automatically add the quantity into the warehouse, mapped to the location. For bin-enabled warehouses, we add the inventory to the default receiving bin. If all items in the RMA have this disposition, we automatically close the RMA.
- NOT_RESTOCKED/NEEDS_PROCESSING – We import the items as Not Received, but we set a receiving warehouse to the RMA based on the Location Mapping of the company.
If the return has a Tracking Number in Shopify, Sellercloud will import it and set it on the RMA page. Additionally, we record the Return Reason, Reason Note, and Customer Note.
To ensure we import RMAs from Shopify:
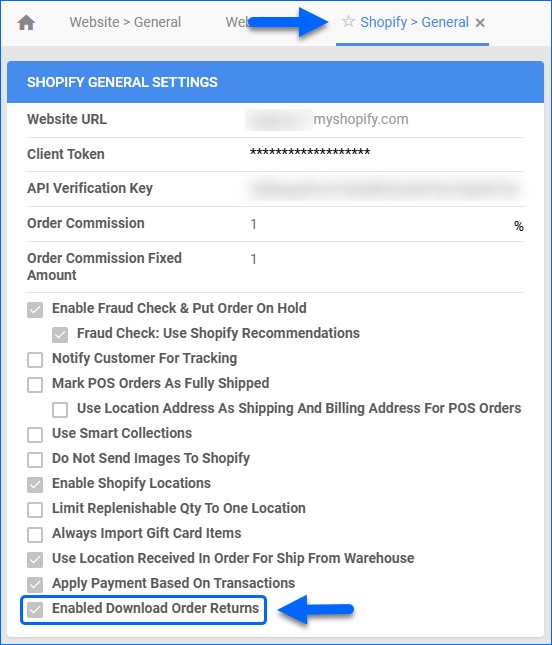
- Go to the Company Settings.
- Click Toolbox and select Shopify > General Settings.
- Click Edit.
- In the Shopify General Settings panel, check Enabled Download Order Returns.
- Click Save.
- After saving, click Actions > Get Token. This ensures your access token includes all the necessary permissions to request Returns from Shopify.
Manually
You can manually initiate an Order Download from Shopify. This is necessary when you first move into production after integrating to bring in existing unshipped orders. Additionally, if there has been a temporary connection failure, this action allows you to import missed orders.
To manually download Shopify orders:
- Navigate to Orders > Tools.
- Click Download Orders from Channel > Select Download Shopify Orders.
- In the Download Shopify Orders panel:
- Select your Shopify-integrated Company.
- Optionally, you can provide a comma-separated Order List. The Order IDs must be fully numeric. You can find the correct Order ID in the URL when you open the Order Details page on your Shopify site.
- Date Range – You can also import all orders placed within a specific date range. Sellercloud will automatically skip creating orders that already exist locally to prevent duplicates.
You can also download orders from the Company Settings:
- Go to Company Settings.
- Click Toolbox and select Website > General Settings.
- Click Actions and select Import Orders.
- A Queued Job is created. The first time the automatic service runs after the Job is completed, it will create the Shopify orders.
Exchange Orders
Sellercloud can process exchanges directly on the original Shopify order. To enable this functionality, open a ticket with Sellercloud Support to request the activation of app setting EnableShopifyRMAExchangeOrderWorkflow. Once enabled, Shopify sends returned items through RMAs and replacement items through the exchange feed. Sellercloud adjusts the original order by applying the returned quantities, adding the replacement items, and using Shopify’s payment data to reconcile any outstanding charges or refunds. The system then applies a discount equal to the value of the returned items, ensuring that the order’s Grand Total reflects Shopify’s updated total.
Shopify Shipping Method Mapping
Sellercloud’s Shipping Method Mapping tool allows you to customize shipping for each channel integrated with your account. Using this tool, you can map the shipping methods sent for each Shopify order to a preferred shipping carrier and service.
To ensure the correct shipping method is applied to each order, you need to enter the shipping code for each respective shipping service. When orders are imported into Sellercloud, the shipping method chosen by the customer will also be imported.
Add Shipping Method Mapping
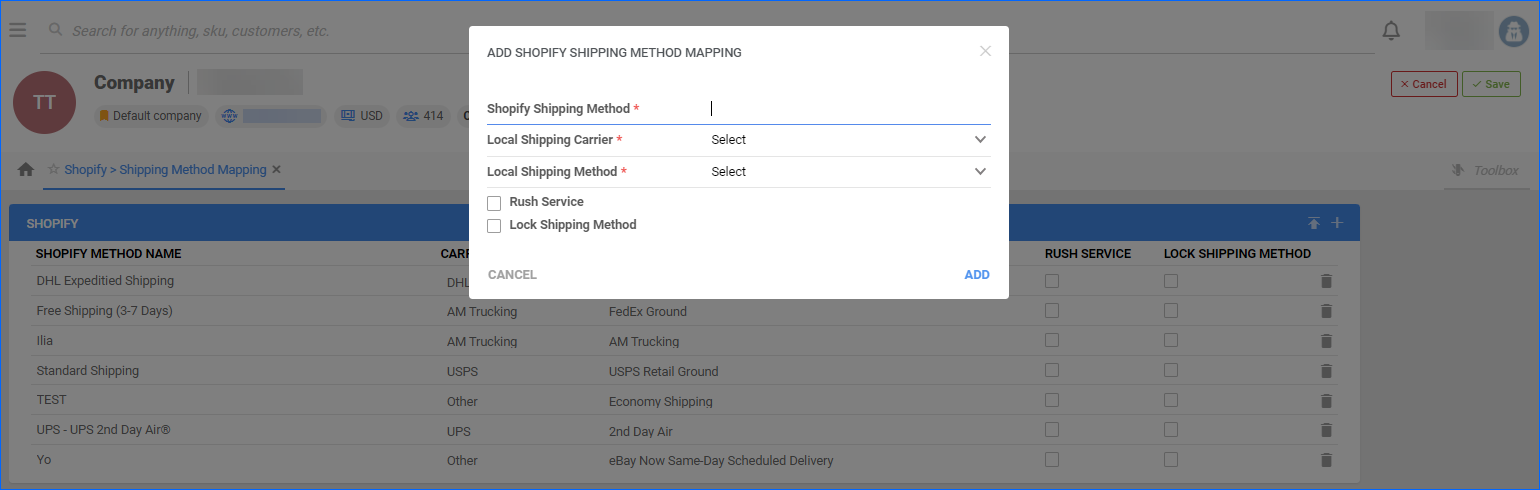
To configure the shipping method for Shopify:
- Go to Company Settings.
- From the Toolbox > select Shopify Shipping Method Mapping.
- Click Edit.
- On the panel header, click the + icon.
- For each Shopify Shipping Method Name, select a Local Shipping Service and Method.
- Click Add.
- After you have added all the necessary mappings, click Save.
Upload Shipping Method Mapping
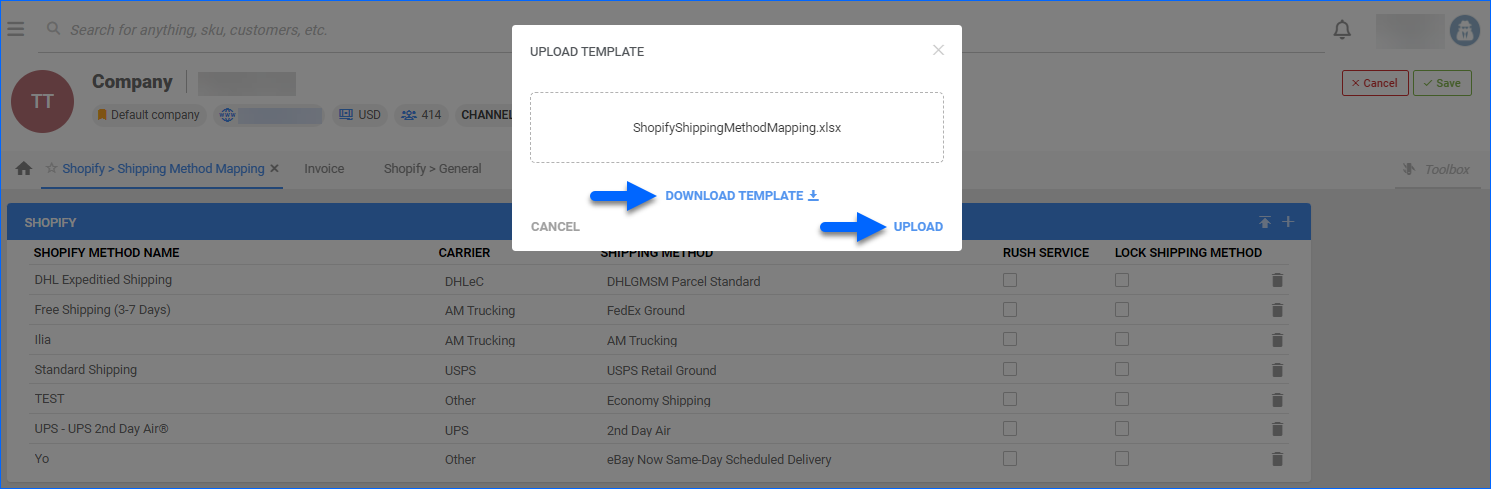
To upload a Shipping Method Mapping:
- Go to Settings > Companies > Manage Companies > Select a company.
- Click Toolbox > Shopify Shipping Method Mapping.
- Click Edit > Click on the Upload Button in the panel header.
- Download the template and populate the columns:
- ShopifyMetodName
- LocalMethodName
- IsRush
- IsLock
- Go back to Sellercloud and upload the filled-in template.
Manage Shopify Orders
You can only cancel a Shopify order before it is marked Ship Confirmed. If it is already Ship Confirmed, you must issue a refund. If the item is being returned, use the RMA workflow instead.
Cancel Shopify Orders
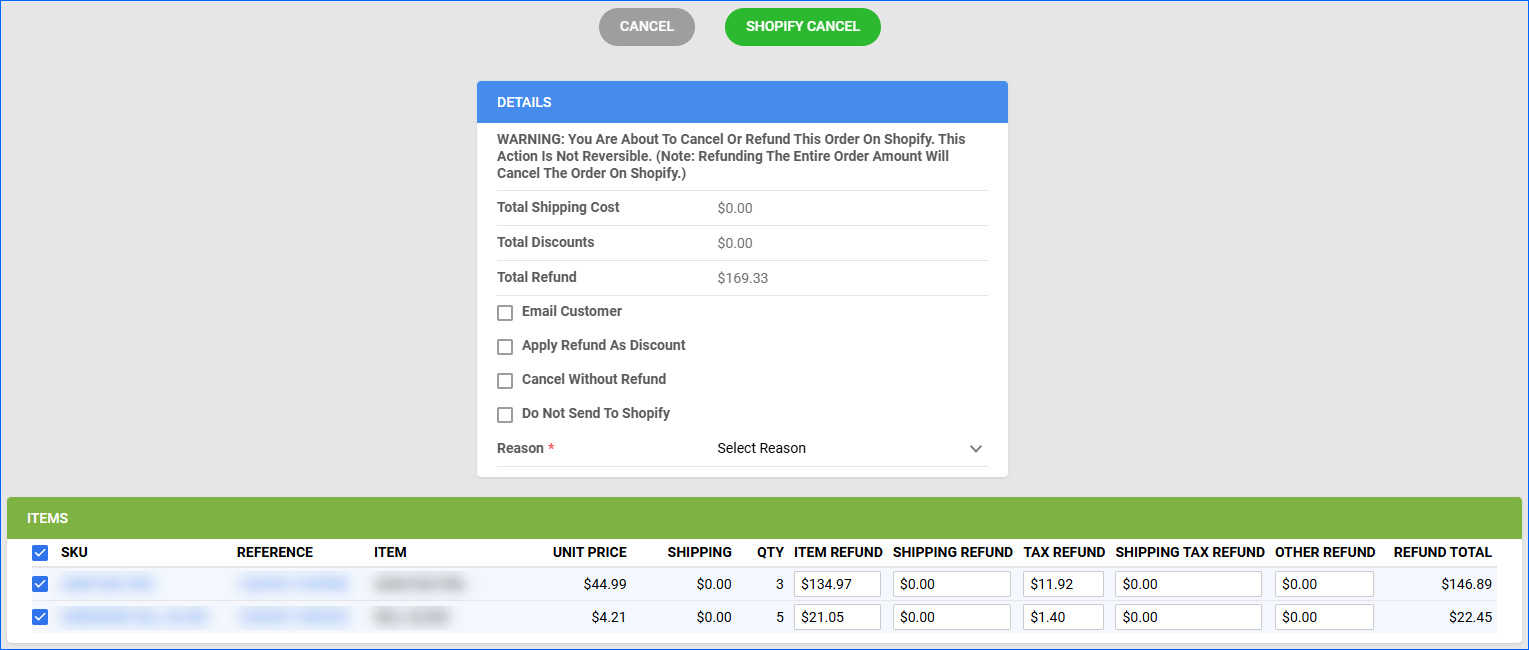
To cancel a Shopify order and send refund information:
- Go to the Order Details page.
- Click Actions > Cancel/Issue Refund.
- Check the boxes on the left to select one or more SKUs and fill in any of the additional product-related fields.
- Optionally, you can check:
- Email Customer
- Apply Refund As Discount
- Cancel Without Refund
- Do Not Send To Shopify
- Select a cancellation Reason.
- Click Shopify Cancel.
By default, the Cancel/Issue Refund action cancels the whole order, and you cannot ship any items. If the customer has only cancelled part of the order (for example, only one of two total order items), you may still want to ship the remaining SKU. For such cases, you must ensure that the Shopify Enable Qty Based Order Cancellation Client Setting is enabled for your account. When set to True, partial cancellations will result in splitting the order. The parent order will be marked as partially refunded, while the child order will be Cancelled. The setting will not affect orders where the customer has cancelled all the ordered items.
Refund Shopify Orders Internally
Sellercloud does not import refunds from Shopify. If a refund is processed on Shopify, it must be manually added to the order in Sellercloud. If the item is being returned, you should create an RMA. Refunds can be issued from the RMA.
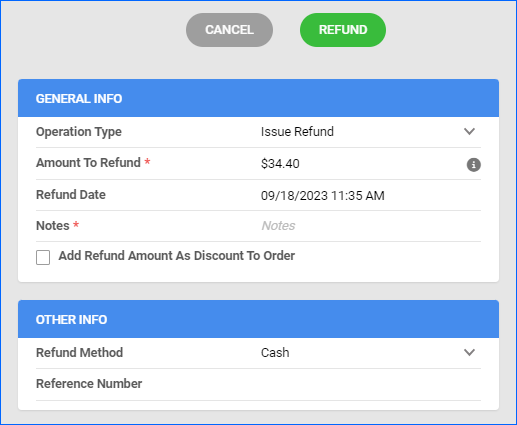
To refund a Shopify Order internally:
- Go to the Order Details page.
- From the Actions menu > click Issue Local Refund.
- Populate the fields:
- Operation Type
- Amount to Refund
- Refund Date
- Notes – Leave comments about the reason for the refund.
- Refund Method – Choose a refund method from Cash, Email, Gift Certificat/Card, Other, Paypal, Purchase Order, Telephone, or Wire.
- Reference Number.
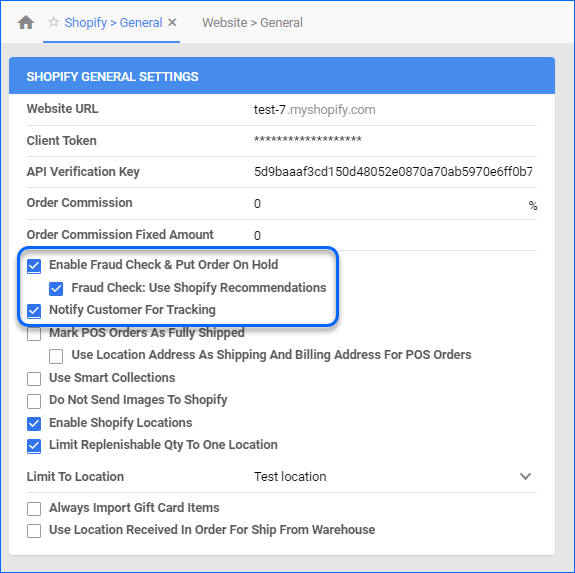
Notify Customers For Tracking
You can enable a setting to send automated emails to customers about Shopify Orders with updated tracking information.
- Go to Company Settings.
- From the Toolbox > Sellercloud Integrated Website > Shopify General.
- Click Edit > check Enable Notify Customer For Tracking.
- Click Save.
Orders Fraud Check
You have the option to retrieve orders’ risk analysis from Shopify:
- Go to Company Settings.
- From the Toolbox > Sellercloud Integrated Website > Shopify General.
- Click Edit > Enable Fraud Check & Put Orders On Hold.
- Save.
Configure PDF Invoices
PDF Invoices usually contain information about your orders and the products they include. You can print Invoices with any specific requirements if needed. You can also select between Standard Invoice, Channel Specific, Word to PDF, or a plugin.
- Go to Company Settings.
- Click Toolbox and select Invoice Settings.
- Click Per Channel Preferences.
- Locate Website in the list and select your preference:
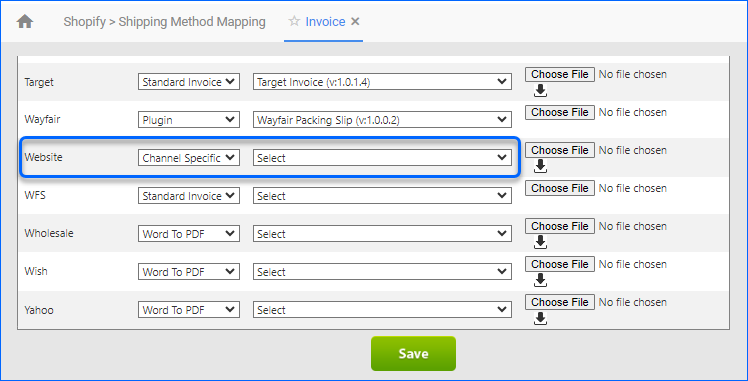
- Click Save.