Overview
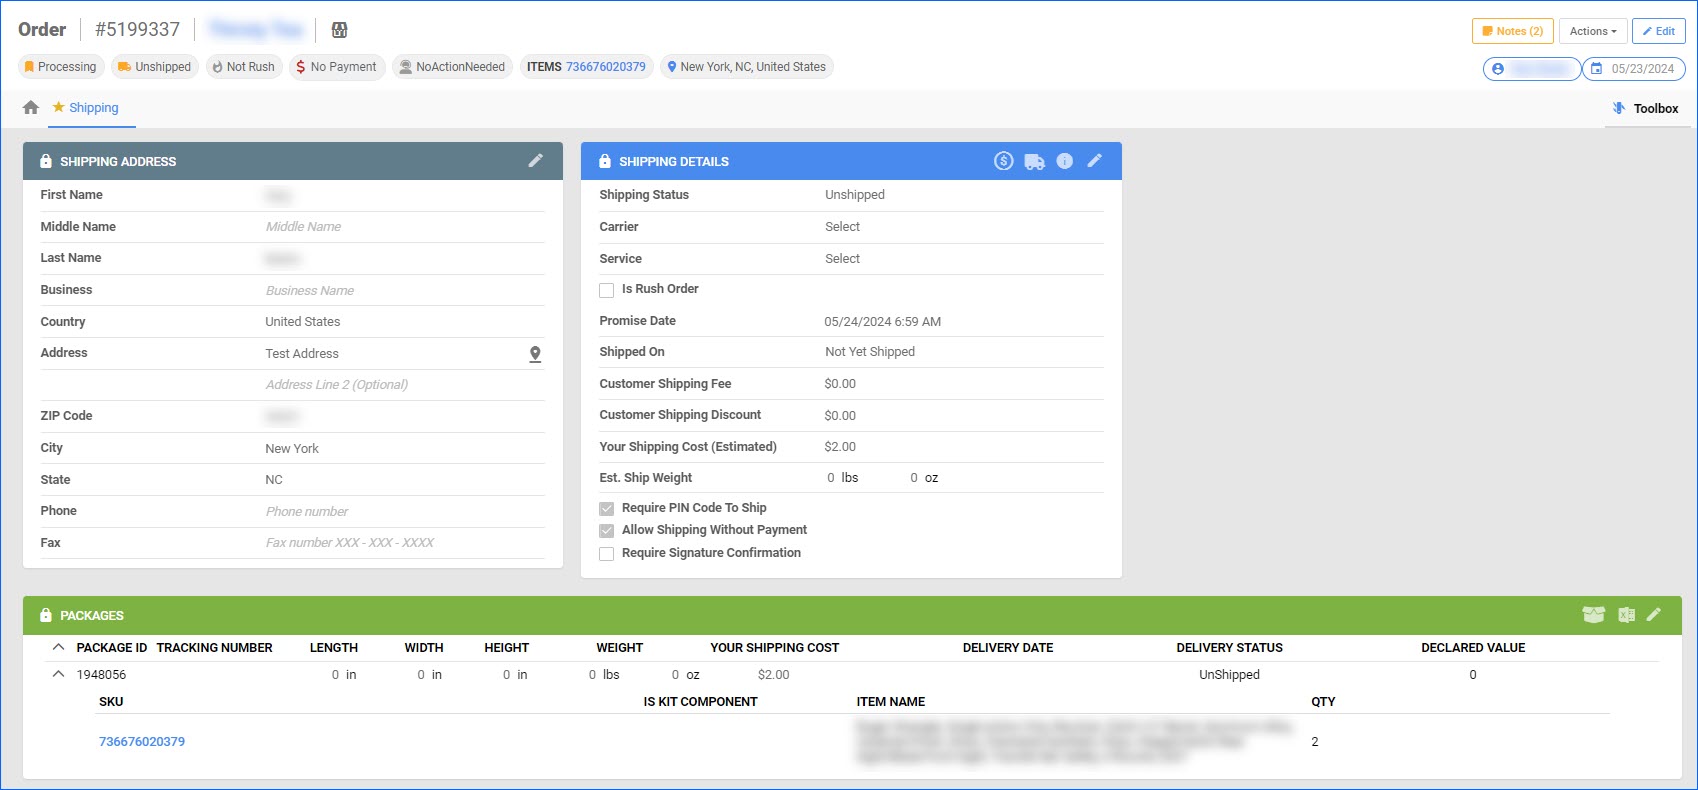
The Order Shipping Tab of the Order Details page provides a user-friendly view of all the relevant fulfillment information for your orders. In most cases, this page is used as a reference only, as shipping is typically handled within Sellercloud’s Shipbridge application.
The Order Shipping page is most commonly used to correct any issues with your unshipped orders. For example, when you need to modify the address information, adjust the selected carrier details, or in cases where packages have not been generated correctly. For all orders, most of the information is auto-populated by the channel or backend calculations, such as the promise date and Predicted Shipping Details, or during the shipping process.
This article provides detailed information about all the available actions and fields on the Shipping tab of your Orders, as well as Package Management and tracking.
Order Shipping Tab
The Order Shipping Tab in Sellercloud lets you view and edit fulfillment information, such as carrier, addresses, and packages. For Unshipped Orders, the information you input here will be reflected in Shipbridge.
To reach the Shipping tab:
- Navigate to Orders > Manage Orders > Search.
- Open your order > Toolbox > Shipping.
- Click Edit to update related information. Some fields are not available for manual editing.
Shipping Address Panel
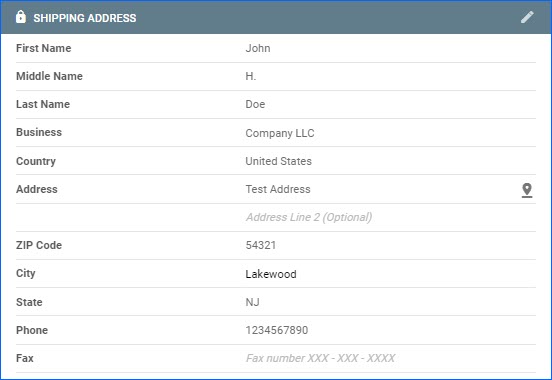
The Shipping Address panel is auto-populated with the Customer shipping information upon order import. For orders you create manually, you must input this information during the creation process. On the Order Shipping page, you can edit any of the available fields if necessary. Additionally, you can Verify the Address by clicking on the map pin icon next to the Address field. You must have valid Shipping API Credentials to use this option.
Shipping Details Panel
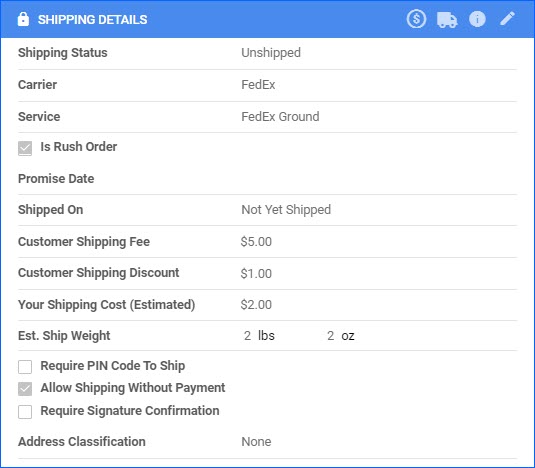
You will very rarely have to edit information in this panel, especially for Shipped orders. However, in case of errors, or if you regularly import tracking or shipping costs, you can make additional adjustments here.
You can edit all fields except for Shipping Status, Shipped On, Promise Date, Address Classification, and Shipping Cost. Any details you update here will also be considered if you later ship the order through Shipbridge.
To update the shipping details, click the Edit button at the top of the page or the pencil icon in the panel header.
- Shipping Status – displays the overall shipping status of the order: Unknown, Unshipped, Partially Shipped, or FullyShipped.
- Carrier – the selected Shipping Carrier (e.g., FedEx, USPS, UPS, etc.)
- Service – the selected Shipping Service (e.g., FedEx Ground.)
- Is Rush Order – indicates whether the order is marked as Rush.
- Promise Date – indicates the Ship-By-Date.
- Shipped On – displays the date and time the order was shipped.
- Customer Shipping Fee – displays how much the end customer pays for shipping.
- Your Shipping Cost (Estimated) – for unshipped orders, you can configure your account to calculate a Predicted Shipping Cost. Once the order is Fully Shipped, the Estimated indicator disappears.
- Est. Ship Weight – before the order is shipped, this field shows an Estimated Shipping Weight.
- Require PIN Code To Ship – check this box to enforce a Security PIN code upon shipping the order. Once enabled, the PIN will be required in both Sellercloud and Shipbridge.
- Allow Shipping Without Payment – by default, you can only ship an order once it is fully paid. However, some workflows require you to ship the items before receiving payment, and you can overwrite this rule by checking this box or via an Action or automation such as the Order Rule Engine.
- Require Signature Confirmation – check to add Require Signature Confirmation to the Shipping Service.
- Address Classification – indicates whether the Ship To address is Residential or Commercial. This information is populated automatically when you Validate the Shipping Address.
- Shipped By, Shipping Location, Shipping Station – these three fields appear after an order has been shipped. The first displays the username of the employee who shipped the order. The other two refer to the Locations and Stations workflow and display the specific Shipbridge station used to print the labels.
Click the panel header icons for the following options:
- Shipping Calculator – allows you to view and compare shipping rates for your order. You must first configure your Shipping API Credentials on the related company’s settings page.
- Ship/Unship Order:
- Ship Order – for Unshipped Orders only. This action redirects you to a page where you can manually mark the order as Fully or Partially Shipped. The Generate and Print Carrier Labels option is in Beta testing. Read more about how to Manually Ship an Order.
- Unship Order – for Shipped Orders only. Allows you to mark the Order as Unshipped and InProcess.
- Shipping Summary – opens a modal with the Shipping Summary of the order.
Packages Panel
This panel displays information about each shipping package. If you have configured the shipping preferences for the order SKUs, the packages will be created automatically.
The panel grid displays:
- Package ID – automatically generated ID for the package.
- Tracking Number – the package’s tracking number generated upon shipping.
- Dimensions and Weight – the package’s shipping dimensions (length, width, and height.)
- Your Shipping Cost – the shipping cost for the specific package.
- Delivery Date and Delivery Status – indicates whether the package has been delivered to the Customer and when. To see this information, you must set up the Track Order Delivery Status workflow.
- Declared Value – declared value for shipping insurance.
Click on the arrow next to a Package ID to view:
- SKU – the order item Product IDs within the specific package.
- Is Kit Component – indicates whether the product is part of a Kit.
- Item Name – the product name.
- Qty – the quantity of that SKU within the specific package.
In the Packages panel header, click on the respective icons to:
- Export to Excel – generates an Excel sheet with all the information you see in this panel and downloads it onto your device.
- Edit – allows you to change the package Dimensions, Weight, and Shipping Cost.
- Manage Packages and Contents – click to be redirected to the Manage Packages page. Here, you can create and delete packages, as well as drag and drop order items to add them to a package. See the section below for more information.
Manage Packages and Contents
On this page, you can regenerate packages according to your Product Shipping Preferences and product setup. Additionally, it allows you to make one-time changes for orders that need to be shipped differently than your standard configuration.
To access an order’s package information:
- Navigate to Orders > Manage Orders.
- Open an Order. Then, you can either:
- Go to Actions > Shipping Packages or,
- Open the Toolbox > Shipping.
- You will be redirected to the Order Shipping tab. Click the box icon on the Packages panel header. This will take you to the Manage Packages and Contents page.

Actions
The following actions are available in the page header:
- Re-generate packages – refreshes and rearranges the packages and their contents based on your products’ Shipping Preferences.
- Smart re-generate packages – this action is in Beta testing.
- Merge all packages – click here to merge all existing packages into one that contains all unshipped order items. This action will delete the unnecessary packages.
- Ship Items – once you finalize the packages, you can click this to initiate the manual shipping workflow.
- Back – click here to return to the Order Shipping tab.
Items Panel
The Items panel contains a list of all the unshipped SKUs in the order:
- To Ship – indicates how many units have not yet been shipped.
- Boxed – displays the item quantity that is already assigned to a package.
- Remaining – shows how many units still need to be assigned to a package.
You can use the search bar to view a specific order item. Click the Breaking up kits button to see only kit components in the list. You can reverse this by clicking the same button to Complete kits, which will return the view of the kit parent with each component as a sub-item.
When creating packages, you must click on a SKU from this list and drag it to a package in the Packages panel. Then, in the pop-up modal, input how many units you are assigning to that box.
Packages Panel
Here, you create new Packages by clicking on the plus icon in the panel header, delete existing packages, or remove items assigned to a box. You can also view the package’s ID, how many units are currently in it, which order items, and the Kit Parent ID if you are shipping Kit Components. To add a new item to a package, you can click on the SKU from the Items panel and drag it over an existing package.


