Overview
Shopping Cart Websites are platforms designed to facilitate and manage the process of online purchases. They store e-commerce marketplaces and serve as virtual shopping carts, where customers can add items they want to purchase, and then proceed to checkout to complete their transactions. Sellercloud integrates with such Shopping Cart Websites to seamlessly facilitate product listings, inventory synchronization, order processing, and data management. Sellercloud Shopping Cart Integrations are of two types – Core Integrated Websites and Plugin Websites.
Sellercloud Core Integrated Websites
Sellercloud core software incorporates several Shopping Cart Websites:
- Shift4Shop (3dCart) – Website integration established via Shift4Shop’s API. Core or plugin cart integrations are both available.
- AspDotNetStoreFront – Integration established via AspDotNet Storefront API.
- Magento – To integrate with Magento, you should create a webservice user and role on Magento and configure Sellercloud’s webservice access. Also, your web developer or Sellercloud Support must place the PHP plugin on the FTP connected to your website. Select Magento General settings, from your company’s Toolbox to enter Magento Credentials and to define related Options and Controls. The Magento Settings have their own separate page in the Company’s toolbox, and they are not configured on the Website General page.
- Volusion – Cart integration established via Volusion’s API.
- Yahoo Stores – Website integration done via Yahoo Stores API. Navigate to your Yahoo Store Control Panel, to configure the API settings, Order Notifications and Real-time Inventory. Select Yahoo General settings, from your company’s Toolbox to enter Yahoo API token and to define related settings.
- Shopify – Website integration established via Shopify’s API. When you are connecting a Shopify store to Sellercloud, it is recommended to create a Shopify webhook. Also, your web developer or Sellercloud Support must place the PHP plugin on the FTP connected to your website.
You can configure Core Integrated Websites directly from your Company’s Website General Settings:
- Complete the required prerequisites on the respective shopping cart platform.
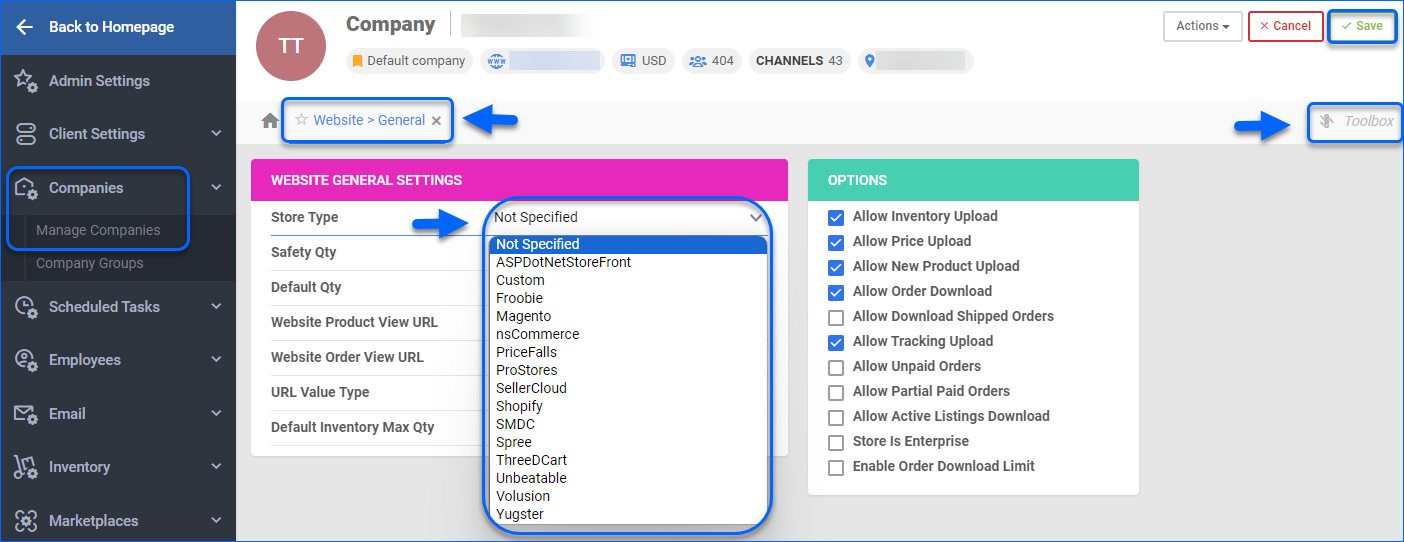
- Navigate to Settings > Companies > Manage Companies and choose the required company.
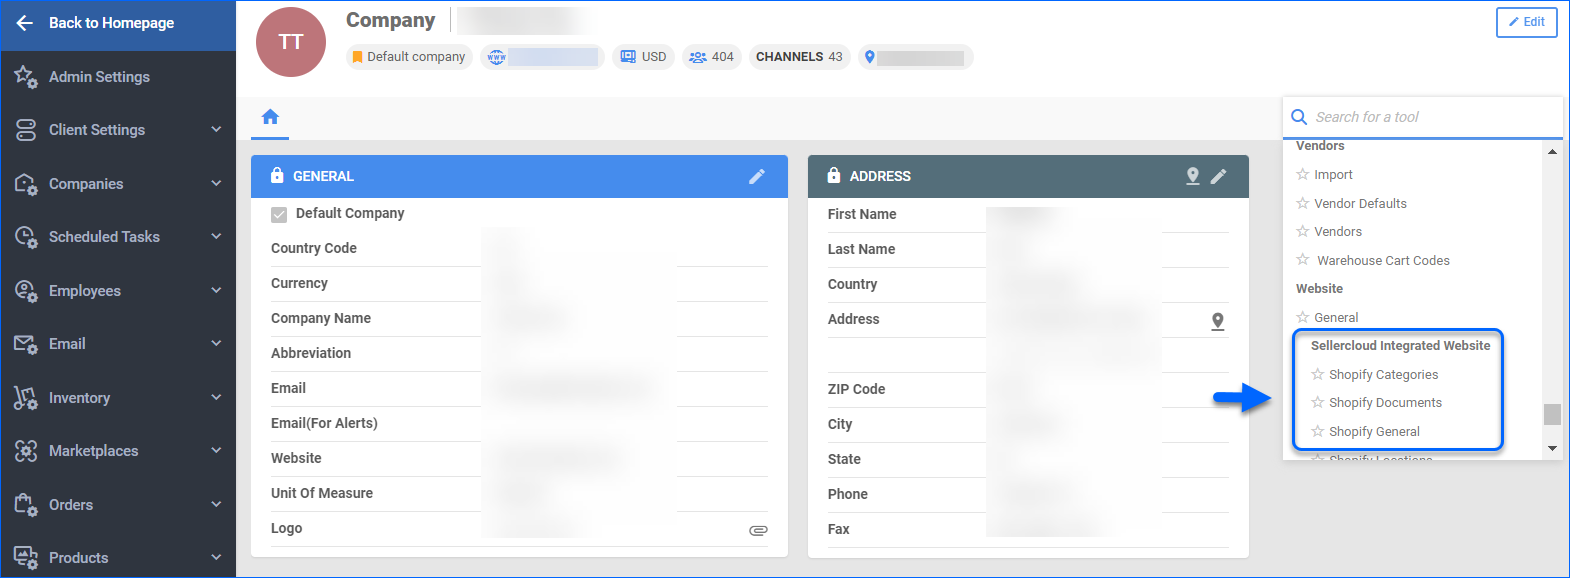
- From Toolbox, select Website > General.
- Click Edit.
- Select the necessary Store Type from the dropdown menu in the Website General Settings panel.
- Define the respective configurations in the Options panel.
- Click Save.

- To display and manage related website settings, navigate to Toolbox > Sellercloud Integrated Website.

Sellercloud Plugin Websites
Some Shopping Cart Websites can be integrated with Sellercloud via plugins:
- Shift4Shop (3dCart) – Website integration established via Shift4Shop’s API. Core or plugin cart integrations are available. The plugin aids in high-volume order downloads and allows for shipping method mapping.
- Big Commerce – Generate API credentials from Big Commerce, including 2 API tokens – Access Token and Secret Token. The Test Settings action must be executed to initialize the connection. If you don’t complete this step, your BigCommerce orders may not import as intended.
- ClaimTheWeb – Obtain API credentials from your ClaimTheWeb account.
- OpenCart – Integration through FTP plugin. Typically, the FTP credentials are provided by OpenCart. Two plugins are needed to integrate with OpenCart: DLL and PHP. Your web developer or Sellercloud Support must place the PHP plugin on the FTP connected to your website.
- PrestaShop – In order to begin the integration, enter Sellercloud PHP Plugin as a module into your PrestaShop Portal.
- WooCommerce – Sellercloud integrates with WooCommerce via client-supplied FTP. Sellercloud will upload new products, inventory, and tracking documents and download orders from the FTP. Additional setup must be done by Sellercloud Support.
- X Cart – Website integration established via XCart’s API plugin. Set XCart URL, API UserName and API Password in Sellercloud Website Cart Settings.
- Zen Cart – Website integration established via Zen Cart’s API. Set Website URL, API UserName and API Password in Sellercloud Website Cart Settings.
- CS-Cart – Website integration via CS-Cart API. Two plugins are required – DLL and PHP. The DLL plugin is deployed on your Sellercloud server, and the PHP plugin is deployed on the CS-Cart FTP. Set FTP Server , FTP UserName and FTP Password in Sellercloud Website Cart Settings.
- Miva – Fill in Miva’s API URL, API Store Code, API Access Token, API Signing Key and API Signing Digest in Sellercloud Website Cart Settings. Refer to Miva’s API instructions for further specifications.
- Network Solutions – Website Integration through API.
- SpreeCommerce – Website integration established via SpreeCommerce’s API. Navigate to your Spree Commerce user account, to generate an API Token.
- TikTok Shop – Website Cart integration established via API plugin. App Key and App Secret are required to call the TikTok Shop Open API.
To integrate a shopping cart Plugin Website with Sellercloud:
- Complete the required prerequisites and generate the necessary credentials on the respective shopping cart platform.
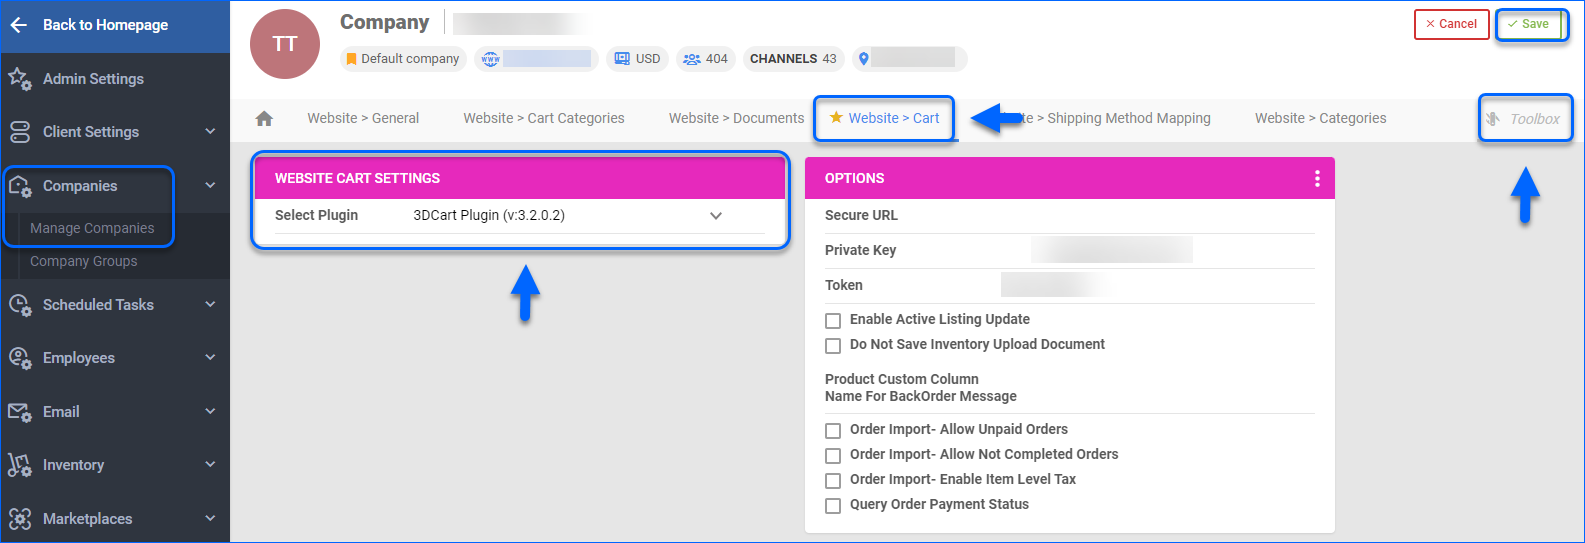
- Go to Settings > Companies > Manage Companies and open the required company.
- From the Toolbox, select Sellercloud Plug-in Website > Cart General.
- Click Edit and choose the required extension from the Select Plugin dropdown.
- Define the necessary API/FTP configurations in the newly appeared Options panel.
- Click Save.

- From the Options panel, select action Test Settings to check if the website integration is successful.
- From Toolbox, select Website General Settings.
- Click Edit.
- Choose Custom from the Store Type dropdown menu. This will reveal a Store Plugin list, from which you can select the appropriate plugin.
- Configure the integration Options settings and Save your changes.