Overview
Shipbridge lets you calculate and compare different Shipping Rates to select the ideal shipping method for your orders. With our user-friendly Rate Calculator, you can easily quote rates from various shipping carriers and make an informed decision according to your business needs.
Configure Carrier API Credentials
Before you begin, learn more about how to obtain your carriers’ credentials:
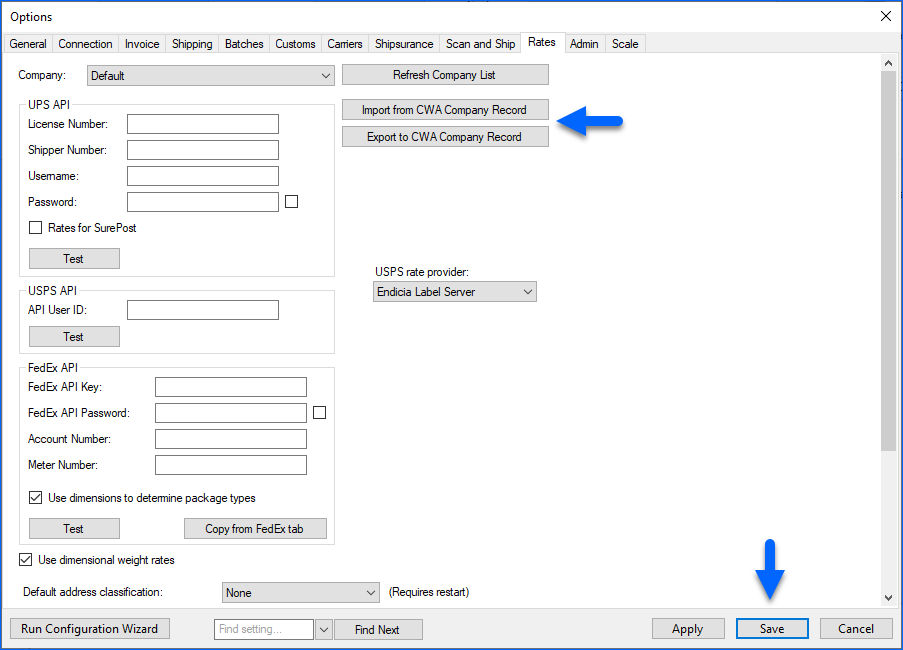
Next, to configure your API Credentials in Shipbridge, navigate to:
- Menu > Options > Rates.
- Enter your API Credentials.
- Click Save.
For USPS, all you require is the USPS API User ID unless you are using an Endicia Label Server account. If you use Dazzle for postage, select USPS Web Tools in the USPS Rate Provider dropdown. For ELS accounts, select Endicia Label Server. If you go with ELS, your Endicia credentials will be pulled from the USPS tab, and you can leave the USPS API User ID field empty.
Alternatively, if your shipping carrier credentials are already configured in Sellercloud, you can import them into Shipbridge. This can be done in the Rates tab > Import from CWA Company Record.
Refer to Shipping API for Calculating Rates for more information on how to configure your API Credentials in Sellercloud.
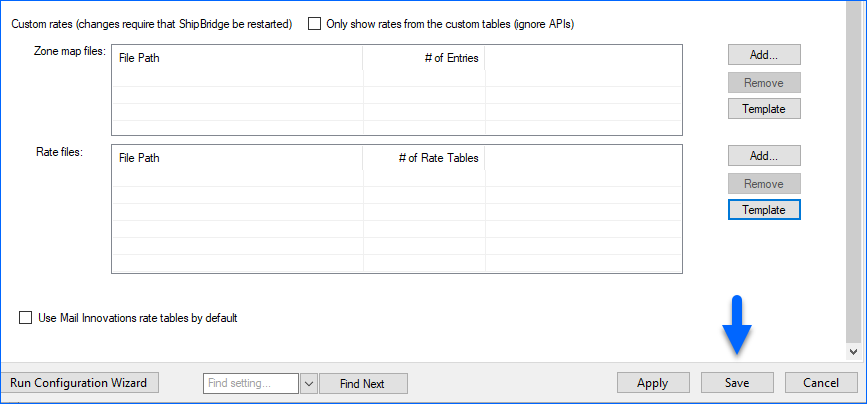
Import a Rate Chart for Certain Carriers
Certain carrier rates, like DHL eCommerce (Global Mail) and UPS Mail Innovation (UPSMI), can’t be fetched through API. Instead, you need to import their rate charts into the Rate Calculator.
To import rates into the Rate Calculator, navigate to:
- Menu > Options > Rates.
- Scroll down to the bottom of the page.
- Click Add to import your rate table. If you are importing a UPSMI rate table, be sure to also enable Use Mail Innovations rate tables by default.
- Click Save.
Calculate Order Shipping Rates
To calculate shipping rates for different orders, follow the steps below:
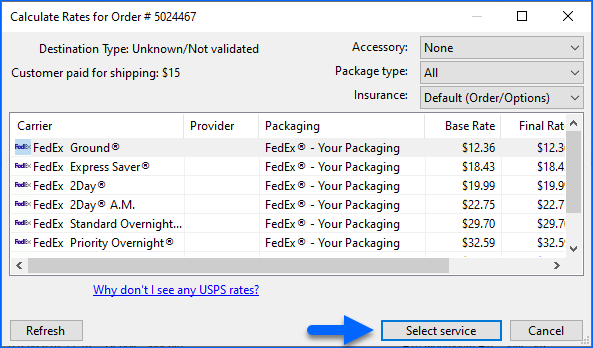
- Select an Order from the grid.
- Click Menu > Rate Calculator, the F6 hotkey, or right-click an order > Calculate Rates.
- A rate window will appear with available services and their rates. To see the amount the customer paid for shipping in the rate grid, enable the setting Show how many customers paid for shipping (on Calculate Rates form) in Menu > Options > Shipping tab.
- The Accessory dropdown field lets you see rates when adding Signature Required or Delivery Confirmation options. A column called Features Rates will appear to show the additional cost for the selected services.
- Select a Package Type to compare rates with different package types. For example, to compare USPS Priority rates for a Flat Rate Box with USPS Priority rates for an Envelope.
- The Provider column displays where you are buying the label from For example, if you have enabled Amazon Services: Buy Shipping, this column will show Amazon. It can also display Endicia.
- Highlight a service on the grid > Click Select service. The selected service and packaging type will populate in the order grid.
Shipping Rate Plugin
By default, you can only calculate rates for one order at a time in the Shipbridge grid. Alternatively, you can configure pre-defined rules for preferred shipping carriers and services or configure a customized Shipbridge Plugin that automatically selects the cheapest rate available based on the order’s estimated delivery date.
Open a ticket with the Sellercloud Support team to request the latest version of our generic Rate Shopper Plugin. You can request additional customizations tailored to your business needs; however, any such customizations may be billable.
You’ll also need to enable the following settings on your Shipbridge application:
- Always Use Cheapest Rate To Ship
- Calculate Rates based on Estimated Delivery Date
- If the above is enabled and you would like UPS SurePost rates to be included in the calculation, you must also enable Use UPS Ground Delivery Days. Otherwise, Shipbridge will not be able to include a Delivery Date in the rate request.
Troubleshoot Carrier Rate Calculations
If carriers or services are not visible during the shipping rate calculation, consider the following troubleshooting options:
- Check if the carrier credentials are valid in Menu > Options > Carrier tab or Menu > Options > Rates tab.
- Confirm that the intended service is enabled by checking Menu > Customize Interface > Shipping Services.
- If shipping to a PO box, review the setting Only Offer USPS services for POB destinations under Menu > Options > Shipping tab, as it may affect the displayed rates.
- Ensure the selected service supports shipping from the specified ShipFrom location to the ShipTo address by checking details such as country, address type, etc.
Relevant Settings
The following related settings are available in the Rates tab:
- Use dimensional weight rates – Uses the Dimensional weight (DIM) in the rates calculation.
- When the rate calculator opens, load pre-selected packaging types – Loads your pre-selected package types when you open the rate calculator. Ensure all package types are unchecked if you want to disable the option.
- Include rates for default/empty package services – Shows rates for all default services and empty packages.
- Default address classification – Select a default address classification from the dropdown list: None, Residential, or Commercial. You must restart Shipbridge after updating this setting.
- Show rates for additional shipper numbers even if the amounts are identical – By default, the rates calculator will not show the additional UPS shipper numbers if the calculated rate is the same as the main account. Enable this setting to view all available UPS shipper number rates.
- Show rates for batch – Allows you to view shipping rates for batch orders.
- Show FedEx Ground rate for residential destinations – Display FedEx Ground rates for residential destinations. Learn more about how to Validate Shipping Addresses.
- Calculate Rates based on Estimated Delivery Date – The rate calculation process will be based on the order’s estimated delivery date.
- Add extra day after – automatically extends the Estimated Delivery date by one day for shipping requests received after the specified cutoff time.
- Use negotiated rates – Implement negotiated rates to ensure you benefit from specially agreed-upon pricing, optimizing cost-effective shipping solutions.
- Only show rates for UPS services – Limits the displayed shipping rates to those offered by UPS exclusively.
- Only show priority services for rush orders – Customize the rate display to show exclusively priority shipping services for orders marked as Rush.
- Allow immediate selection in the rate calculator – When enabled, you will be able to select a shipping service in the rate calculator before all the available options have loaded.
- Prefer USD currency – Shows rates in the calculator in USD instead of the order currency.
- Only show rates from the custom tables (ignore APIs) – Displays rates exclusively from custom tables and disregards information retrieved from carriers via API.
- Use Mail Innovations rate tables by default – Enables rate tables specific to Mail Innovations.