Overview
Serial numbers are unique identifiers assigned to individual units of a product for traceability. They are essential for:
- Verifying authenticity and ownership
- Managing warranties and recalls
- Preventing fraud
- Ensuring regulatory compliance
- Audits and inventory control
Sellercloud supports tracking serial numbers throughout the full product lifecycle and across multiple tools, including Skustack, Receivebridge, and Shipbridge. You can scan and validate serials during receiving, storage, shipping, returns, and audits. All actions are automatically synchronized with your Sellercloud account.
Configure the Serial Numbers Workflow
To configure this workflow, you must enable the Client Setting Enable Serial Number Validation.
To set up a product to require serial numbers during Receiving in Sellercloud, shipping with Scan and Ship, and Warehouse Inventory Transfers:
- Go to the Product Details Page.
- Click Toolbox and select Shipping Preferences.
- Click Edit.
- In the Preferences panel, check Require Serial Number Scan In Scan & Ship.
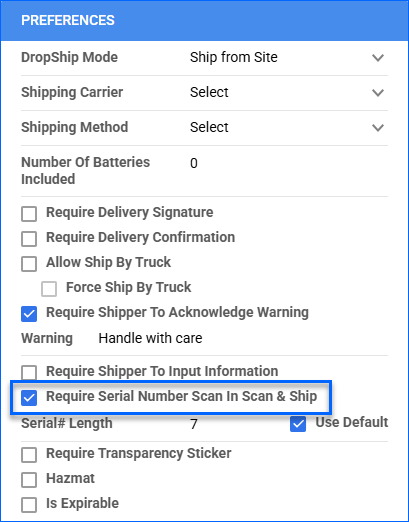
- Click Save.
To set up multiple products at once, do a Bulk Update with the column header RequireSerialNumberScanWhileShipping set to True.
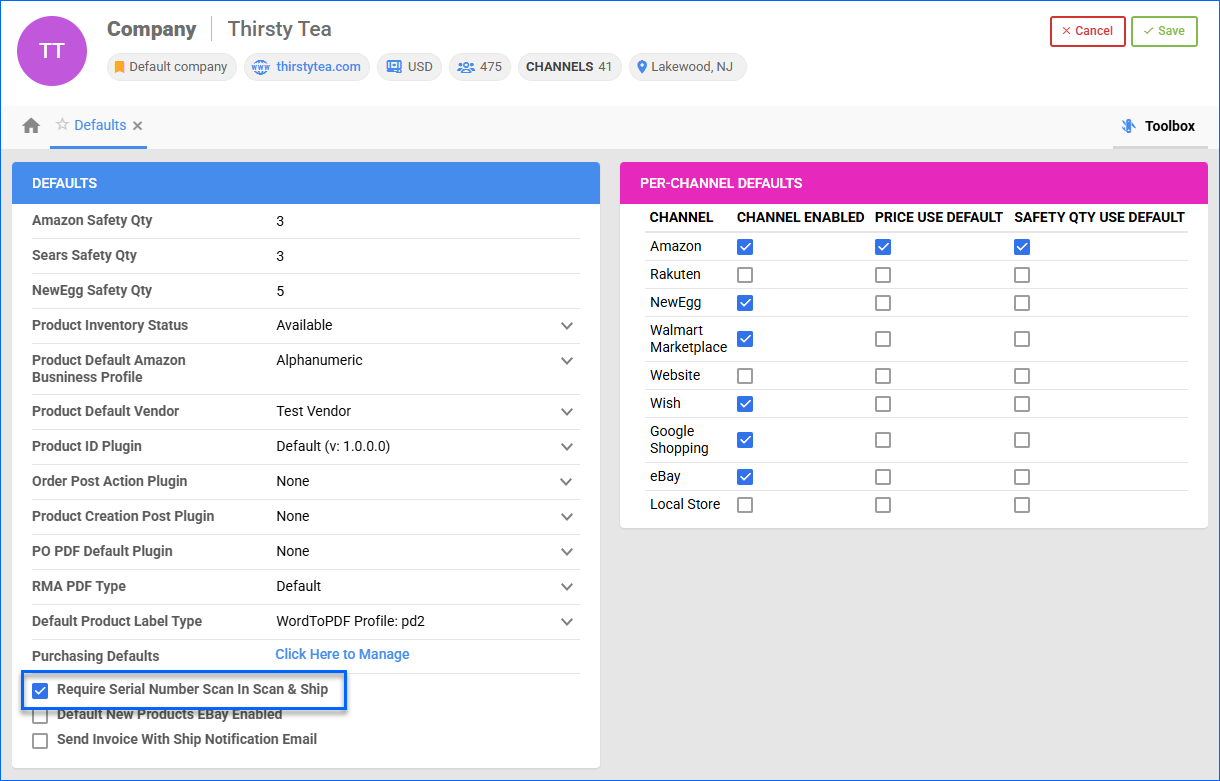
You can also enable this by default for all subsequently created products (it won’t update already existing products) by enabling the Require Serial Number Scan In Scan & Ship setting on the Company Defaults Page.
In addition, the Validate Serial Globally Client Setting sets up Skustack to require serial number scanning for the following:
- Bin-to-bin transfers
- Warehouse or bin adjustments
- Warehouse-to-warehouse transfers
- SKU-to-SKU transfers
- Kit assembly
- Bin cycle counting
- Credit memo picking
- FBA picking
- FBA box content packing
- Put away lists
- One-way transfers
Next, configure the other Related Client Settings, and note that Receivebridge and Shipbridge also have additional settings.
Add Serial Numbers Through a PO
Assigning serial numbers to your products through Purchase Orders allows you to validate them during inventory transfers, shipping, and other workflows.
You can enter serial numbers via Sellercloud or Receivebridge, a tool for managing receiving.
Via Sellercloud
You can add serial numbers manually or by uploading a spreadsheet.
To add serial numbers manually:
- Go to the PO Details Page.
- Click Toolbox and select Serial Numbers.
- Click Edit.
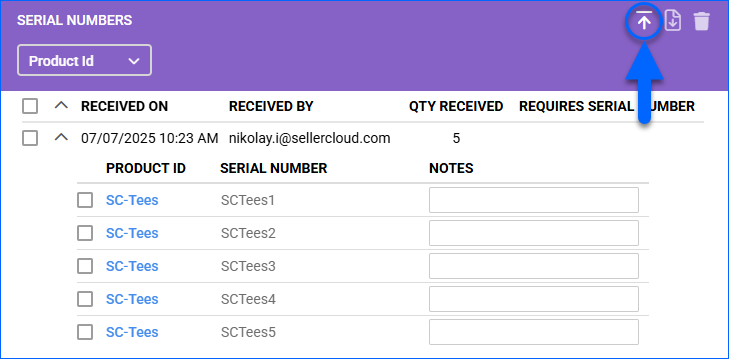
- Click the arrow icon in the Serial Numbers panel to expand the appropriate Receiving Session.
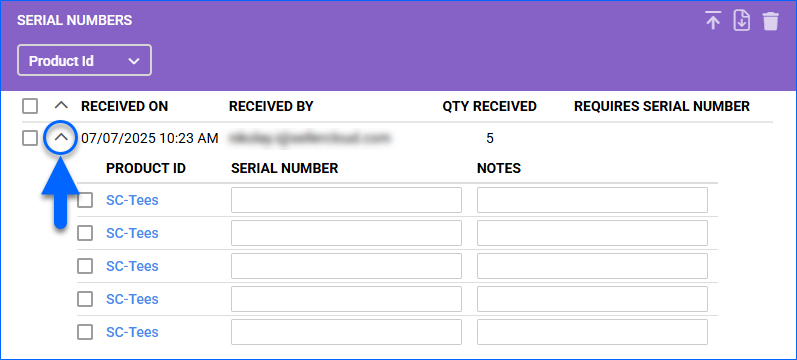
- Enter the serial number of each product unit.
- Click Save.
To add serial numbers from a spreadsheet:
- Go to the PO Details Page.
- Click Toolbox and select Serial Numbers.
- Click Edit.
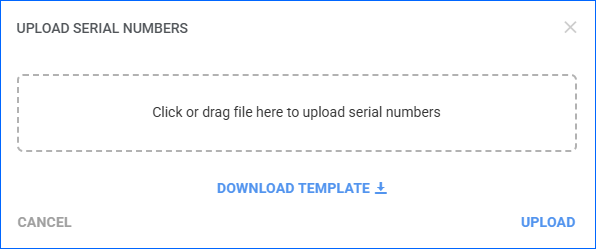
- Click the Upload Serials icon in the Serial Numbers panel.
- Click Download Template.
- Fill out the template file, then drag it into the dashed box area labeled Click or drag file here to upload serial numbers or click inside that box to browse and upload the file.
- Click Upload.
Via Receivebridge
To add serial numbers via Receivebridge:
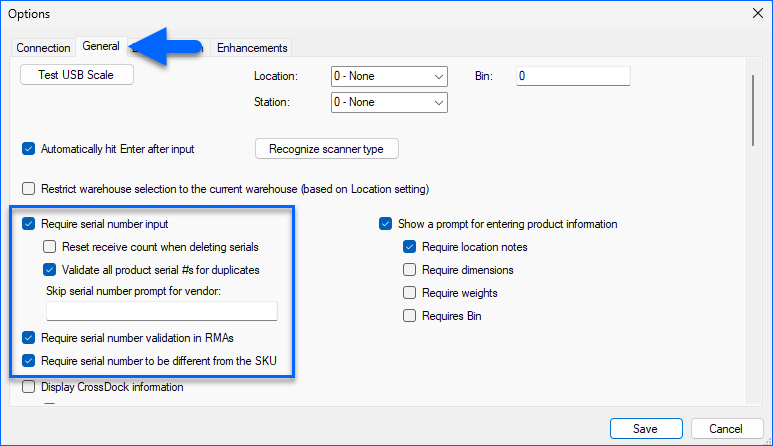
- Go to Menu > Options.
- Under the General tab, check Require serial number input to enforce serial number validation.
- Optionally, you can also enable:
- Reset receive count when deleting serials – When deleting already saved serial numbers, this setting will also subtract the number of deleted serials from the purchase item’s receive count.
- Validate all product serial #s for duplicates – Enforce a check to ensure that no duplicate serial numbers exist.
- Skip serial number prompt for vendor – Bypass the serial number requirement for selected vendors during PO receiving.
- Require serial number validation in RMAs – Enforce validation when receiving a returned item with a serial number scanned during shipping.
- Require serial number to be different from the SKU – Only accept serial numbers that are different from the SKU.
- Click Save.
- Click Refresh List and then select the appropriate PO.
- Click Scan Purchase Order.
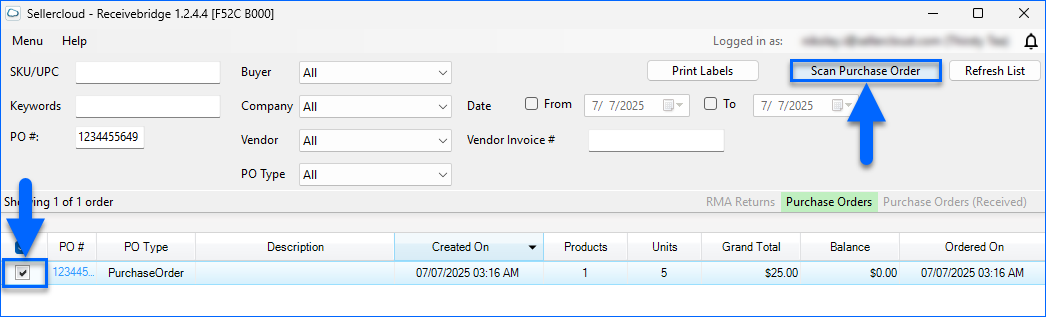
- Enter the product’s SKU, UPC, or EAN and click Mark as Received.
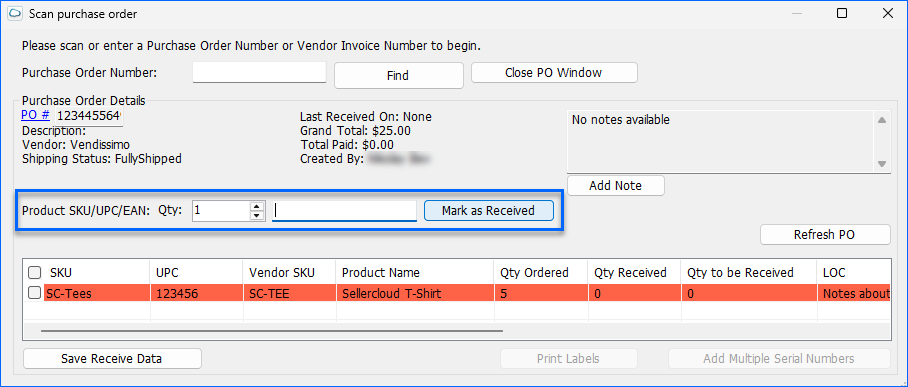
- In the dialog box that appears, scan or input the serial number, then click OK.
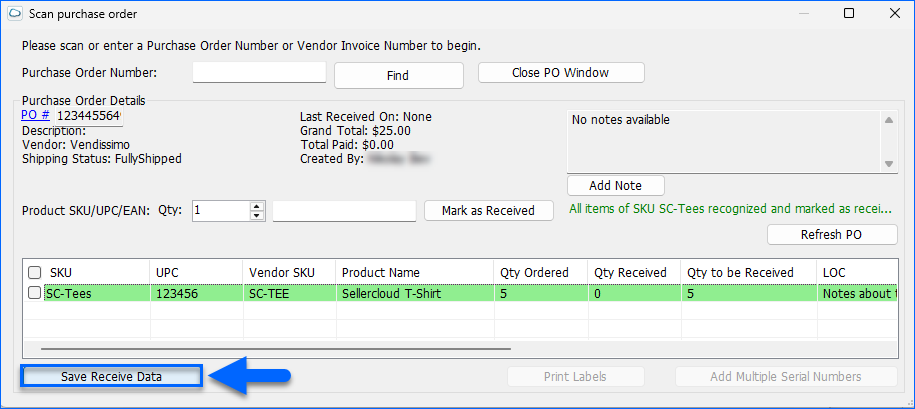
- After processing all items, click Save Receive Data. The inventory calculation will be processed by a Queued Job, and you can see it in Sellercloud.
Add Serial Numbers Without a PO
With the Serial Numbers Product Import plugin, you can import serial numbers to your products from an Excel spreadsheet file.
This option works differently from the standard Spreadsheet Upload Option, where you add serial numbers to products through a PO:
- This method adds serial numbers to SKUs without associating them with a specific PO.
- Each imported serial number increases the product’s in-stock quantity by 1 unit. Therefore, you can import serial numbers regardless of your current inventory.
- The plugin requires you to specify the exact warehouse and bin where you want to add the serial numbers. The warehouse and bin must exist, even if bins are not currently Enforced for the warehouse. Otherwise, the plugin will skip adding the corresponding serial numbers.
To use this functionality:
- Open a ticket with Sellercloud Support and request the Serial Numbers Product Import plugin.
- Verify that the Client Setting Enable Warehouse Bin (WMS) is enabled.
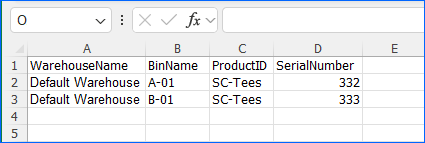
Next, prepare an Excel spreadsheet with the following headers:
- WarehouseName – The name of the warehouse where you are adding the serial number.
- BinName – The name of the bin where you are adding the serial number.
- ProductID – The product’s SKU.
The plugin supports Shadow Products; the inventory of the parent will increase, and the serial numbers will be added there.
- SerialNumber – The product’s serial number.
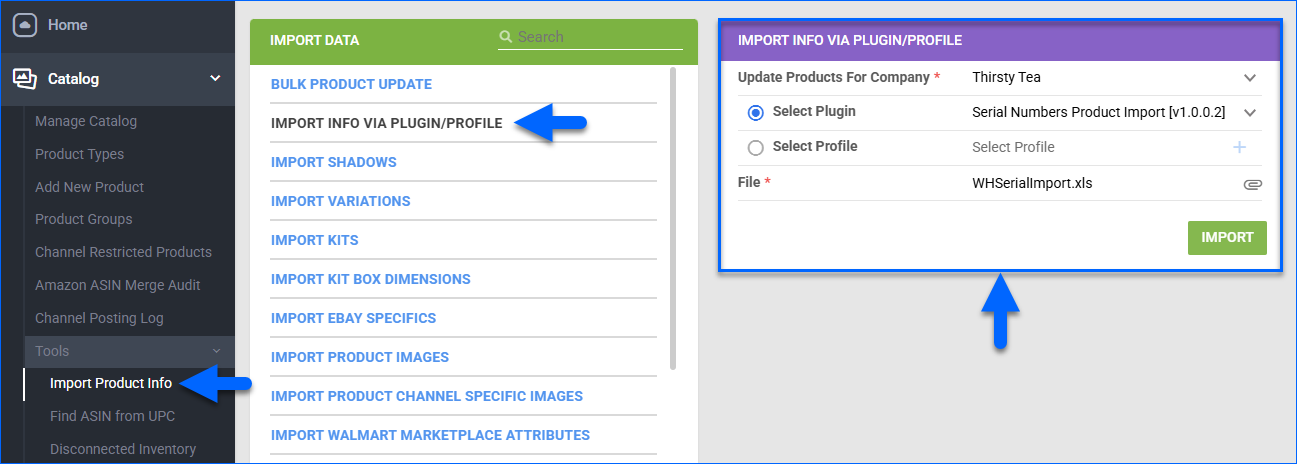
Finally, to upload your spreadsheet, go to Catalog > Tools > Import Product Info, select Import Info Via Plugin/Profile, and select the Serial Numbers Product Import plugin.
Add Serial Numbers to Orders
Adding serial numbers to orders ensures correct validation during fulfillment and improves order and inventory management.
You can prepare your orders for shipment from Sellercloud or via Shipbridge when using Scan and Ship.
Via Sellercloud
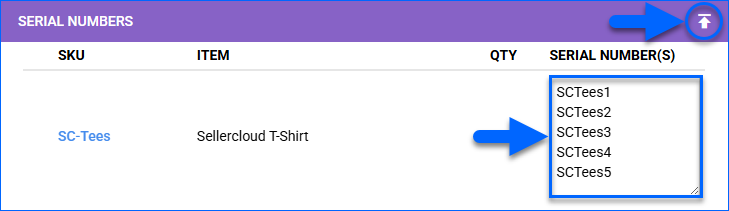
To ship inventory with serial numbers from Sellercloud:
- Go to the Order Details Page.
- Click Toolbox and select Serial Numbers.
- Click Edit.
- In the Serial Numbers panel, expand the appropriate SKU and enter a unique serial number for each item in the list. Sellercloud’s Mobile Application supports barcode scanning using your phone’s camera.
- Alternatively, you can add serial numbers from a spreadsheet by clicking the Upload Serials icon.
- Click Download Template.
- Fill out the template file, then drag it into the dashed box area labeled Click or drag file here to upload serial numbers or click inside that box to browse and upload the file.
- Click Upload.
- Ship the Order.
Via Shipbridge
First, configure the related settings. The following settings are available under Menu > Options > Scan and Ship:
- Require Serial Number validation – Enable serial number validation and prompt shippers to enter a serial number when using Scan and Ship.
- Require serials to match PO (product in stock) – Shipbridge will verify that serial numbers scanned during shipping match those assigned to received POs and ensure that they are in stock.
- Use unique serial numbers – Each serial number must be unique and cannot be reused.
- Allow manual serial # input (overriding validation) – Enable manual serial number input, eliminating the need to scan and overriding validation, which means that any serial number will be accepted.
- Allow scanning products by serial number – Enable scanning by serial numbers instead of SKU or UPC to process products faster.
- Use replacement product, when scanned serial number matches – Allow a scanned serial number to resolve to a Replacement Product, substituting the order item without manual intervention.
- Serial scan wait time (sec) – The number of seconds Shipbridge waits after the user begins entering or scanning a serial number before automatically accepting the input. This setting is useful for scanners that do not append an Enter key at the end of a scan.
- Skip all product related scans (SKU, Serial, Lot) – Skip scanning (the Check products step) to speed up shipping and confirmation label printing.
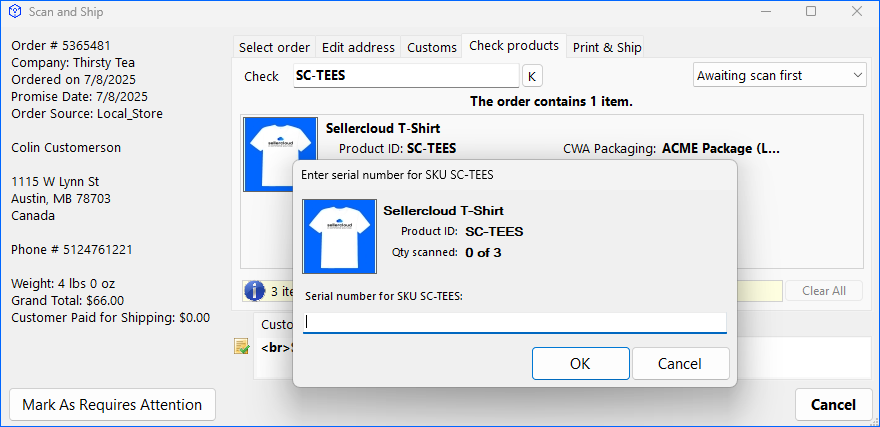
To scan serial numbers while shipping:
- Select the appropriate order(s).
- Click Scan and Ship.
- Scan or enter the item’s SKU or UPC.
- Scan or enter its serial number.
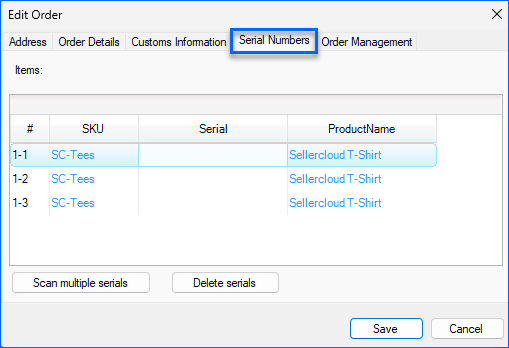
You can also add (manually or by scanning), update, or delete the serial numbers associated with an order even before shipping by right-clicking an order in the grid, selecting Edit Order, then selecting the Serial Numbers tab.
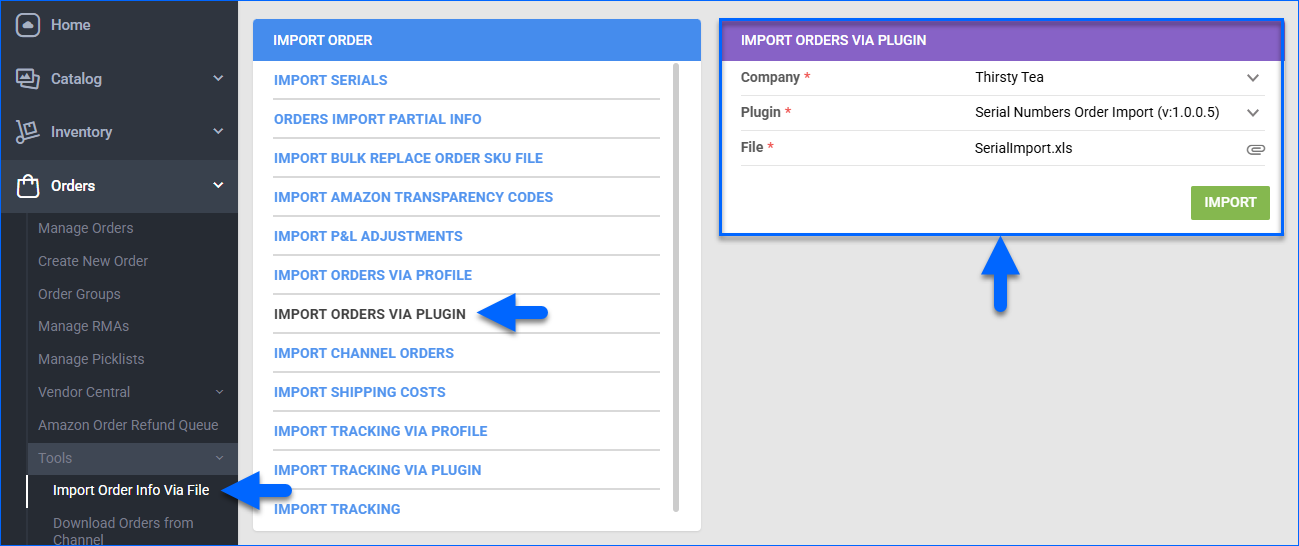
Via Plugin
With the Serial Numbers Order Import plugin, you can import serial numbers to your orders directly from an Excel spreadsheet file.
The plugin checks which PO the serial numbers are linked to, pulls the Item Cost of the SKUs on that PO, and uses it for the P&L calculation.
Enable these Client Settings:
- Enable Serial Number Validation
- Enable Order Profit And Loss By Serial Numbers
Next, prepare an Excel spreadsheet with the following headers:
- OrderID – The order number.
- ProductID – The product’s SKU.
- Serial # – The product’s serial number.
The serial number must exist on the product. The plugin will not create serial numbers that don’t currently exist.
To upload your spreadsheet, go to Orders > Tools > Import Order Info Via File, select Import Orders Via Plugin, and select the Serial Numbers Product Import plugin.
Track Serial Numbers
Once you add a serial number to Sellercloud, the system generates a log detailing its history. This allows you to track serial number activity across purchase orders, inventory transfers, sales orders, shipping, and FBA shipments.
There are two ways to access this log in Sellercloud:
- To view info for one or more products in your account, use the Product Serials Report. See the linked article for step-by-step instructions and more information.
- For a specific product, go to the Product Details Page > Toolbox > Serial Numbers tab.
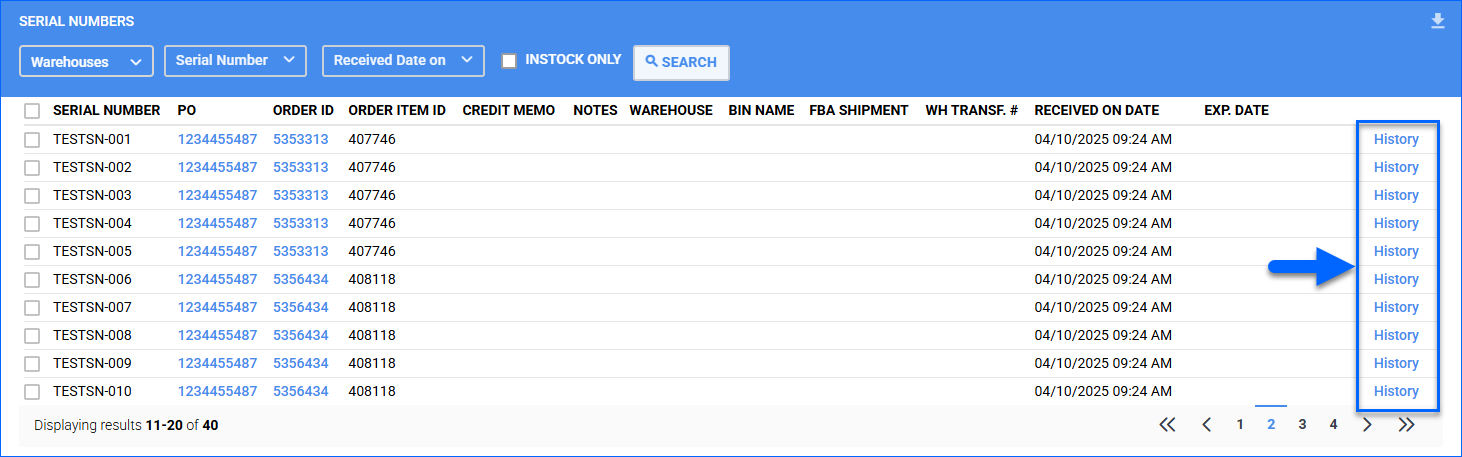
To track a specific product’s serial numbers:
- Go to the Product Details Page.
- Click Toolbox and select Serial Numbers.
- You can use the filters at the top to see specific serial numbers:
- Warehouses – Show only serial numbers of units in a specific warehouse.
- Serial Number – Search by a specific serial number.
- Received Date on – Show only units received within a specific date range.
- In Stock Only – Show only serial numbers that are currently in stock.
- Click the History link to the right of the serial number to view a log of its past activity.
You can also search by serial number across several areas:
- Use the Global Search Bar to locate products by serial number
- Filter by serial number on the Manage Catalog, Manage Purchase Orders, and Manage Orders pages
Delete Serial Numbers
Sellercloud allows you to delete serial numbers from a product or a PO.
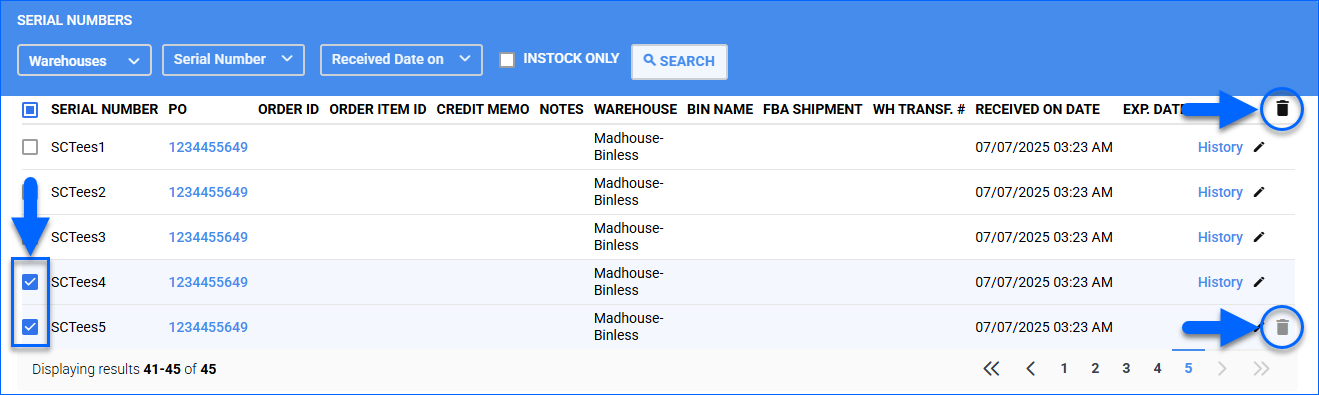
From a Product
To delete serial numbers from a product:
- Go to the Product Details Page.
- Click Toolbox and select Serial Numbers.
- Click Edit.
- To delete a single serial number, hover over its row in the grid and click the Delete icon that appears on the right.
- To delete multiple serial numbers, select them and then click the Delete icon at the top.
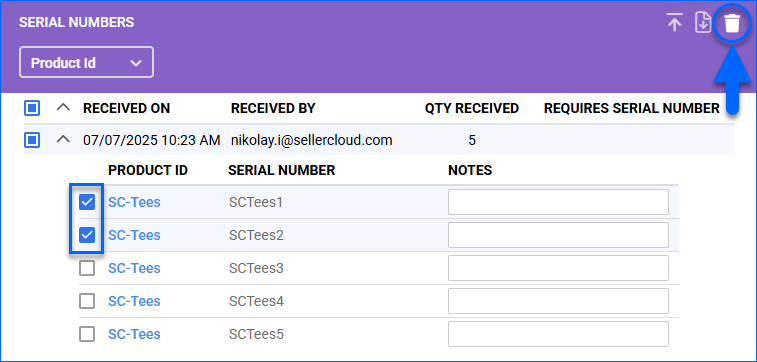
From a PO
To delete serial numbers from a PO:
- Go to the PO Details Page.
- Click Toolbox and select Serial Numbers.
- Click Edit.
- Select the serial number(s) to delete.
- Click the Delete Serials icon.
Export Serial Numbers
To download Inventory Arrivals with serial numbers to a spreadsheet:
- Go to Inventory > Inventory Arrivals.
- Select SKUs to export.
- Click the Actions menu and select Export With Serials.
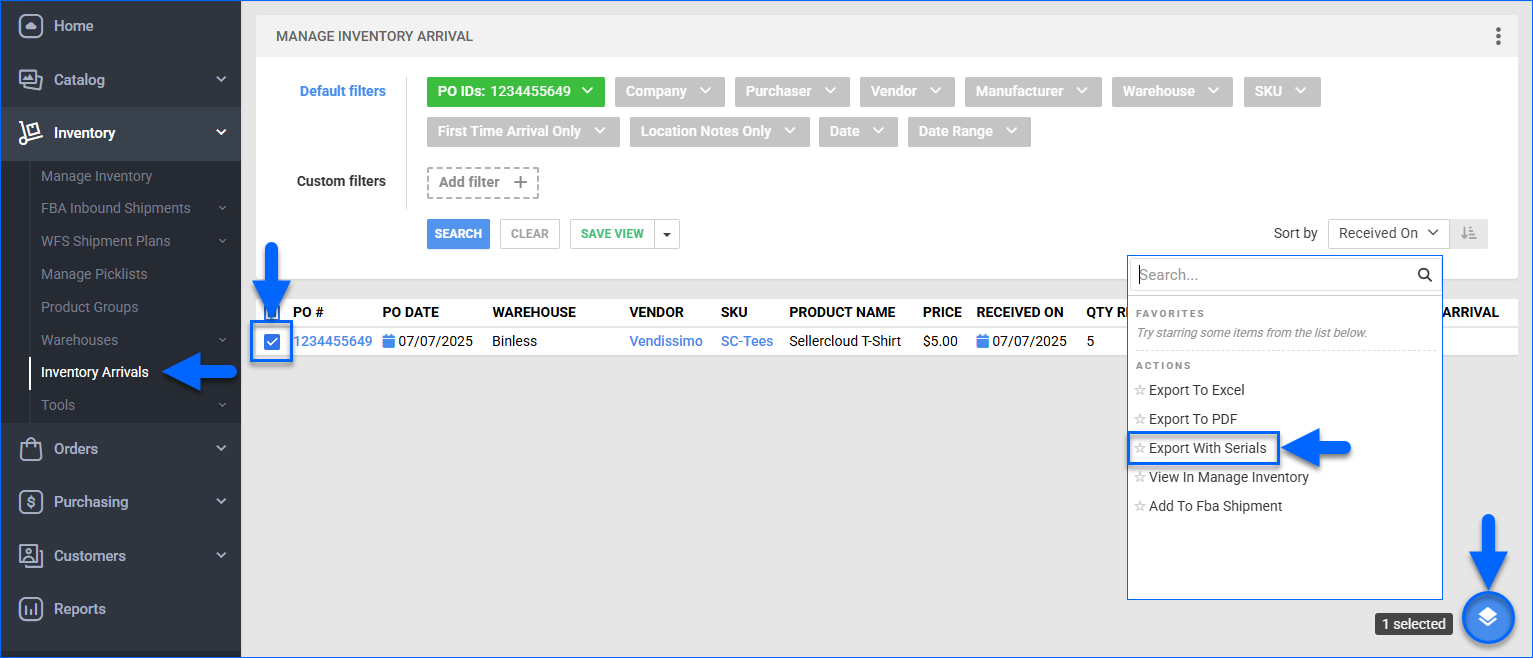
- The spreadsheet includes a SerialNumber column.

Related Client Settings
The following Client Settings control your serial numbers workflow:
- Enable Serial Number Validation – Require products’ serial numbers to match serial numbers on received POs. This setting only controls the validation process within Sellercloud. Shipbridge and Receivebridge have independent settings for validation. These tools do not require Enable Serial Number Validation to be enabled in Sellercloud.
When enabled, you can’t Delete Serial Numbers by going to the Product Details Page > Toolbox > Serial Numbers tab.
- Validate Serial Globally – Enable validation in Skustack, prompting for a serial number scan to complete the following actions:
- Bin-to-bin transfers
- Warehouse or bin adjustments
- Warehouse-to-warehouse transfers
- SKU-to-SKU transfers
- Kit assembly
- Bin cycle counting
- Credit memo picking
- FBA picking
- FBA box content packing
- Put away lists
- One-way transfers
- Enable Product Serial Number Length Validation – Require a specific length for all serial numbers. Adding serial numbers with fewer or more characters will generate an error. When this setting is enabled, you can select a different length for a specific product by going to the Product Shipping Preferences page, unchecking the Use Default box next to Serial# Length, and setting another length there.
- Default Length Product Serial Validation – Choose the required length for serial numbers. This length applies only if Use Default is checked on the Shipping Preferences page.
- Transfer Serial Numbers While Transferring Inventory Between Warehouses – Require serial numbers to complete a Warehouse Inventory Transfer.
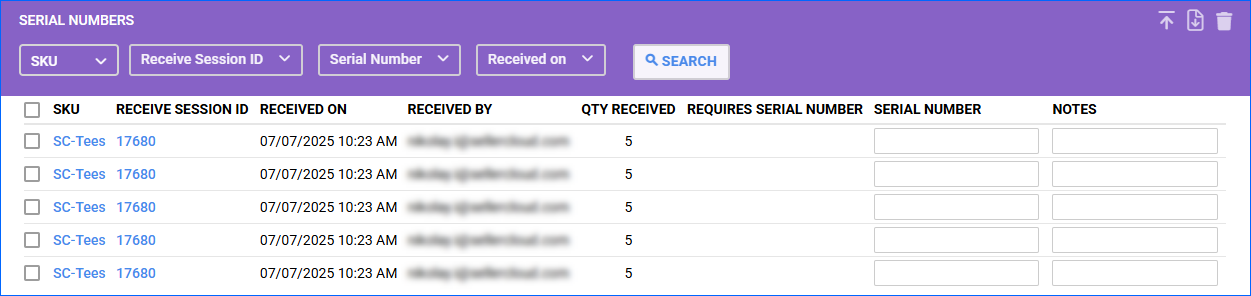
- Use Simple Grid For PO Serial Numbers Toolbox – Changes the Serial Numbers panel on the Product Details Page. When disabled, serials are grouped by Receiving Session and can only be viewed if you click the arrow to expand the dropdown. With this setting enabled, you will see a simplified grid that loads quicker and offers more filtering options.
- Enable Order Profit And Loss By Serial Numbers – When a serial number is received on a PO, its specific price will be stored and used on the P&L when that unit is sold.