Overview
Sellercloud can mark orders with a Backorder status when a customer orders an out-of-stock item. This allows you to fulfill the order at a later time once you replenish the inventory for that product.
There are several ways to handle backorders:
- Reallocate inventory
- Dropship from a vendor
- Delay the shipping or cancel the order
- Configure automated emails to notify your customers
Backorders
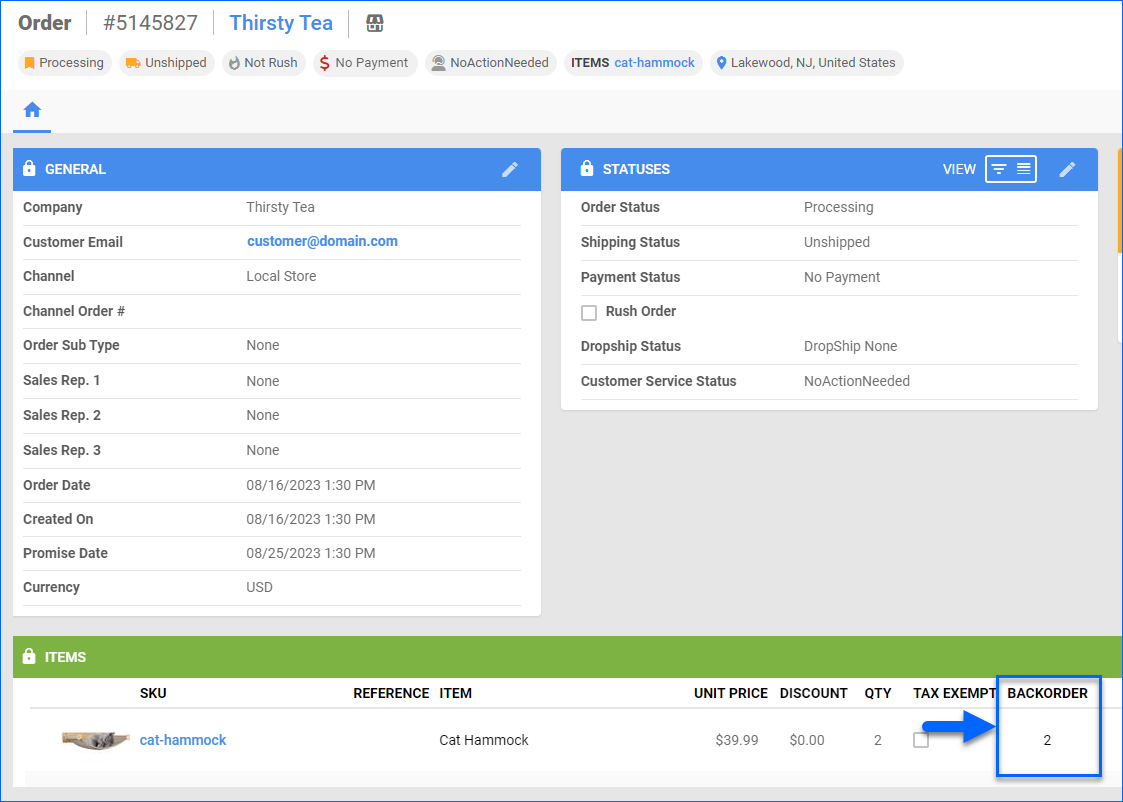
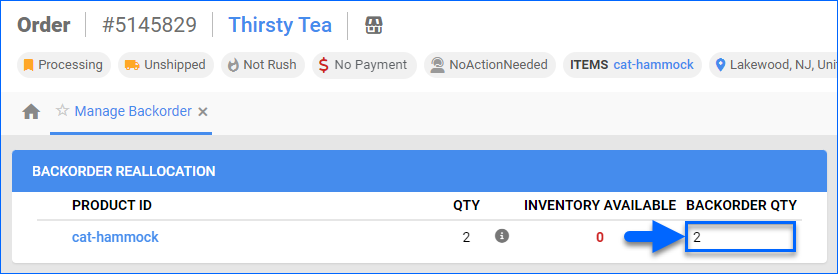
The Backorder quantity is available on the Items panel of the Order Details page. The backorder quantity equals the number of insufficient product units that are required to fulfill the order. When inventory becomes available, this quantity is adjusted, and the order status gets updated accordingly.
Search Backorders
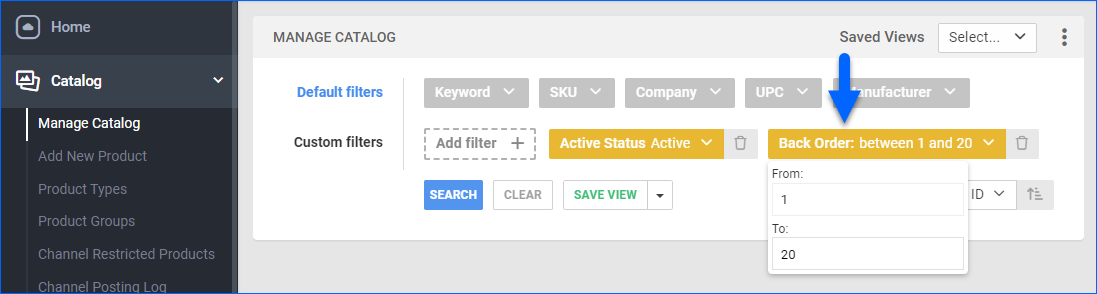
To search for backordered products:
- Go to Catalog > Manage Catalog or Inventory > Manage Inventory.
- Click Add filter and select Back Order.
- Click the Back Order filter and select the From / To backorder quantities to search for.
- Click Search.
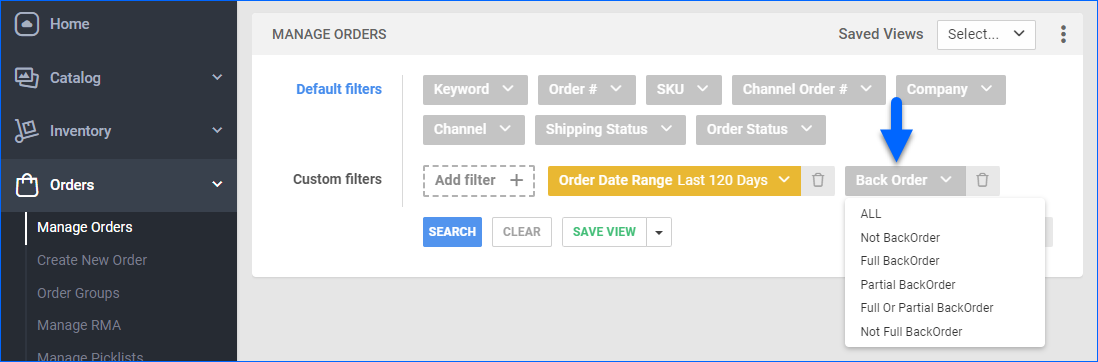
To search your orders by backorder status:
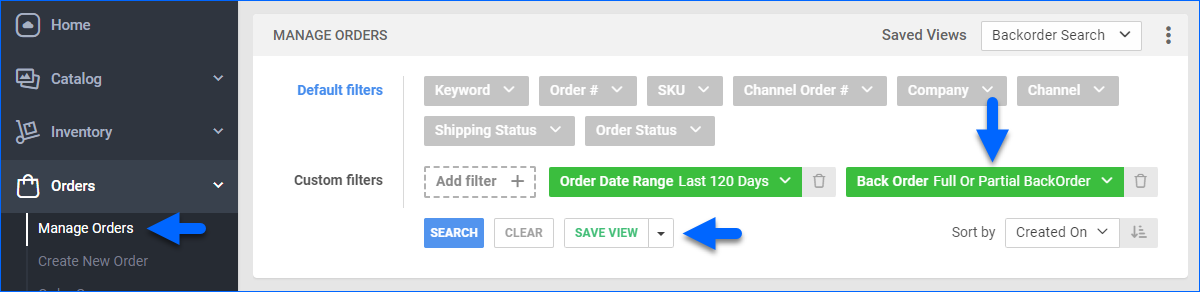
- Go to Orders > Manage Orders.
- Click Add filter and select Back Order.
- Click the Back Order filter and select a backorder type.
- Click Search.
Manage Backorders
The following order-related actions affect your orders’ backorder status. When they occur, the backorder status and quantity are immediately updated:
- An order gets Split
- Items get added or Replaced
- Inventory becomes available through a PO Receive
When inventory becomes available, older orders get updated first. If you Manually Adjust or Set the Physical inventory of an item, you can force the recalculation of one or more backorders instead of reallocating inventory or waiting for the BackOrderReCalculateService to rerun.
Update Backorders
To manually update orders:
- Go to Orders > Manage Orders.
- Search and select orders by checking the boxes on the left.
- Click the blue Actions icon in the bottom right corner.
- Search for Backorder and select from these actions:
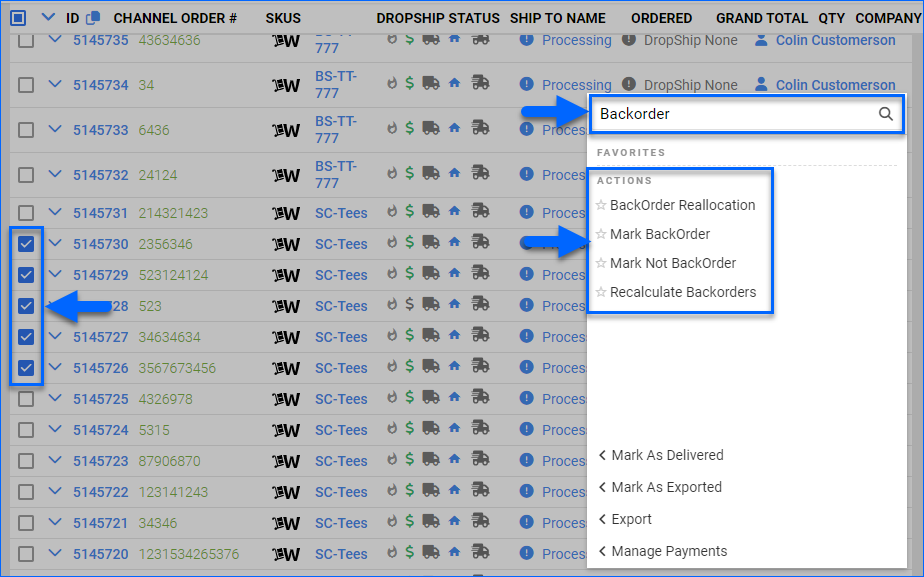
- BackOrder Reallocation – Edit the backorder quantity. This is useful when you want to reallocate an order’s backordered item to fill the backorder quantity on another order and ship it immediately. Note that your changes will be overwritten when the BackOrderReCalculateService re-runs based on the quantity available and the backorder-related Client Settings.
- Mark BackOrder – Mark orders as backorders.
- Mark Not BackOrder – Unmark orders as backorders.
- Recalculate Backorders – Recalculate the selected backorders immediately based on the currently available product quantities.
- BackOrder Reallocation – Edit the backorder quantity. This is useful when you want to reallocate an order’s backordered item to fill the backorder quantity on another order and ship it immediately. Note that your changes will be overwritten when the BackOrderReCalculateService re-runs based on the quantity available and the backorder-related Client Settings.
You can also manage backorder reallocation action for a specific order:
- Go to the Order Details Page.
- Click Toolbox and select Manage Backorder.
- On this page, you can see the quantity on order, the currently available inventory, and the backorder quantity. Click Edit, then update the Backorder Qty field and click Save.
Workflow Automation
Sellercloud also allows you to automate parts of your backorder workflow:
- Create a Saved Search with the Back Order filter.
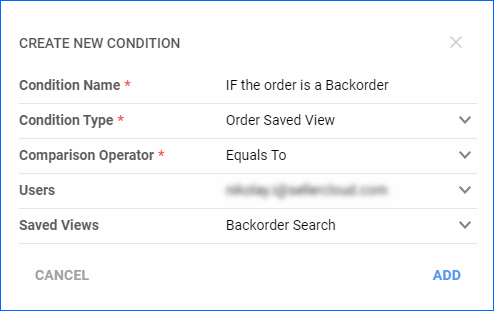
- Create a new rule with the Order Rule Engine with a condition where the Condition Type is Order Saved View, then select the saved search created in Step 1.
- Add Actions to apply to your backorders automatically.
Email Customers
You can automate the backorder workflow further by notifying customers about cancellations or shipping delays. You do this by creating an email template and configuring it to be sent automatically whenever a backorder occurs.
- Go to Company Settings.
- Click Toolbox and select Email Settings > Email Templates.
- Click Add New Template.
- Create a customized template to be used when an item is out of stock. You can personalize your template with Placeholders.
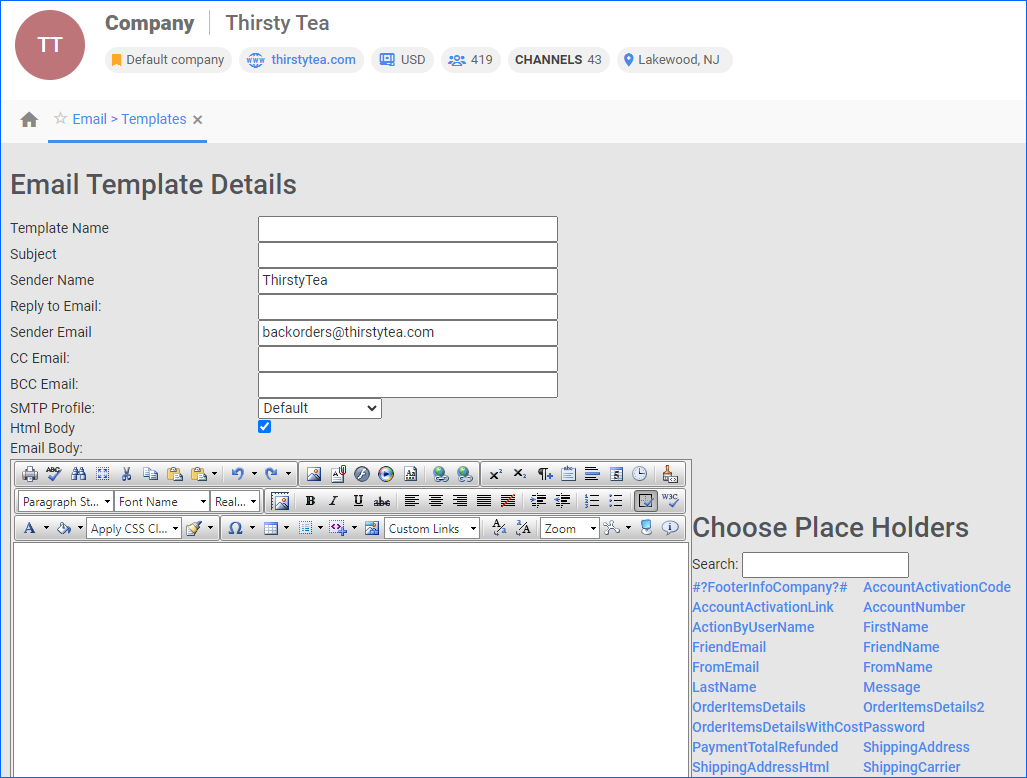
- Click Save Template.
- Click Toolbox and select Email Settings > Email Template Assignment. Here, you can select email templates to send automatically in specific scenarios.
- Click Edit.
- Scroll down to EmailCustomerForBackOrder and choose your email template.
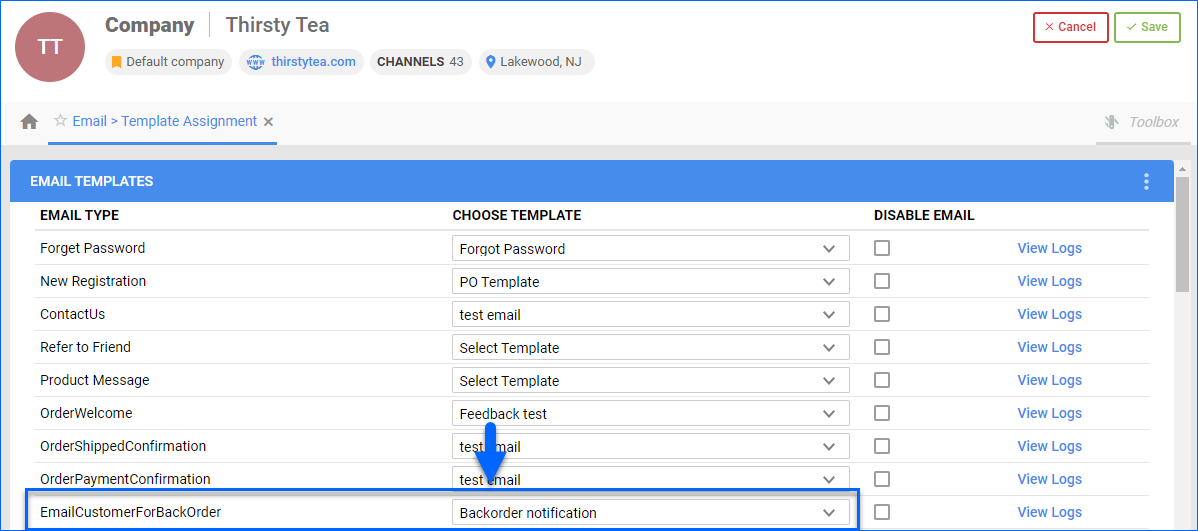
- Click Save. This email will be sent whenever an order is marked as a Backorder.
Configure Shipbridge
Shipbridge also has settings related to backorders.
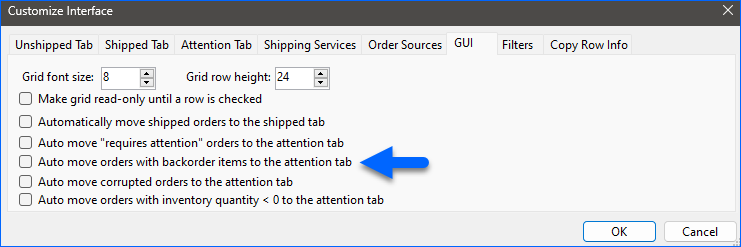
You can move all backorders to Shipbridge’s Requires Attention tab instead of the Unshipped tab. To enable this option:
- Go to Menu > Customize Interface.
- Select GUI.
- Check Auto move orders with backorder items to the attention tab.
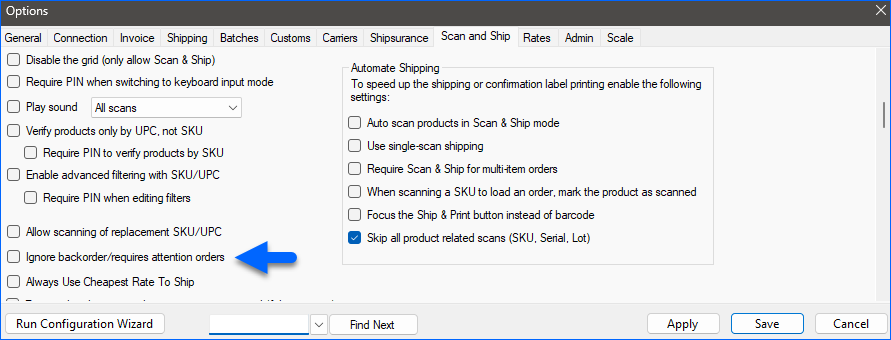
You can hide all backorders from Shipbridge’s Scan and Ship tab when entering or scanning those orders, so you will not try to ship a backorder when you have no item(s) available in the warehouse. To enable this option:
- Go to Menu > Options.
- Select the Scan and Ship tab.
- Click Ignore backorder/requires attention orders.
Shipbridge also has a filter for backorders called Back Order Status.

Client Settings
Below are the Client Settings that affect Sellercloud’s backorder calculation and general functionality.
General Settings
- Enable BackOrder Workflow – Enables all backorder functionality.
- BackOrder: Max Days to bo Back – Enable to set a specific past number of days to include in the backorder calculation. If an order is older, it will not have its backorder status changed.
- Update BackOrder status on Order Status Change – Disabled by default. Enable to automatically recalculate the backorder status based on the currently available inventory anytime an order’s status is changed from any status to On Hold or Quote or vice versa.
- Hide BackOrder Column In Manage Orders – Enable to hide the Backorder Qty column on the Manage Orders Page.
- Enable per OrderItem based BackOrder in PickList – Controls how the Mark Backorder action on the Picklist Details page works. If this setting is enabled, it will mark the items as backorder even if they have enough inventory. This setting is available only in Alpha.
- Stop Marking Orders as BackOrder while Creating Orders – Enable to prevent orders’ backorder status from being set upon creation. The backorder status will still be updated once the BackOrderReCalculateService runs.
- Do Not Send BackOrder Tags To Magento – Enable to prevent Sellercloud from sending the <backorders> and <use_config_backorders> tags to Magento.
Calculation Settings
- Use Payment Date Instead of Order Creation in Backorder Calculation – Enable to use the Payment Date instead of the Order Date when allocating product inventory for backorders during calculation.
- Use Warehouse-Based BackOrder Calculation – Enable to calculate backorder per product, based on the Ship From warehouse set on the order. This will not do the calculation for FBA, Interim, or Untested Warehouses.
- Don’t consider Dropship WH Qty as Available Qty for BackOrder calculation – Enabled by default. Excludes product quantities in Dropship Warehouses from the backorder calculation. You can use this when importing inventory from a vendor into a dropship-type warehouse, and you don’t want this inventory to be considered available.
- Don’t consider Unsellable WH Qty as Available Qty in Backorder Calculation – Enabled by default. Excludes product quantities in Unsellable Warehouses from the backorder calculation.
- Consider ReplacementSKU Qty in BackOrder Calculation – Disabled by default. If an item is out of stock, but its Replacement SKU has stock, the order will not be marked as a backorder.
- Include Authorized Orders In BackOrder Calculation – Enable to include orders with their Payment Status set to Authorized in the backorder calculation.
- Include OnHold Orders In BackOrder Calculation – Enable to include orders with their Order Status set to On Hold in the backorder calculation.
- Include Unpaid and Partially Paid Orders In BackOrder Calculation – Enabled by default. Orders with a Payment Status of Unpaid, Partially Paid, and Partially Refunded will be included in the backorder calculation.
- Prioritize Fully-Shippable Orders in BackOrder Calculation – Enable to prioritize the allocation of available quantity to the order with the minimum required quantity that can be fulfilled when recalculating backorder quantities. This setting is useful when dealing with multiple backorders with different quantities. For example, if an order for 40 items with 10 on hand, and a second order for 10 comes in later, this setting will allocate quantity to the second order instead of reserving it for the first. As usual, it will try to do this for the oldest orders first.
- Prioritize Rush Orders in Backorder Calculation – Enable to prioritize the allocation of available quantities to Rush Orders when recalculating backorder quantities.
- Prioritize Picked Orders in Backorder Calculation – Enable to allocate available quantities to picked orders when recalculating backorder quantities.