Overview
When an order is created in Sellercloud, it is automatically assigned a shipping warehouse, also known as the Ship From warehouse, based on pre-defined settings and logic. You can customize the assigned location according to the sales channel or fulfillment method, such as dropshipping or shipping through FBA. The available options to assign a Ship From warehouse are:
If no specific settings are selected, Sellercloud will assign the Default Warehouse and deduct inventory from it, regardless of where inventory is available.
Channel Warehouses
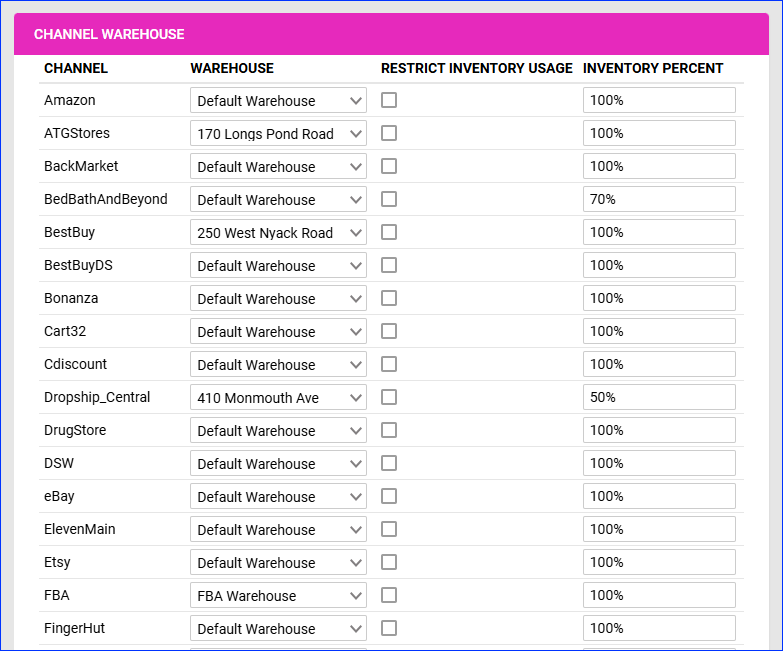
The Channel Warehouse settings let you automatically assign a Ship From warehouse for all orders from a specific channel. To set up channel warehouses:
- Go to your Company Settings.
- Click Toolbox and select Channel Warehouse.
- Click Edit.
- Choose a warehouse for each channel.
- To set a default Ship From warehouse for FBA orders, set up an FBA-type warehouse and assign it to the relevant FBA channel. The same applies to WFS.
- Click Save.
Dropship Warehouses
To select a default dropship warehouse per vendor:
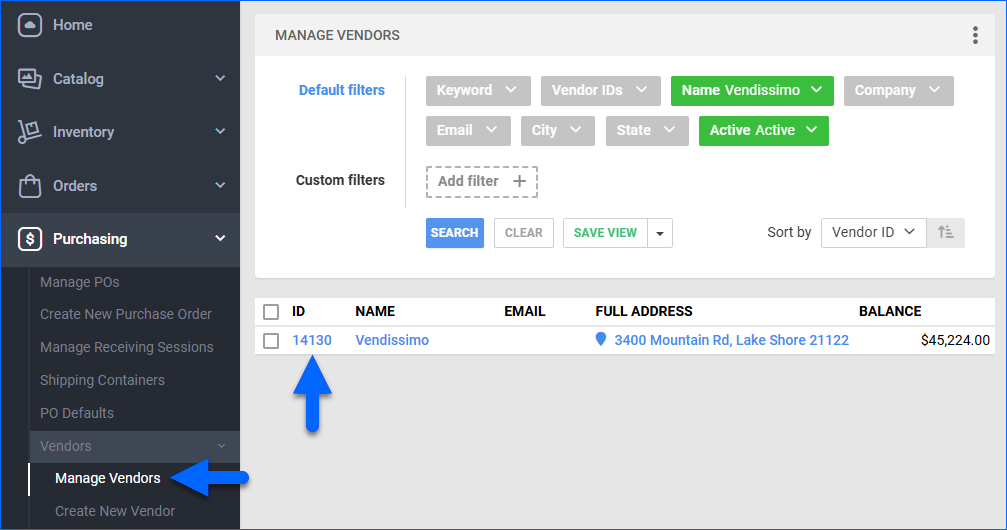
- Go to Purchasing > Vendors > Manage Vendors.
- Open the desired vendor profile.
- Click Edit.
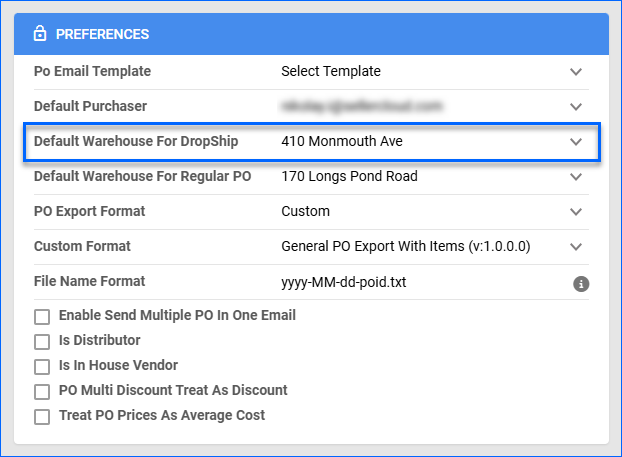
- Update the Default Warehouse For DropShip field in the Preferences panel.
- Click Save.
Order Rule Engine
With the Order Rule Engine, you can set up rules that check if orders meet certain Conditions and then automatically change the shipping warehouse.
You can also execute rules at any time, making the Order Rule Engine a great way to bulk-update the shipping warehouse of multiple orders manually. To do this:
- Go to Settings > Orders > Rule Engine > Manage Rules.
- Click the rule’s ID to open the Rule Details page.
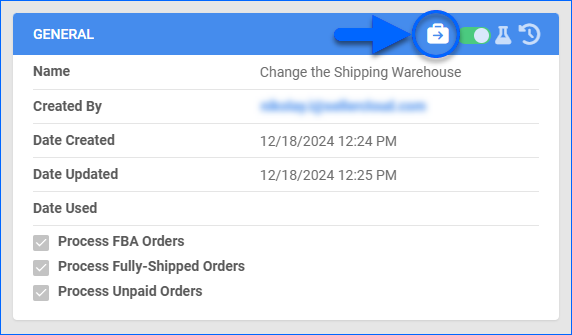
- Click the Execute Rule on Orders icon at the top right of the General panel.
- Enter a comma-delimited list of Order Numbers.
- Click Execute.

You can configure the Order Rule Engine to execute three actions to update the shipping warehouse:
- Update Ship From Warehouse
- Split Order By Warehouse Availability
- Execute Post Order Plugin
Update Ship From Warehouse
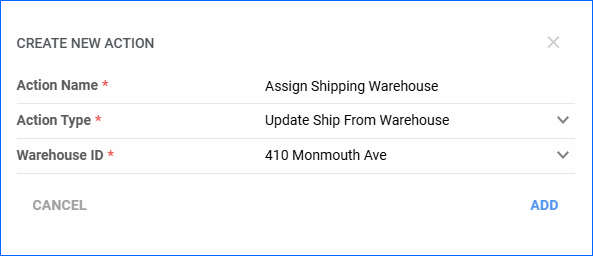
Set the Action Type to Update Ship From Warehouse to always assign the selected Warehouse ID.
Split Order
The Split Order action is more complex. For each order item, the Order Rule Engine:
- Checks multiple warehouses one by one in a specific order for available inventory.
- Assigns the first warehouse with sufficient inventory to fulfill it.
- If multiple warehouses are required to fulfill all items, the rule engine Splits Orders based on the shipping warehouse.
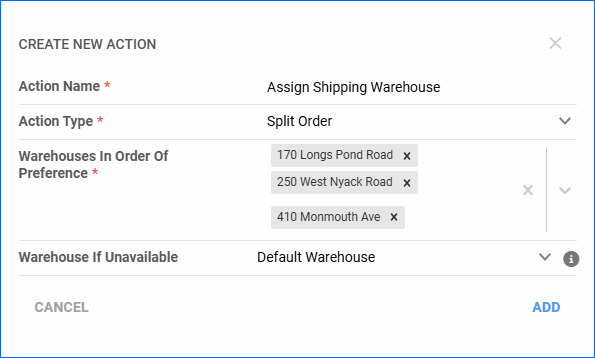
Set the Action Type to Split Order and configure the settings below:
- Warehouses In Order Of Preference – Select warehouses in order of preference. The Order Rule Engine will assign the first warehouse with sufficient inventory.
- Warehouse If Unavailable – Select a fallback warehouse to assign if none of the preferred ones have an in-stock quantity.
Execute Post Order Plugin
The Execute Post Order Plugin action allows you to execute a post-order plugin. Before configuring this action, you must set up the custom settings described in the Plugins subsections.
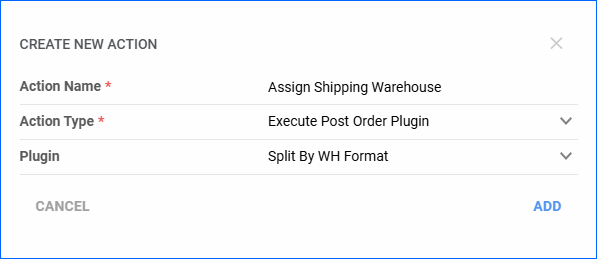
Then, set the Action Type to Execute Post Order Plugin and select the Plugin.
Post-Order Plugins
With Post-Order Plugins, you can automatically assign shipping warehouses based on specific rules.
To set up a post-order plugin:
- Go to your Company Settings.
- Click Toolbox and select Custom Settings.
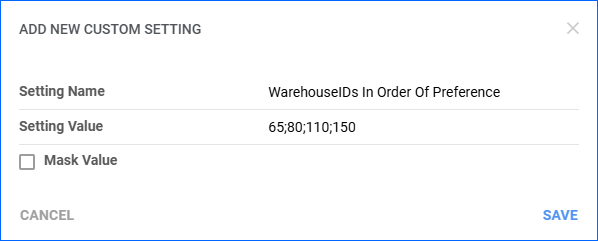
- Click the Add New Custom Setting + icon.

- Enter the Setting Name as described in the following sections.
- Configure the Value field as described in the following sections.
- Click Save. Repeat this process until you have added and configured all of the plugin’s settings.
- To enable the plugin, click the company’s Toolbox and select Channels > Defaults.
- Click Edit.
- Select the plugin from the Order Post Action Plugin dropdown menu.
You can only run one post-order plugin per company with the Company Defaults Page‘s Order Post Action Plugin setting. In addition, it only works if the Client Setting Enable Rule Engine Action For Post Order Plugin is disabled. If this Client Setting is enabled, you must use the Order Rule Engine to execute the post-order plugin. With the Order Rule Engine, you can execute more than one post-order plugin per company. - Click Save.
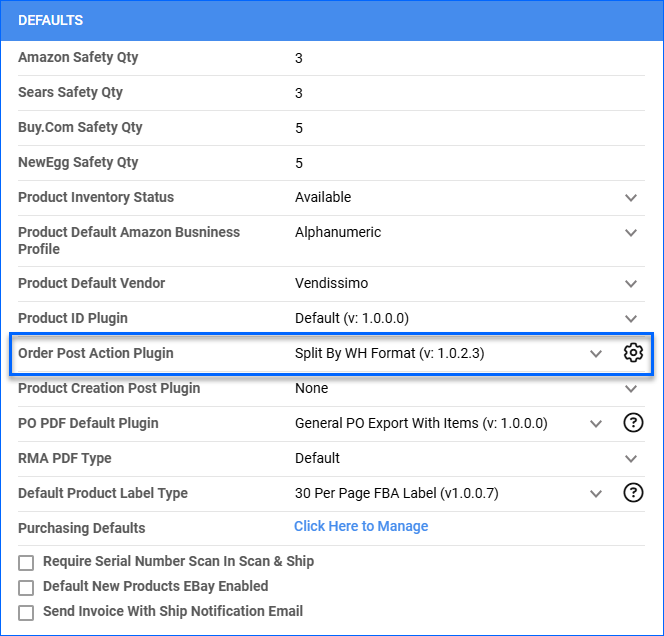
Split By WH Format
Similar to the Order Rule Engine’s Split Order action, Split By WH Format is a post-order plugin that Splits Orders based on item availability across specific warehouses you list in order of preference. However, you can also configure this plugin per channel, set it up for Dropshipping, and apply Safety Quantities.
To use the plugin, create and configure these Custom Company Settings:
- WarehouseIDs In Order Of Preference – Enter a semicolon-delimited list of Warehouse IDs ordered by preference. For example, if you enter “65;80;110;150”, the plugin will first try to assign the warehouse with ID 65 if there is available inventory. If not, it will move on to the next warehouse, and so on.
- PostOrder – WarehouseID If Unavailable – Enter a Warehouse ID that the plugin will assign as a backup if there is no inventory in any warehouse listed in the WarehouseIDs In Order Of Preference setting above. This setting accepts both Sellable and Unsellable warehouses.
- (Optional) SetCustomDropshipStatusOnSplitOrder – Set to True to automatically set split orders’ Dropship Status to Dropship Pending when the warehouse assigned to the order items is a Dropship warehouse.
Optionally, you can open a ticket with Sellercloud Support to request this Custom Setting per Channel:
- (Optional) PerChannelWarehouseIDs – For each channel you use, enter a semicolon-delimited list of Warehouse IDs ordered by preference. This setting overrides WarehouseIDs In Order Of Preference for orders from any channel you have configured it for.
In addition, create this Custom Product Column:
- POSTORDERCONSIDERZEROIFLESSTHAN – Enter a product-specific Safety Quantity, which will be subtracted from the product’s Available Quantity when the plugin checks warehouses for inventory. Set the Data Type to Integer.
After orders are created in Sellercloud, this plugin automatically checks if the order items are available in the warehouses you have listed in the Custom Company Setting WarehouseIDs In Order Of Preference. You can also configure channel-specific warehouse preferences with the PerChannelWarehouseIDs setting, which overrides WarehouseIDs In Order Of Preference.
The plugin then assigns the first warehouse with sufficient quantity, applying the Safety Quantity from the Custom Product Column POSTORDERCONSIDERZEROIFLESSTHAN. Items with inventory below the Safety Quantity in this column are considered unavailable.
If order items are unavailable in any warehouse listed in WarehouseIDs In Order Of Preference, the plugin assigns the warehouse specified in the PostOrder – WarehouseID If Unavailable setting. This setting accepts both Sellable and Unsellable warehouses.
Finally, the plugin splits the orders so that you can ship each item from a warehouse with in-stock inventory. It splits orders at the line-item level, not by individual units. It keeps orders together whenever possible, assigning all items to a single warehouse if they are all available there.
You can automate dropshipping by setting the Custom Company Setting SetCustomDropshipStatusOnSplitOrder to True. The plugin will automatically set the split orders’ Dropship Status to Dropship Pending when the warehouse assigned to the order items is a Dropship warehouse. You should also enable the Client Setting Auto Create PO When Dropship Requested to automatically create dropship POs to the products’ Default Vendor or Manufacturer.
Warehouse Priority Format
Warehouse Priority Format is another post-order plugin that Splits Orders based on item availability across specific warehouses you list in order of preference. It builds on the foundation of the Split By WH Format plugin with additional functionality such as FBA Shipping, Amazon EU-only warehouses, and controls for Walmart Marketplace Orders.
To use the plugin, create and configure these Custom Company Settings:
- WarehouseIDs In Order Of Preference – Enter a semicolon-delimited list of Warehouse IDs ordered by preference. For example, if you enter “65;80;110;150”, the plugin will first try to assign the warehouse with ID 65 if there is available inventory. If not, it will move on to the next warehouse (whose ID is 80), and so on.
- Enable Amazon EU only warehouses – Set to True to assign the warehouses listed in the Amazon EU only warehouse IDs setting below only if the order is from Amazon UK, DE, FR, IT, or ES. This setting defaults to False.
- Amazon EU only warehouse IDs – Enter a semicolon-delimited list of Warehouse IDs that the plugin will only assign to orders from Amazon UK, DE, FR, IT, or ES as long as the Enable Amazon EU only warehouses setting is True.
- ITGWarehouse_FBA_ShipExpedited – Set to True to ship FBA orders with Expedited or Priority methods; never Standard. This setting defaults to False.
- disableWalmartFor_POP – Set to True to prevent the plugin from processing Walmart Marketplace orders. This setting defaults to False.
- disableFBAWhForWalmartFor_POP – Set to True to prevent the plugin from considering FBA warehouses for orders from Walmart Marketplace. This setting defaults to False.
After orders are created in Sellercloud, this plugin automatically checks if the order items are available in the warehouses you have listed in the Custom Company Setting WarehouseIDs In Order Of Preference. Then, it assigns the first warehouse with an available quantity. If an item is unavailable in all warehouses, the plugin assigns the first warehouse listed in WarehouseIDs In Order Of Preference.
Finally, it splits the orders to ship each item from a warehouse with in-stock inventory. It splits orders at the line-item level, not by individual units. It keeps orders together whenever possible, assigning all items to a single warehouse if they are all available there.
The plugin only processes orders with these statuses:
- Order Status – Processing
- Shipping Status – Unshipped
- Dropship Status – None or Pending.
The plugin also offers the following channel-specific functionality:
- When the plugin assigns an FBA Warehouse to a split order, it also Ships the Order via FBA.
This doesn’t apply to Kit Products. - To ship FBA orders using Expedited or Priority methods only, excluding Standard, set ITGWarehouse_FBA_ShipExpedited to True.
- If you set Enable Amazon EU only warehouses to True, the plugin only assigns the warehouses listed in Amazon EU only warehouse IDs if the order is from European Amazon marketplaces: UK, DE, FR, IT, or ES.
- To skip processing orders from Walmart Marketplace, set disableWalmartFor_POP to True.
- To prevent the plugin from assigning FBA warehouses to orders from Walmart Marketplace, set disableFBAWhForWalmartFor_POP to True.
Set Warehouse From Zip Code Range
Set Warehouse From ZipCode Range is a post-order plugin that assigns shipping warehouses to order items based on the Postal Code in each order’s Shipping Address. It also Splits Orders if the order items are only available in different warehouses. In addition, this plugin provides flexibility in handling unfulfillable orders and supports channel-specific configurations.
To use the plugin, create and configure these Custom Company Settings:
- ZipCode Ranges – Enter pairs of warehouses and zip code ranges in the format described below.
- (Optional) AmazonPrimeOrdersOnly_PostOrderPlugin – Set to True for the plugin to process only Amazon Prime orders.
- (Optional) Mark Orders as Requires attention – Set to True for the plugin to mark unfulfillable orders as Requires Attention instead of placing them On Hold. This setting defaults to False.
After orders are created in Sellercloud, this plugin automatically determines the shipping warehouse for each order item based on pairs of warehouse to zip code ranges defined in the Custom Company Setting ZipCode Ranges. Each pair consists of a single warehouse ID followed by the equals sign and ends with one or more corresponding zip code ranges closed within square brackets. The pairs must be comma-separated. This is the format with standard placeholders:
WarehouseID=[StartRange-EndRange][StartRange-EndRange],WarehouseID=[StartRange-EndRange]
For example, the setting’s value could be 123=[60000-79999][00000-58999],234=[59000-59999][80000-99999], where:
- 123 and 234 are Warehouse IDs.
- 60000, 00000, 59000, and 80000 are start ranges.
- 79999, 58999, 59999, and 99999 are the corresponding end ranges.
When processing orders, the plugin first looks for the closest warehouse with sufficient inventory based on the shipping address’s zip code and assigns it as the shipping warehouse. If the nearest warehouse cannot fulfill the order, the plugin checks for available inventory in warehouses outside the matching zip code range.
If all items are available in one warehouse, the plugin assigns the entire order to that warehouse, regardless of the zip code range. It avoids splitting orders whenever possible. If you can’t fulfill the order from a single warehouse, the plugin splits it by appropriately assigning SKUs and quantities to different warehouses.
By default, if you can’t fulfill an order due to insufficient inventory across all warehouses, the plugin places it On Hold. However, if you set Mark Orders as Requires attention to True, the plugin will mark such orders as Requires Attention.
The plugin offers the following channel-specific functionality:
- You can configure the plugin to process only Amazon Prime orders by setting AmazonPrimeOrdersOnly_PostOrderPlugin to True.
- The plugin supports Walmart Marketplace orders with multiple line items for the same SKU. It also supports Bundles (sets of multiples of the same item, such as a 2-pack or 3-pack) and ensures proper allocation.
Split By Vendor Format
Split By Vendor Format is a post-order plugin that splits orders based on the shipping settings of the order items – whether you ship them to the customer or dropship them from a vendor. When your order items are Configured for Dropshipping, the plugin splits orders by the vendor, using the Default Vendor set for each product to create a dropship Purchase Order (PO).
With this plugin, you can automate dropshipping by creating vendor-specific POs while ensuring proper order splits.
To use the plugin, configure these Client Settings:
- Auto Create PO When Dropship Requested – Enable this setting so the plugin can create POs.
- Mark Dropship PO Received Only When Acknowledged – Disable this setting so the plugin can receive POs.
Create the following Custom Company Setting:
- (Optional) Post-Order – Use Order Company For PO Creation – Create this setting and set it to True for the plugin to use the order company to create POs. This setting defaults to False, in which case, the plugin uses your default company.
After orders are created in Sellercloud, the plugin automatically checks the order items’ Dropship Mode setting, available on the Product Details Page > Toolbox > Purchasing tab > General panel.
Then, it splits orders based on whether the order items’ Dropship Mode setting is Ship From Site or Ship From Vendor. For items set to Ship From Vendor, it also splits orders by the product’s Default Vendor, sets the Dropship Fee, and creates a Dropship PO for each vendor.
By default, the plugin uses your Default Company to create POs. You can create the Custom Company Setting Post-Order – Use Order Company For PO Creation and set it to True for the plugin to create POs under the original order’s company.
Manage Manually
While there are many options for assigning the shipping warehouse automatically, you can also do so manually, either individually per order or in bulk for multiple orders at once.
Individually
To manually assign a shipping warehouse:
- Go to the Product Details Page.
- Click Edit.
- Update the Warehouse field in the Items panel.
Hover over the Info icon to the right of the Warehouse field to see the SKU’s inventory across warehouses. - Click Save.

In Bulk
Generally, manually changing the shipping warehouse of multiple orders in bulk is not recommended as a standard practice. However, if necessary, you can do so using two plugins:
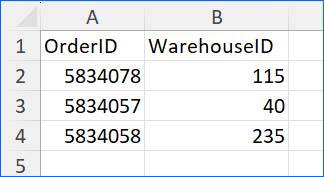
- Change order warehouses in bulk – This plugin lets you Import a File with order and warehouse IDs. It only works for Unshipped orders.
- Change ShipFromWarehouse Order Export – This plugin lets you assign your Default Warehouse or a warehouse from a Custom Company Setting by Exporting Orders. It works for both Unshipped and Fully Shipped orders.
To use the Change order warehouses in bulk plugin:
- Create a spreadsheet in .xlsx format with two headers:
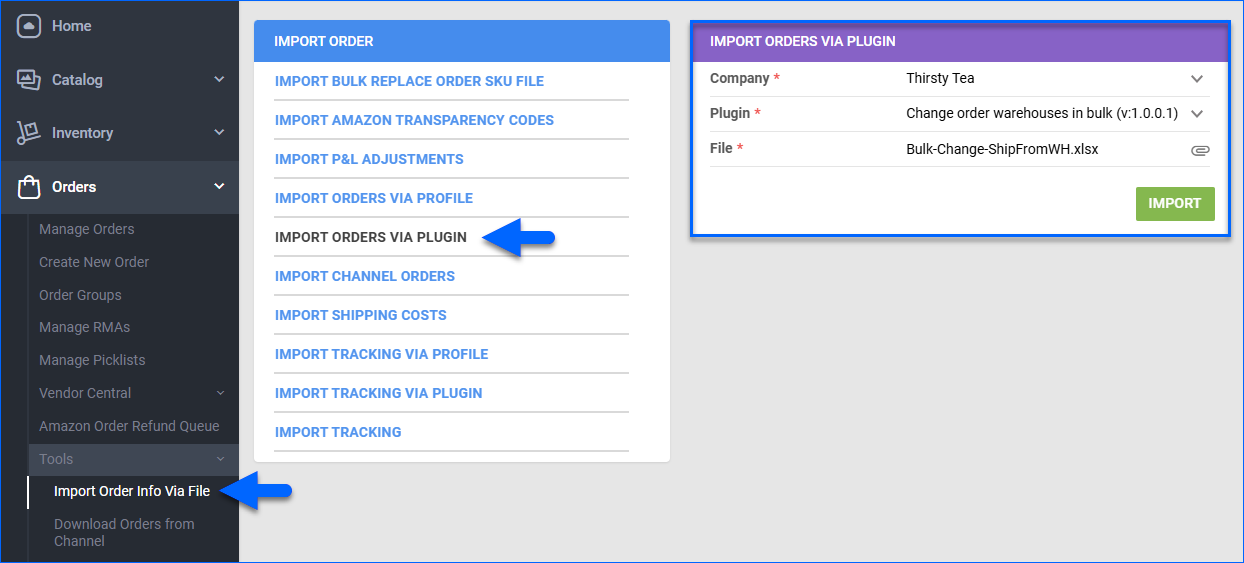
- Next, to import the spreadsheet and update orders, go to Orders > Tools > Import Order Info Via File.
- Select Import Orders Via Plugin.
- Select the Company with orders to update.
- Set the Plugin to Change order warehouses in bulk.
- Upload your File.
- Click Import. This creates a Queued Job. You will receive a Notification once it finishes.
Alternatively, to use the Change ShipFromWarehouse Order Export plugin:
- Create and configure these Custom Company Settings on your Default Company:
- (Optional) ShipFromWarehouseID For OrderExport – By default, if you don’t create and configure this setting, the plugin will assign your Default Warehouse. Create this setting and enter a Warehouse ID to assign a different warehouse.
- (Optional) ProcessDropShipOrders – By default, the plugin doesn’t update Dropship Orders with a Dropship Status other than None or Pending. Set to True to enable the plugin to do so.

- (Optional) ShipFromWarehouseID For OrderExport – By default, if you don’t create and configure this setting, the plugin will assign your Default Warehouse. Create this setting and enter a Warehouse ID to assign a different warehouse.
- Export Orders with the Plugin option, selecting the Change ShipFromWarehouse Order Export plugin.

Related Shipbridge Settings
Shipbridge also offers settings related to the shipping warehouse:
- Options > General > Only load orders from specific warehouse – Select a specific shipping warehouse to only allow Importing Orders where it is assigned, and prevent importing orders set to ship from other warehouses.
- Options > Shipping > When using multiple warehouses, deduct inv qty from proper warehouse (based on location) – If enabled, the order will be shipped and inventory will always be deducted from the Warehouse Location Shipbridge is set to.
- Options > Shipping > Use Warehouse Address (based on Location and Station) – Based on the Assigned Location, use the Warehouse Address as the Ship From and Return Address on orders. If this setting is disabled, Shipbridge will use the default Address from the Company Settings page of the order company.
