Overview
The Order Details Page in Sellercloud gives you an in-depth understanding of your order’s data and allows you to manage and change its details.
You can Manage Orders, configure general information, update statuses, items, and more.
Manage Order Details Page
You can view and manage different data associated with your order. To access the Order Details Page, navigate to Orders > Manage Orders > Open an order.
At the top of the page, you will see the header. It contains information that will be visible, regardless of which Toolbox tab you are viewing. On the first row, you can see:
- The entity you are viewing, in this case, Order.
- The Sellercloud Order ID – you can click on it to copy the number to your clipboard.
- The related Order Company Name – click to open the Company General Settings page.
- The logo of the related Sales Channel.
- The Order Source Order ID – click to open the order on the channel’s site.
Below these are pills with relevant order information, such as Shipping and Payment Statuses, Ship to address, and Customer Service status.
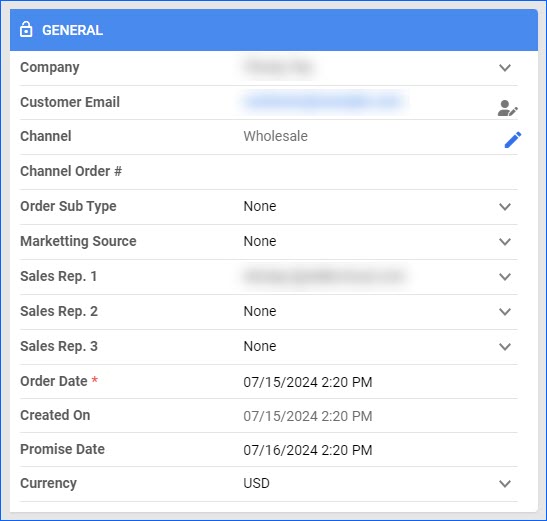
General Panel
| Field | Description |
| Company | This is the company under which the order was created. |
| Customer Email | The email of the Customer that is associated with the order. |
| Channel | This field shows in which marketplace the order was placed. |
| Channel Order # | Also known as order source ID received from the channel. |
| Order Sub Type | Select the order sub-type. |
| Marketing Source | An editable field that displays the order’s Marketing Source. |
| Sales Rep. 1/2/3 | These fields show the Order Sales Representative’s email address. |
| Order Date | The date when the order was placed on the marketplace. |
| Created On | The date when the order was created in Sellercloud. |
| Promise Date | Order shipping deadline. |
| Currency | This is based on the company’s default currency and location. |
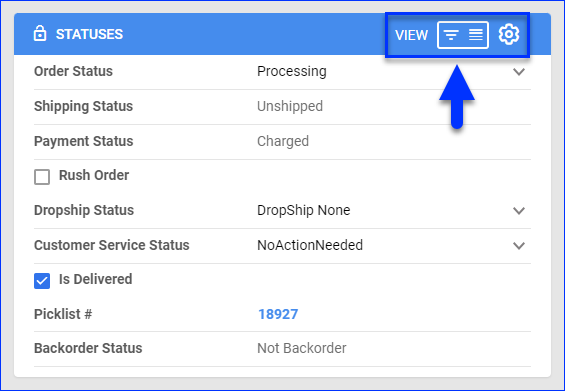
Statuses Panel
| Field | Description |
| Order Status | Indicates the order’s general processing status. |
| Shipping Status | Indicates the order’s shipping status. |
| Payment Status | Indicates the payment status, showing if the order has been fully paid, partially refunded, or awaiting payment. |
| Rush Order | The Rush Order field indicates if the customer has paid extra to upgrade the shipping service. |
| Dropship Status | Indicates the order’s Dropship status. To edit it, the Client Setting Allow Editing Dropship Status On Order Details Statuses must be enabled. |
| Customer Service Status | Indicates the actions needed from customer service. |
| Is Delivered | Indicates if the order has been Delivered. |
| Picklist # | Shows the number of the related Picklist. |
| Backorder Status | Indicates the order’s Backorder status. |
| Is Invoice Printed | Indicates if an Invoice has been printed for the order. |
| Is Exported | Indicates if the order has been marked as exported to a sales channel. |
| Inventory Disabled | Disconnects the order from the standard inventory calculations. |
| OK To Process | Indicates if the order has been marked as OK to process by an employee. |
| OK To Ship | Indicates if the order has been marked as OK to Ship by an employee. |
| QB Exported | Indicates if the order has been exported to QuickBooks. |
| Confirmed | Indicates if the order has been marked as confirmed by an employee. |
| Feedback Received | Indicates if Feedback has been received from the buyer. |
| Shipping Verified | Indicates if the order has been marked as shipped verified. |
| Tracking Sent To Channel | Indicates if the tracking details have been sent to the channel. |
| Final Sale | Indicates if the order has been marked as Final Sale, preventing refunds and returns. |
| Picking Status | Indicates the order items’ picking status. |
| Is Invoiced | Indicates if the customer has received their invoice for the order. |
| Is In Group | Indicates if the order is in an orders group. |
| Is Black Listed | Indicates if the order has been Blacklisted. |
| Skublox Status | Indicates the order’s Skublox status. |
| Address Verified Status | Indicates if the order has had its Address Verified. |
The View menu at the top right of the Statuses panel allows you to change what statuses are displayed. You can click the Gear icon to show or hide specific statuses in the Statuses panel or as a pill at the top of the page. In addition, you can toggle between the Filtered view, which only shows the statuses you have chosen to show, and the All view, which shows all statuses.
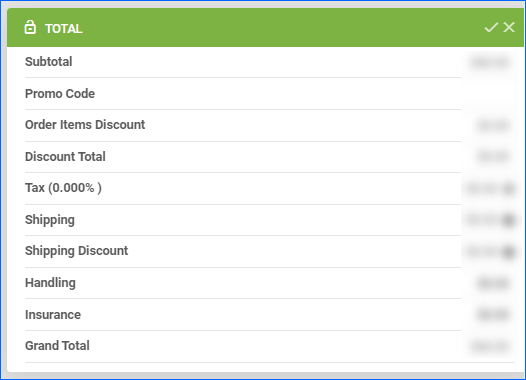
Total Panel
| Field | Description |
| Subtotal | Refers to the total cost of all the items in the order before any additional charges like taxes, shipping fees, or discounts are applied. |
| Promo Code | This field shows if a promotional code has been applied upon payment. |
| Order Items Discount | Indicates if there are items with applied discount within the order. |
| Discount Total | The total value of the discount. |
| Tax | This field indicates the Overriding Tax or the Custom Tax Rate, if applicable. |
| Shipping | This field shows the shipping amount. It can be updated from the toolbox. |
| Shipping Discount | This field shows if there was a discount applied to the shipping cost. The shipping discount can be updated in the shipping tab from the toolbox. |
| Handling | Handling fees. |
| Insurance | Insurance Cost. |
| Duties | This field will only appear if the Duties charge for the order is more than 0. |
| Grand Total | This field indicates the order’s total amount. |
Order Toolbox
The Toolbox grants you access to tabs with other modules related to your order. To access these tabs, click the Toolbox button on the Order Details Page.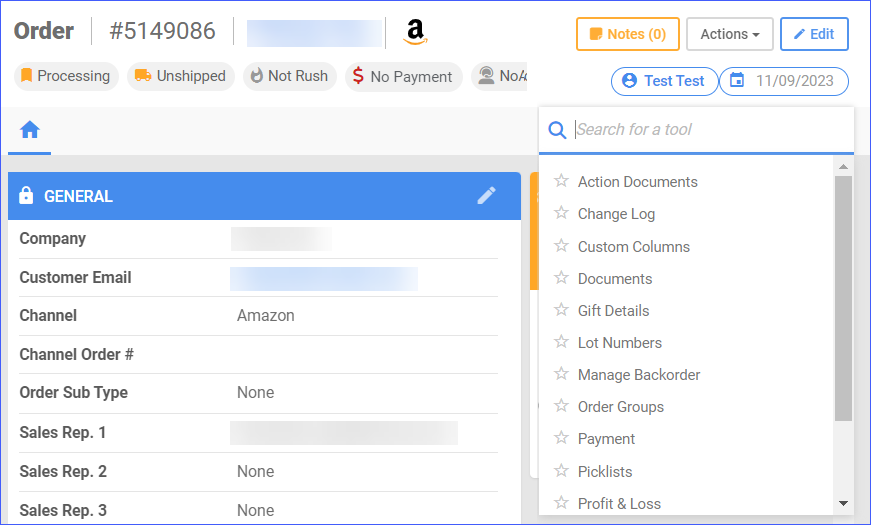
Action Documents
Here you can see all documents transmitted between Sellercloud and the channel. These documents contain details about the order’s lifecycle and help you understand every aspect of the process in detail.
Change Log
The Change Log panel provides comprehensive records of all the changes made to the order, including the date, time, and the user who made the change. It helps you to track and manage all order changes and updates.
To see the Order Change Log navigate to Orders > Manage Orders > Open an order > Toolbox > Change Log.
 You can see the original order details, order products, order status, and payments. Any notes left will also be displayed, and the email address of the user that initiated the changes. You will also be able to see if the change was applied using Alpha or Delta.
The Change Log displays both the original and the new value after a change has been made.
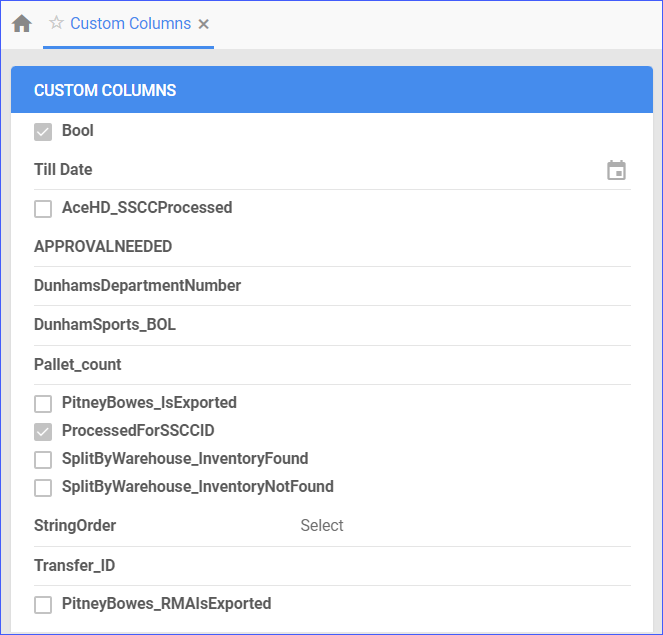
Custom Columns
Custom Columns let you store information beyond the constraints of default columns, accommodating unique data tailored to your needs. You can add Order Custom Columns to your orders and update their values at any time.
Contact Sellercloud Support to request the creation of such columns.
Documents
You can upload various order-related documents and attachments, from labels and images to tables and other pertinent information. After uploading files, you can Delete, Download, or Preview them at your convenience by clicking each respective icon. To download all current documents, click the icon at the top right of the panel.
To bulk-upload files, you can use the generic Upload Documents Order Import plugin. The plugin works with excel spreadsheets and requires you to enter direct download URLs of the files you want to upload to the Order Documents.
First, create these Custom Company Settings on the order company:
- Upload delay – Enter the number of seconds the plugin will wait between each image upload. The default is 0. You can increase this if you encounter issues after uploading your file.
- (Optional) Skip re-importing existing documents – Enter True to skip uploading files already in the Order Documents. The default is False.
Next, prepare a file with these column headers:
- OrderNumber – Enter the Order Number or the Channel Order Number.
If the plugin finds multiple orders with the same Channel Order Number, it will skip processing the files on these rows and update the Queued Job’s log to reflect this. - Link – Enter the URL for a direct download of the file you want to upload to the Order Documents. To verify that you are entering a valid URL, visit it in your browser and see that the file starts downloading immediately. This URL must be publicly accessible.
- (Optional) Filename – Enter the file name, including the format extension. For example, image-name.jpg. If you don’t enter a file name here, the plugin will set it based on the URL in the Link column.
Once your file is ready, follow the steps to Import Order Information Via Plugin.
Gift Details
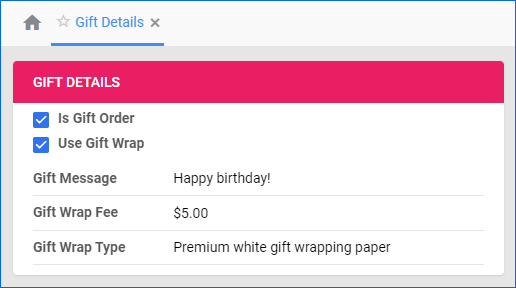
Sellercloud provides gift order features for adding gift messages, gift wrapping, and calculating associated fees. Gift details and instructions are visible in Sellercloud, Shipbridge, and on the invoice to facilitate accurate processing based on customer preferences.
You can mark the order as a gift order, leave a gift message, and insert a wrap fee, if applicable.
Lot Numbers
Sellercloud enables seamless tracking of lot numbers and expiration dates, ensuring that expired products are prevented from reaching your customers. Here, you will see information about lot numbers connected with products in this order.
Manage Backorders
Sellercloud can mark orders with a Backorderstatus when customers purchase items currently out of stock, allowing you to fulfill the order when the inventory for that product is replenished.
With the Manage Backorder tool, you can easily view the quantity on order, the currently available inventory, and the backorder quantity. Additionally, you can edit and adjust the Backorder’s quantity to redistribute inventory as needed, allowing for immediate shipment.
Order Groups
In this section, you can quickly identify whether the order is part of any existing order group or conveniently add it to a new or existing group for the streamlined organization. Additionally, you can choose to remove the order from the group if needed.
Payment
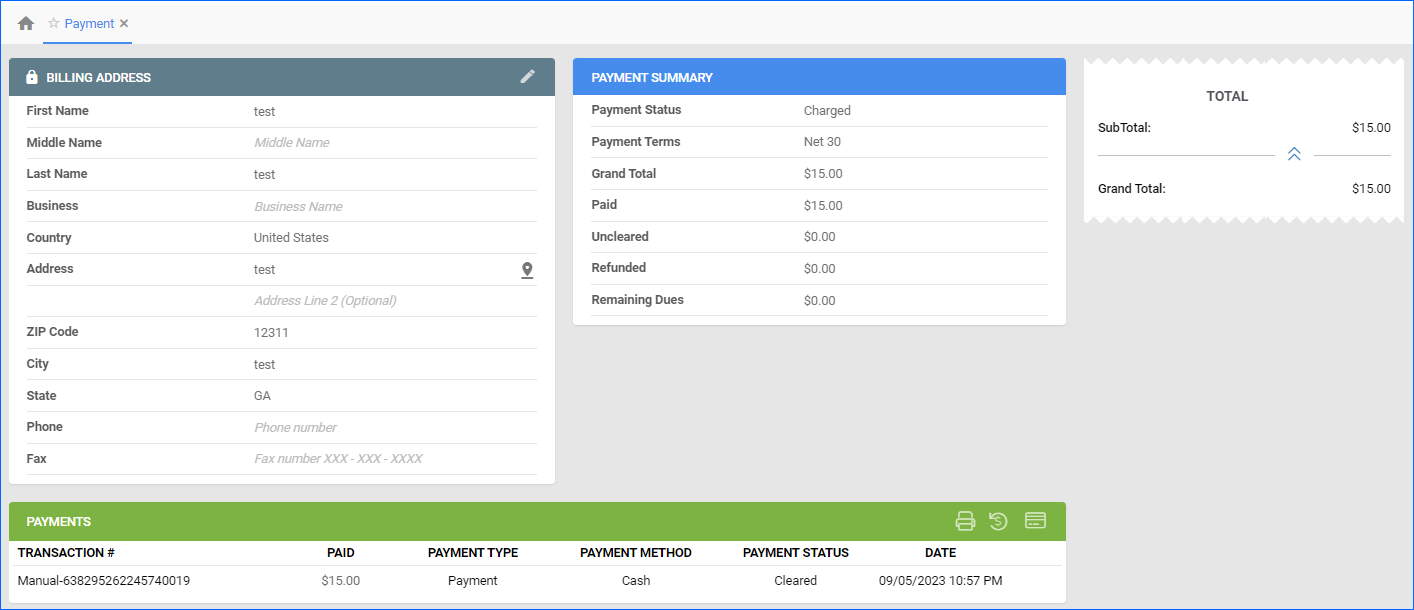
This section provides extensive payment management features. You can create and oversee PDF invoices, collect payments, modify billing details, and view a detailed payment summary for a comprehensive understanding of financial transactions.
On this page, you can choose to print invoices, process order refunds, receive payments, or delete them. To delete a payment, simply click the Edit button in the upper right corner and go to the Payments panel.
Picklist
Here, you can easily determine if the order is associated with any picklist, providing visibility into the order’s inclusion in specific picking processes.
You can access the picklist by clicking on its ID number, and see its title, when it was uploaded, and who created it.
Profit & Loss
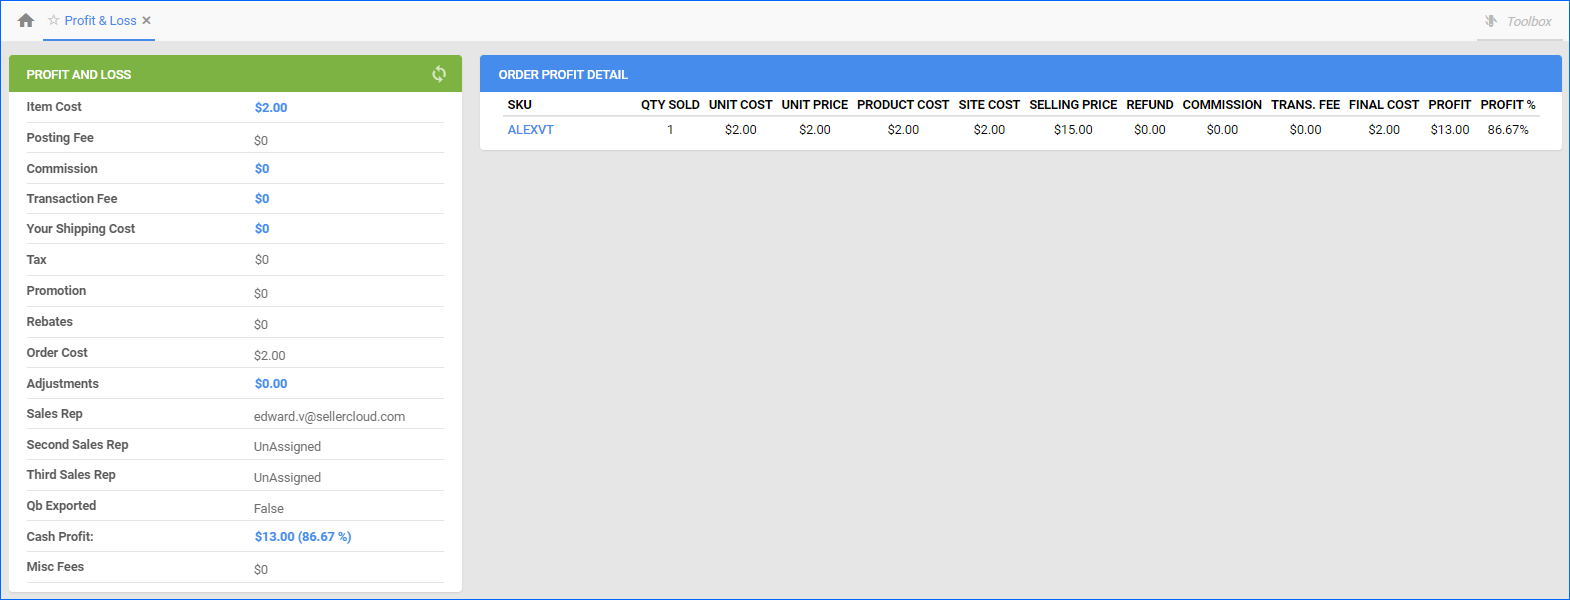
The Profit and Loss (P&L) section showcases the Profit and Loss panel and Order Profit Details Panel, offering a detailed insight into the financial aspects of the order.
You can view specifics like Item Cost, Posting Fee, Commission, Transaction Fee, and other details. Additionally, you have the option to regenerate the profit and loss information.
Related PO
This section provides information on any related purchase order (PO) and its associated dropship details, if applicable. Additionally, the cost of a dropshipped order can be automatically updated when the related PO is received with different costs.
Click on the Edit button in the upper right corner to edit the Dropship Status or unlink Items from the PO. You can easily access the Purchase Order as well, by clicking on the Linked PO number in the Products Panel.
Serial Numbers
If applicable, this section allows you to efficiently add or upload serial numbers associated with the order, providing a convenient way to track and manage serialized items. Sellercloud’s mobile application supports barcode scanning using your phone’s camera.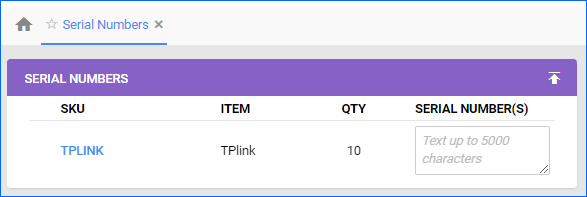
Shipping
In the Shipping section, you can edit shipping addresses, adjust shipping details, and efficiently manage packages and their contents, ensuring accuracy and control throughout the shipping process.
The Shipping Details Panel provides you with the following options:
- Re-Print Shipping Labels generated from Shipbridge – for Shipped Orders, you can click the Label Icon in the Shipping Details panel header to download the label generated in Shipbridge. This function works for ZPL labels or labels with one of the following formats: PNG, JPG, or PDF. If Shipbridge is configured to print EPL labels, you will see an error message. This functionality is available if the label was generated from a Shipbridge application running version 5.9.5.4 or higher.

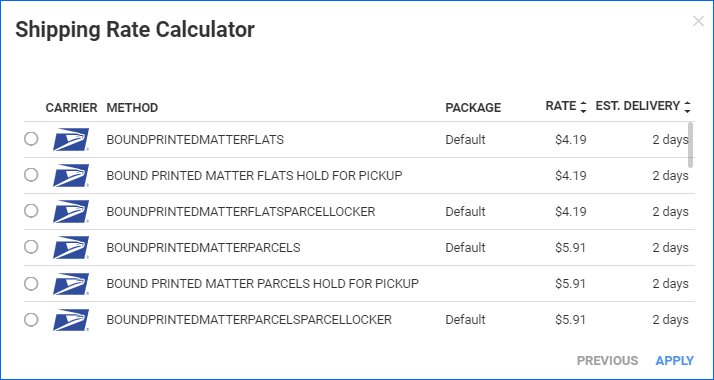
- Shipping Calculator– In this section, you can review the order destination type, Ship From Warehouse, package type, accessory, insurance, weight, and dimensions. After entering the relevant details, click on Calculate. This action will redirect you to a new panel where you can select and apply the shipping carrier and method.
- Ship Order– Here you can enter and edit the Order Shipping Details, like Carrier, Service, Ship Date, Warehouse Information, Dimensions, Cost, and Tracking Number, then ship the order.

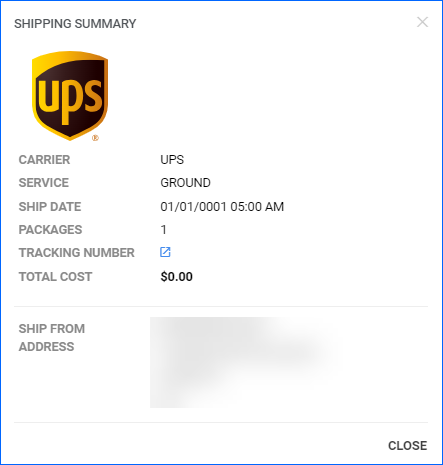
- Shipping Summary – The Shipping Summary provides you with all the Carrier details. Additionally, you can click on the link adjacent to the Tracking Number to easily track the order on the Carrier’s official website.
In the Packages Panel, you have the option to:
- Manage Packages and Contents – In this section, you have the ability to search for SKUs within the order, remove packages and products, and regenerate packages. If needed, you can also consolidate various packages within the order and proceed to ship the items.

- Export Packages – This action will export all your package details to an Excel file, making it easier to manage orders externally and store various information for better order handling.
Order Actions
Some of the order Actions are available to perform in bulk, on the Manage Orders Page. However, you will find only a limited number of actions there. Some actions, such as Importing Tracking Information, can be done via a file import on a separate page in the Orders Tab.
The following are the actions found on the Order Details Page for individual orders:
- Add Order to Group… – Add the Order to Existing or New Group.
- Enable Case Qty – Enables the Case Quantity workflow for the order and the packages are recalculated.
- Add to Credit Memo – This action will add the order to a PO Credit Memo when the customer wants to return it. Only applicable to Dropship orders.
- Contacted Customer – This action updates the Order Customer Service Status to Customer Was Contacted.
- Create Duplicate Order – This action will create a new duplicate order of the current one.
- Create Related Order… – This action will create a related order, and you will be prompted to leave customer service notes.
- Create a Replacement Order…– If you detect a defect in the order, you can create a replacement order. Once created, the status of the order will be Processing.
- Create RMA – You can create RMA only on fully shipped and paid orders.
- Disable Inventory Count – This action will exclude the order from the inventory count. No inventory will be deducted as a result of this order. If the inventory count is disabled, you will see a red banner warning on the Ship Order wizard.
- Disconnect Shipping Confirmation to Order Source – Once the order is shipped, the channel from which the order was placed won’t receive a tracking update.
- Edit Custom Columns – Here, you can edit the information in the existing Custom Columns for this order.
- Email Customer – This action allows you to contact the customer who placed the order.
- Export Order… – allows you to download order information in the desired format or generate it via a plugin. You can also select a mapping profile to generate the needed information.
- Generate Picklist – opens a pop-up dialog where you can generate a Picklist that only contains the order you are viewing.
- Generate Return Transaction – This action allows you to create an invoice for an order refund.
- Generate WayToPay Payment Link – This action allows you to create a WayToPay Payment Link to be sent to the customer.
- Get Tax From TaxJar – This one allows you to retrieve taxes from TaxJar
- Issue Refund – Process an order refund to the customer.
- Link Item(s) to PO – This action will take you to a new page where you can either request Dropship (create a new PO) or link to an existing PO (for Cross-Docking).
- Lock Shipping Method – You can lock the shipping method, which will prevent your employees or any Sellercloud services from changing it.
- Manage Documents – Manage/Upload Order Documents/Attachments.
- Manage Dropship – This action leads you to the Related PO tab. You can manage Dropship Product Details.
- Manage Gift – Leads you to the Gift Details Tab. Here you can edit Gift Order Details.
- Manage Payments – This leads you to the Payment Tab, where you can edit billing address and payment details.
- Manage Paypal Invoices – This action lets you cancel and create Paypal Invoices.
- Manage Serial Numbers – Leads you to the Serial Numbers tab, where you can add or upload order Serial Numbers if you use such.
- Mark QB Exported – This action will mark the order as Quickbooks exported.
- Merge Same Order Items – This action allows you to merge line items in the order if they are the same SKU.
- Move Order to Group… – This one lets you move the order to a specific order group.
- Not OK To Process – This action prevents the order from being processed. You will also need to write down a reason.
- Ok To Process – This will mark the order as waiting to be processed.
- Override Shipping Delivery Status – This will allow you to change the delivery status of the order.
- Paypal Confirmed (Address) – This allows you to mark the Paypal Shipping Address as confirmed.
- Post to TaxJar – This action allows you to post the order to TaxJar
- Print Invoice(s) to PDF – This will generate an order invoice in PDF format.
- Print Invoice(s) to PDF (Internal) – This will generate an order invoice in PDF format that will be stored only internally.
- Print Invoice(s) to PDF (Order Form) – This action generates an Invoice PDF in the Order format template.
- Print Invoice(s) to PDF (WholeSale) – Generates an invoice PDF for a wholesale order.
- Print Product Labels – This action will print labels for the products in that specific order. The label includes product information, such as SKU, UPC, and more.
- Query Shipping Delivery Status – This allows you to check the delivery status of this particular shipment. It will only work if you have entered credentials for the carrier on your Company’s Shipping API page.
- Re-Apply Co-Op Fee / Commission – This will allow you to recalculate and reapply Co-Op Fees or Commissions. This is usually used to update the fees of orders that are already processed or fees that haven’t been applied.
- Re-Calculate Inventory – This will recalculate the inventory of the order’s products.
- Re-Calculate Picking Status – This action will only be available if the Ship From warehouse of the order is Bin-Enabled.
- Recalculate Order Cost – This will recalculate the order’s cost in cases there are changes applied. This functionality is available to Client Admins and users with the Recalculate Order costs Advanced Permission.
- Receive Payment – This action will redirect you to a window where you can apply payment for the order and change the Payment Status.
- Refresh Kit Components – This action can be performed only on unshipped orders, and it will refresh kit component details in cases of any kit changes.
- Refresh Status from FBA – Refers to updating the order status information for orders that are fulfilled by Amazon’s FBA service.
- Remove Order from Groups – If the order is part of any group, this action will remove it.
- Sales Representative – You can change the order’s Sales Representative with this action.
- Save Wholesale Prices – This action will save the Wholesale prices for the order and apply them by default to other Wholesale Orders as well.
-
-
- Enable the client setting Auto Save WholeSale Prices When Order Is Created to apply this action for all future wholesale orders.
-
- Send Shipping Notification – This action will send a shipping notification to the buyer.
- Set As Problem – This will set the order status to ProblemOrder. Once you execute this action you will be redirected to a different page to enter a comment for this change.
- Set as Quote Order – This will change the order status to Quote.
- Set Cancelled Internally – This will cancel the order in Sellercloud without sending a notification to the marketplace.
- Set Delivered – This action will mark the order as delivered.
- Set Exported – This will mark the order as exported.
- Set Feedback Received – Execute this action once you receive order feedback from the buyer
- Set Final Sale – Once you finalize the final order sale. Once you execute this action, RMAs will not be allowed
- Set In Process – This will change the order status to Processing.
- Set Invoice Printed – This will mark the order invoice as printed.
- Set On Hold – This will change the order status to on Hold, and you will be prompted to give a reason for this change.
- Set Payment Pending – This will change the Payment Status to Pending.
- Set Payment Authorized – This will change the Payment Status to Authorized.
- Set Pre-ship Confirm – This will mark the order as pre-confirmed.
- Set UnConfirmed – This will set the order as not confirmed.
- Shipping Packages – This will lead you to the Shipping panel, where you can update shipping information.
- Ship via FBA – The shipping of the order will be handled by Amazon’s FBA Services.
- Update Customer Service Status… – You can update the customer service status here, depending on whether the customer was contacted or further actions are needed.
- Update Shipped Verified Status – Here, you can change the current status to either Not Verified or Shipped Verified.
- Update Shipping Claim – This action allows you to change the shipping claim status to Requested/InProcess/Claim Succeeded/Rejected and enter the amount claimed.
- Verify Shipping Address – Here, you can see the suggested address and update the order address.
- View Action Documents – This action will lead you to the Action Documents panel where you can see all documents transmitted between Sellercloud and the channel.
- View Products in Manage Inventory – This action will lead you to the inventory tab so that you can see the order items’ current inventory.
- View Snapshot – This action takes you to an order summary page, including general information, payment summary details, item details, and the total calculation. If the order has been Split, the Order Snapshot displays the original order in its entirety before the split happened. There is also a link that will take you to the Profit by Order Details Report. Snapshots won’t be generated for WFS, FBA, and SBN orders.
- Void Postage & Unship Order – This will change the shipping status of the order to Unshipped.
- Waiting To Process – This will mark the order as waiting to be processed further.
Overview
The Order Details Page in Sellercloud gives you an in-depth understanding of your order’s data and allows you to manage and make changes to the order’s details.
You can Manage Orders, configure general information, update statuses, items, and more.
Manage Order Details Page
You can view and manage different data associated with your order. To access the Order Details Page navigate to Orders > Manage Orders > Open an order.
General Panel
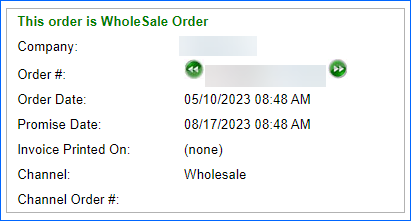
| Field | Description |
| Company | This is the company under which the order was created. |
| Order # | The email of the Customer that is associated with the order. |
| Order Date | The date when the order was placed on the marketplace. |
| Promise Date | Order shipping deadline. |
| Invoice Printed On | You can see if there is an order payment invoice |
| Channel | This field shows in which marketplace the order was placed. |
| Channel Order # | Also known as order source ID received from the channel. |
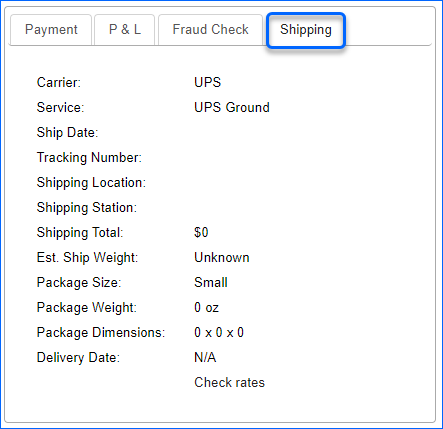
Shipping Panel
| Field | Description |
| Carrier | The carrier responsible for transporting your products. |
| Service | This refers to the type of shipping or delivery option chosen. It may include options like standard shipping, express shipping, overnight delivery, or international shipping. |
| Ship Date | This is the date on which the package/goods are shipped from the warehouse. |
| Tracking Number | A unique code assigned to a package or shipment. |
| Shipping Location/Station | Read about Location and Station. |
| Shipping Total | The cost associated with shipping the package or goods. |
| Est. Ship Weight | An approximation of the weight of the package. |
| Package Size | |
| Package Dimensions | |
| Delivery Date | Estimated or expected date when the package or goods are to be delivered to the buyer’s specified address. |
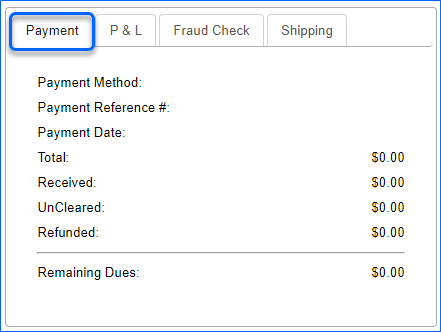
Payment Panel
| Field | Description |
| Payment Method | This is the payment option chosen by the buyer. |
| Payment Reference # | The payment reference number is a unique identifier assigned to a particular payment transaction. |
| Payment Date | The payment date indicates the date on which the payment was initiated by the buyer. |
| Total | This is the total sum that the buyer needs to pay. |
| Received | Indicates the amount of money that has been credited to your account. |
| Uncleared | The uncleared amount represents the portion of the payment that is not fully processed or cleared by the payment system or financial institution. It may occur when a payment is still pending, under review, or being processed. |
| Refunded | The payment has been returned/refunded back to the buyer. |
| Remaining Dues | This refers to the outstanding amount that is yet to be paid by the buyer. |
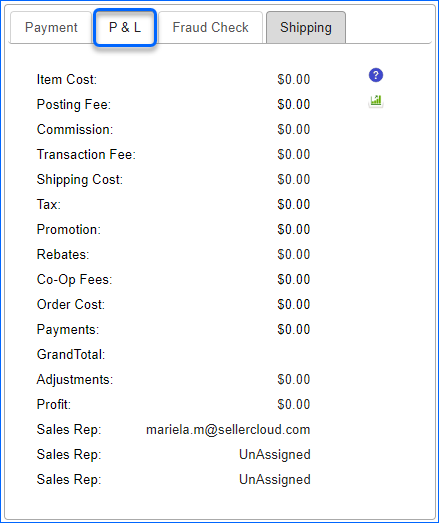
P&L Panel
| Field | Description |
| Item Cost | The cost of the specific product being sold. |
| Posting Fee | This is the fee charged for listing or posting your product on the marketplace. |
| Commission | A percentage or a fixed amount will be charged for each sale made. |
| Transaction Fee | A fee charged for each completed transaction or payment made through a specific payment gateway or processor. |
| Shipping Cost | The fee charged for the transportation and delivery of the purchased items to the buyer’s address. |
| Tax | The amount charged by the relevant tax authorities on the sale of goods or services. |
| Promotion | This refers to a discount amount or special offer. |
| Rebates | Partial refund amount. |
| Co-Op Fees | |
| Order Cost | This would be the total expenses to fulfill an order. |
| Payments | The total amount of money received. |
| GrandTotal | This is the final sum of all costs and fees associated with the order. |
| Adjustments | Refers to any changes or modifications made to the financial aspects of a transaction. |
| Profit | Represents the amount of money that remains after deducting all costs, fees, and expenses from the total revenue. |
| Sales Rep | This field shows the Order Sales Representative’s email address. |
Order Status Panel
The order status panel provides a comprehensive overview of the order’s progress and key details. It displays the channel through which the order was created, along with the current shipping and payment status.
Additionally, the panel includes information such as invoices, rush orders, pick lists, and delivery status. You can edit the order and set any actions required, if applicable. The panel indicates the specific warehouse where the order is being processed or fulfilled.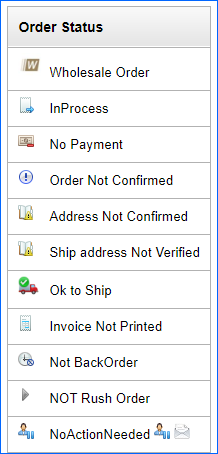
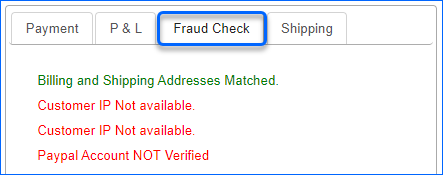
Fraud Check Panel
The Fraud Check panel helps maintain the security and integrity of your business while protecting your and your customers’ data from potential fraud.
The panel usually indicates if the billing and shipping addresses are a match. Any relevant payment security verification will be shown under this dashboard.
Order Change Log
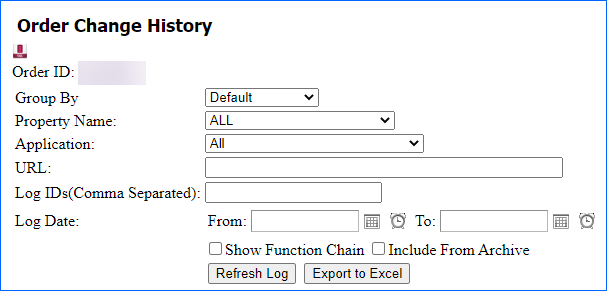
The Order Change Log is a record of all the changes made to the order, including the date, time, and the user who made the change. It helps you to track and manage all order changes and updates.
To see the Order Change Log navigate to Orders > Manage Orders > Open an order > Scroll down > Click Show History.
You can see the original order details, order products, order status, and payments. Any notes left will also be displayed, and the email address of the user that initiated the changes. You will be able to see also if the change was applied to Alpha or Delta.
The Change Log displays both the original and the new value after a change has been made.
Order Actions
Some of the order Actions are available to perform in bulk, by selecting them from the grid on the Manage Orders Page. However, you will find only a limited number of actions there. Some actions, such as Importing Tracking Information, can be done via e-file import on a separate page in the Orders Tab. The following are the actions found on the Order Details Page for individual orders:
- Edit Order – Allows you to apply modifications to the order.
- Add/Remove Order to Group… – Add or remove the Order to/from Existing or New Group.
- Add to Credit Memo – This action will add the order to a PO Credit Memo when the customer wants to return it. Only applicable to Dropship orders.
- Contacted Customer – This action updates the Order Customer Service Status to Customer Was Contacted.
- Create Duplicate Order – This action will create a new duplicate order of the current one.
- Create Related Order… – This one will create related order and you will be prompted to leave customer service notes.
- Create a Replacement Order…– If you detect a defect in the order, you can create a replacement order. Once created, the status of the order will be processing.
- Create RMA – You can create RMA only on fully shipped and paid orders.
- Disable Inventory Count – This action will exclude the order from the inventory count. No inventory will be deducted as a result of this order.
- Disconnect Shipping Confirmation to Order Source – Once the order is shipped, the channel from which the order was placed, won’t receive an update.
- Edit Custom Columns – Here, you can edit the information in the existing Custom Columns for this order.
- Edit Shipping Address – You can modify the order shipping address here.
- Email Customer – This action allows you to contact the customer who placed the order.
- Export Order… – allows you to download order information in the desired format or generate it via a plugin. You can also select a mapping profile to generate the needed information.
- Generate Return Transaction – This action allows you to create an invoice for an order refund.
- Generate WayToPay Payment Link – This action allows you to create a WayToPay Payment Link to be sent to the customer.
- Get Tax From TaxJar – This one allows you to retrieve taxes from TaxJar.
- Issue Refund – Process an order refund to the customer.
- Link Item(s) to PO – This action will take you to a new page where you can either request Dropship (create a new PO) or link to an existing PO (for Cross-Docking).
- Lock Shipping Method – You can lock the shipping method, which will prevent your employees or any Sellercloud services to change it.
- Manage Documents – Manage/Upload Order Documents/Attachments.
- Manage Dropship – This action leads you to the Related PO tab. You can manage Dropship Product Details.
- Dropship Pending – The process of arranging the dropship is still pending. This will change the status of the order.
- Dropship Requested – This will change the status of the order. It means that the order awaits dropship fulfillment.
- Manage Gift – Leads you to the Gift Details Tab. Here you can edit Gift Order Details.
- Manage Payments – This leads you to the Payment Tab, where you can edit billing address and payment details.
- Edit Payment Date – This allows you to modify the date when the payment for the order was initiated.
- Manage Paypal Invoices – This action lets you cancel and create Paypal Invoices.
- Manage Serial Numbers – Leads you to the Serial Numbers tab, where you can add or upload order Serial Numbers if you use such.
- Mark QB Exported – This action will mark the order as Quickbooks exported.
- Merge Same Order Items – This action allows you to merge line items in the order if they are the same SKU.
- Move Order to Group… – This one lets you move the order to a specific order group.
- Not OK To Process – This action prevents the order from being processed. You will also need to write down a reason.
- Ok To Process – This will mark the order as waiting to be processed,
- Override Shipping Delivery Status – This will allow you to change the delivery status of the order.
- Paypal Confirmed (Address) – This allows you to mark the Paypal Shipping Address as confirmed.
- Post to TaxJar – This action allows you to post the order to TaxJar.
- Print Invoice(s) to PDF – This will generate an order invoice in the PDF format.
- Print Invoice(s) to PDF (Internal) – This will generate an order invoice in the PDF format that will be stored only internally.
- Print Invoice(s) to PDF (Order Form) – This action generates an Invoice PDF in the Order format template.
- Print Invoice(s) to PDF (WholeSale)) – Generates an invoice PDF for a wholesale order.
- Print Product Labels – This action will print labels for the products in that specific order. The label includes product information, such as SKU, UPC, and more.
- Query Shipping Delivery Status – This allows you to check the delivery status of this particular shipment.
- Re-Apply Co-Op Fee / Commission – This will allow you to recalculate and reapply Co-Op Fees or Commissions. This is usually used to update the fees of orders that are already processed or fees that haven’t been applied.
- Re-Calculate Inventory – This will recalculate the inventory of the order’s products.
- ReCalculate Order Cost – This will recalculate the order’s cost in cases there are changes applied.
- ReCalculate Shipping Charges – This action recalculates and updates the shipping fees for an order based on any changes to the order’s weight, dimensions, or shipping method.
- Re-Calculate Picking Status – This action will only be available if the Ship From warehouse of the order is Bin-Enabled.
- Manage Payment – This action will redirect you to a window where you can insert a credit card and address information and receive payment for this order
- Refresh Kit Components – This action can be performed only on unshipped orders and it will refresh kit components details in cases of any kit changes.
- Manage Backorders Reallocation – You can edit the backorder’s quantity. This is useful if you want to reallocate an order’s backordered item to fill the backorder quantity on another order and ship it immediately.
- Manage Lot Expiry – This allows you to oversee and control the expiration dates of inventory lots.
- Refresh Status from FBA – Sends a query to Amazon regarding the order delivery status. Only applies to orders that are being shipped via FBA.
- Remove Order from Groups – If the order is part of any group, this action will remove it.
- Sales Representative – You can change the order’s Sales Representative with this action.
- Save Wholesale Prices – This action will save the Wholesale prices for the order and apply them by default to other Wholesale Orders as well.
-
-
- Enable the client setting Auto Save WholeSale Prices When Order Is Created to apply this action for all future wholesale orders.
-
- Send Shipping Notification – This action will send a shipping notification to the buyer.
- Update Shipping Verified Status – This will update the status of the order and confirm its shipping status to verified.
- Set As Problem – This will set the order status to ProblemOrder. Once you execute this action, you will be redirected to a different page to enter a comment for this change.
- Set as Quote Order – This will change the order status to Quote.
- Set Cancelled Internally – This will cancel the order in Sellercloud without sending a notification to the marketplace.
- Set Delivered – This action will mark the order as delivered.
- Set Exported – This will mark the order items as exported.
- Set Feedback Received – Execute this action once you receive order feedback from the buyer
- Apply Credit – This allows you to apply available credit to the order if you have any. This can be seen under the order status panel on the order details page.
- Set Final Sale – Once you finalize the final order sale. Once you execute this action, RMAs will not be allowed
- Split Order – This allows you to split the order into separate orders. This will be available only if the inventory quantity is more than 1.
- Allow shipping even if not paid – This will allow you to ship orders, even if the payment has not been received or confirmed.
- Refresh status from FBA – This action updates the order status and inventory information by synchronizing with Amazon’s FBA system.
- Set In Process – This will change the order status to Processing.
- Set Invoice Printed – This will mark the order invoice as printed.
- Set Rush Order – The Rush Order field indicates if the customer has paid extra to upgrade the shipping service.
- Set On Hold – This will change the order status to on Hold and you will be prompted to write a reason for this change.
- Set Payment Pending – This will change the Payment Status to Authorized.
- Set Pre-ship Confirm – This will mark the order as pre-confirmed.
- Set UnConfirmed – This will set the order as not confirmed.
- Shipping Packages – This will lead you to the Shipping panel, where you can update shipping information.
- View Order Transactions – This refers to the ability to access and review the transaction history associated with the order.
- Email Invoice – Sends a digital copy of the order invoice to the buyer’s email address.
- Email Receipt – Sends a digital copy of the receipt to the customer’s email address as proof of their purchase or payment.
- Ship Items – This action will redirect you to a page where you will be able to ship order items
- Update Customer Service Status… – You can update the customer service status here, depending on whether the customer was contacted or further actions are needed.
- Update Shipped Verified Status – Here you can change the current status to either Not Verified or Shipped Verified.
- Update Shipping Claim – This action allows you to change the shipping claim status to Requested/InProcess/Claim Succeeded/Rejected and enter the amount claimed.
- Verify Shipping Address – Here you can see the suggested address and update the order address.
- View Action Documents – This action will lead you to the Action Documents panel where you can see all documents transmitted between Sellercloud and the Channel.
- View Snapshot – This action takes you to a page where you will see a summary of your order, including payments, SKUs, and the Order Total calculation. If the order has been Split, the Order Snapshot displays the original order in its entirety before the split happened. There is also a link that will take you to the Profit by Order Details Report. Note that snapshots won’t be generated for WFS, FBA, and SBN orders.
- View Products in Manage Inventory – This action will lead you to the inventory tab, so you can see the order items’ current inventory.
- Void Postage & Unship Order – This will change the shipping status of the order to Unshipped.
- Waiting To Process – This will mark the order as waiting to be processed further.
